The Effect Menu
The Effect Menu
The Effect menu contains more amazing things than you see on a government-sponsored tour of Area 51 (okay, bad analogy . . . but there’s a lot of stuff there, really). Everything that you apply remains live — that is, changeable until you tell it to stop changing. Effects change the way an object looks but not the object itself. Applying effects is like telling the object to put on a specific costume, or changing the appearance of the world when you look through rose-colored glasses. No permanent change to the underlying object takes place.
| Technical Stuff? |
Instead of rewriting the code for an object (which is what you tell Illustrator to do when you move a point), effects tack on extra code, leaving the original code untouched. You can change or remove the extra code, without affecting the original. It’s sort of like when you put on a nice outfit — you’re still the same person underneath, but you have snazzy duds on that make you look different. |
Ah, yes, all things must change — and sometimes you get to change them. Contemplate the concept of infinite editability for a moment. An object in Illustrator is saying, “Turn me into anything.” Although Illustrator always provided the capability of manipulating points, the current version is the first to make such extreme changes possible but not permanent. You can simply get rid of them at any time, without putting a scratch on your original artwork, without having to redo it, without having to resort to Edit→Undo, and without having to growl at the dog. Now that’s progress.
Applying live effects to objects
Figure 11-1 shows the difference between applying the Roughen command (gives a distressed look) as a permanent change as opposed to a live effect. The biggest difference is that the path on the non-live (dead?) object shows the additional points generated by the permanent Roughen command, found under the Filter menu. The live Roughen command, found under the Effects menu, leaves the path untouched.
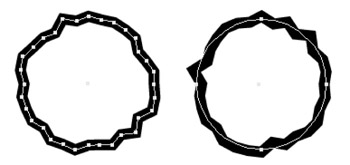
Figure 11-1: Filters versus effects: a path (left) roughened with the Roughen filter and the same path (right) roughened with the Roughen effect.
| Warning? |
The trickiest part of the Effect menu is that many of its commands share names with commands found under the Filter menu. The dialog boxes are even identical! The results look the same, but the way the commands produce those results is different. Keep in mind that if you don’t select the command from the Effect menu, you’re probably permanently changing the artwork in some way. Pay attention to whether your paths change. If you see a difference, you can use Edit→Undo and select the same command from the Effect menu. My recommendation is to avoid the Filter menu at all costs. You really don’t need most of what’s in there, and you’re giving up editability by using it. |
To apply an effect to a path, follow these steps:
-
Select a path.
-
Choose an effect from the Effect menu.
For example, you can choose Effect→Distort & Transform→Pucker & Bloat. A dialog box opens for that effect, and you can enter the specific settings.
Remember? You can always go back and change the settings if you don’t like the result. (If only I could do that in real life.)
-
Click OK to apply the effect to the path.
Warning? Some effects (many of these are in the second section of effects that starts with the Artistic effect) only work when the document is in RGB Document Color mode (see Chapter 1). If an effect is grayed-out (unavailable) after you select an object, your document is probably in CMYK (cyan, magenta, yellow, and black) mode. You can, however, work on artwork initially in RGB Document Color mode and change it to CMYK later.
Removing and changing effects
To change or remove effects, use the Appearance palette, as shown in Figure 11-2. The Appearance palette is such an amazing palette that the majority of this chapter is devoted to it. For now, though, use the Appearance palette to remove and change effects.

Figure 11-2: The Gaussian Blur Effect in the Appearance palette.
Appearances aside (so to speak), removing an effect is as simple as following these steps:
-
Select the object that has the effect that you want to remove.
-
If the Appearance palette isn’t visible (it is by default), choose Window→Appearance.
In the Appearance palette, the selected object is listed as Object or Path. Beneath the object is a list that includes the stroke and fill of the object and all the effects applied to it.
-
In the list, click the effect that you want to discard.
-
Click the trashcan at the lower-right corner of the Appearance palette.
The effect disappears, and the object returns to its former appearance (before you applied the effect).
| Tip? |
To change an effect, follow the preceding steps, except instead of clicking the trashcan, double-click the effect in the Appearance palette. The particular effect’s dialog box opens, where you can enter new settings. Click OK to apply the effect with the new settings. |
| Warning? |
Do not go back to the Effect menu to change the settings of an effect that has been applied to an object, even if adding the effect is the last thing you’ve done. Instead of changing the settings on the existing effect, you actually apply another effect to the object on top of the existing one. While applying multiple effects to objects is often desired, it isn’t if you’re trying to edit the existing effect. |
Find more details on the individual effects in Bonus Chapter 1 online at www.dummies.com/go/illustratorcs_fd.
Rasterization effects
Not all effects can be generated from path-based artwork. That’s where the Rasterization effects come in. These effects either change the original artwork into pixels or add new pixel-based images to achieve the desired effect. The effects in the second section of the Effect menu (from the Artistic effect down), as well as Drop Shadow, Feather, Inner Glow, Outer Glow, and Rasterize use pixels to achieve the change in appearance.
You control various attributes of these rasterization-based effects by choosing Effect→Document Raster Effects Settings. The Raster Effects Settings dialog box appears, as shown in Figure 11-3.

Figure 11-3: The Raster Effects Settings dialog box takes a bow.
In the Raster Effects Settings dialog box, you can set the following options:
-
Color Model: This setting determines the color model used by the resulting graphic. Try to use the color model of your target output as much as possible. If you’re creating a graphic print in grayscale, choose Grayscale. If you’re bound for the Web, choose RGB. Bitmap turns your art into harsh black and white tones, if you’re into that sort of thing.
-
Resolution: This setting determines how much information the resulting image contains. Try to match this setting with the graphic’s purpose. For the Web, select 72 ppi (pixels per inch). For most ink jet printers, 150 ppi is sufficient. For high-resolution printing, 300 ppi is a good, all-purpose size.
-
Background: Pixel-based images are always rectangular. If the graphic you’re rasterizing is anything but rectangular, you have to add a background to make the graphic rectangular. The background can be white or transparent. White is fine for a stand-alone graphic, but if that graphic is in front of other objects, the white background obscures them. When that is the case, choose the Transparent setting.
-
Options: The Anti-Alias option adds a slight blurring wherever different colors meet. Believe it or not, this setting usually makes the resulting graphic look better. Results vary from graphic to graphic, of course, so try rasterizing with and without the Anti-Alias option selected. The Create Clipping Mask option matters only if you selected white for the Background setting. In Illustrator, a clipping mask is a special graphic that hides parts of other graphics. If you select the Create Clipping Mask option, a clipping mask is added to hide the white parts added to make the graphic rectangular.
-
Add: Typing a numeric value in this option box adds extra pixels around the graphic, just in case you need them. Hey, you never know! Nobody wants to run short of pixels, and this option actually helps prevent objects, such as drop shadows and other offset pixels, from getting clipped on the edges.
After you choose your settings, click OK and any existing (or future) effects that use pixels will use these settings.


