Viewing Illustrator Documents
Viewing Illustrator Documents
Illustrator provides versatile options for viewing documents — including ?controls for zooming, scrolling, and hiding (or showing) certain document features. You can get close-up to the smallest areas of your artwork and make changes so minute that they aren’t visible to the human eye — but you feel better knowing that your graphic is microscopically perfect. Or, to get a good feel for your artwork’s effect in the real world, view your document at the actual size it prints at. Or you can view your on-screen objects as their “skeletons” of essential points and paths, with no strokes or colors to distract you from the true essence of your artwork. A view of any phase is available, from points-and-paths to perfect printout. Bottom line: You have to see what you’re doing to know what you’re doing. Illustrator offers that capability.
Zooming in and out of artwork
You can view your artwork at actual size (approximately its size when it prints), much larger, or much smaller. Changing the zoom amount changes only the image’s on-screen appearance — not the image’s actual size, the way it prints, or its appearance in another application. Zooming is like using binoculars to watch a neighbor violate the bylaws of the homeowners’ association. Those unapproved maple saplings (and the sap who’s planting them) don’t actually change size; you just zoom in on them from a discreet distance.
The Zoom tool
![]() ?The Zoom tool is the magnifying glass in the lower-right corner of the Toolbox. When you click the Zoom tool and move it over the document, a plus sign appears in the center of the magnifying glass. Clicking the Zoom tool makes the details of your artwork appear larger in the document window. You can click until you zoom in to 6,400 percent (64 times larger than actual size). Figure 1-11 shows a document viewed at actual size and zoomed in to 400 percent.
?The Zoom tool is the magnifying glass in the lower-right corner of the Toolbox. When you click the Zoom tool and move it over the document, a plus sign appears in the center of the magnifying glass. Clicking the Zoom tool makes the details of your artwork appear larger in the document window. You can click until you zoom in to 6,400 percent (64 times larger than actual size). Figure 1-11 shows a document viewed at actual size and zoomed in to 400 percent.
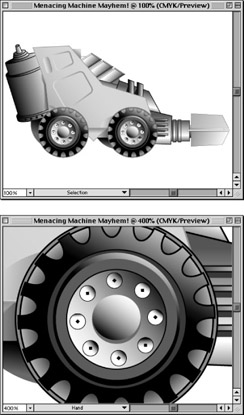
Figure 1-11: Two views of the artwork: actual size and zoomed to 400 percent. If you print while zoomed in, the image still prints at actual size.
The Zoom tool is actually two tools in one. When you hold down the Alt key (Option on the Mac), the magnifying glass contains a minus sign. Holding down the Alt or Option key and clicking your image with the Zoom tool causes your image to appear smaller. You can zoom out as far as 3.13 percent (where every- thing is really tiny). Figure 1-12 shows the art from Figure 1-11 as it looks at 25 percent of its actual size.
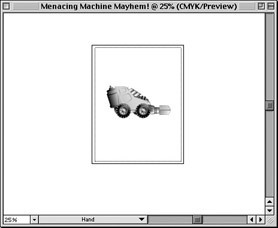
Figure 1-12: The artwork from Figure 1-11 at 25 percent of its actual size.
Speed zoom ahead
Zooming is something Illustrator users do often enough to warrant the multitude of keyboard commands associated with this function. In order of usefulness, the following items represent some of the most useful speed-zoom techniques:
-
Use any tool to Zoom In: Press Ctrl+Space (z+Space on a Mac) and the tool you’re using changes to the magnifying glass with a plus sign in it. Click the area where you want to zoom in. After you release the keys, ?the Zoom tool switches back to the tool you were previously using. ?This shortcut is really handy.
-
Use any tool to Zoom Out: Press Ctrl+Alt+Space (z+Option+Space on a Mac), and the tool you’re using changes to the magnifying glass with a minus sign in it. Click the image to zoom out. After you release the keys, the Zoom tool switches back to the tool you were previously using. This shortcut is as handy as the temporary Zoom In tool.
-
Go to Actual Size: Press Ctrl+1 (z+1 on a Mac) to return to actual size. You can also double-click the Zoom tool to do this.
-
Go to Fit In Window view: Press Ctrl+0 (z+0 on a Mac) to zoom to the level at which your page fits into the window. You can also double-click the Hand tool to do this.
-
Zoom in and out: Press Ctrl++ (plus) (z++ [plus] on a Mac) to zoom in one level or Ctrl+- (minus) (z+- [minus] on a Mac) to zoom out one level.
-
Activate the Zoom In tool: Press Z to change to the Zoom In tool. If you actually read to the bottom of this list, geekiness from someone you know is starting to rub off on you. I strongly advise taking a few days off — away from your computer (and from said geek).
-
While Zooming: Press the spacebar to move around the current marquee (the dotted lines)
Scrolling around your document
You can use the scroll bars to move around your document, but they limit you to moving horizontally or vertically — and only one of those directions at a time. If you’re really cool (and you know you are), you can use the Hand tool to move around your document in any direction.
To use the Hand tool, choose it from the Toolbox. Then click and drag anywhere in the document. The artwork moves in the direction you drag. At first, this action may seem slightly awkward — but power corrupts. After a few minutes of pushing your art around, you’ll never want to go back to those nasty ?scroll bars.
| Tip? |
You can use any tool as the Hand tool. To change a tool into the Hand tool, hold down the spacebar while you click the tool. Then click and drag just as you would with the Hand tool. Let go of the spacebar, and the tool you were using returns to its original form. This trick works with any tool except the Text tool. (If you try it with that tool, you just type space after space after space.) |
Looking at the guts of your artwork
Typically, what you see in your Document window is pretty much what’s going to print (the view in Preview mode). However, what you see isn’t what the printer and Illustrator look at. Instead, they see all your Illustrator artwork and objects as a series of outlines, placed images, and text (the view in Outline mode). If you want to view your document in this skeletal form, choose View→ Outline. Outline mode is a great diagnostic tool; it helps you understand how a document was made. Figure 1-13 shows artwork in both Preview and Outline modes. Outline mode also makes it easier to select objects that are very close together.
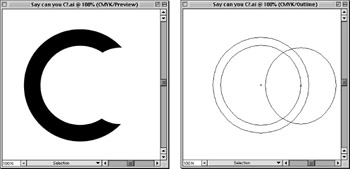
Figure 1-13: Art in Preview mode and Outline mode.
Notice that in Preview mode, the artwork appears to be the letter C; Outline mode shows the three circles (two white circles on top of a black circle) that create that appearance. Graphics like this can be tricky to work with; if you don’t know how the object is made, you may assume (mistakenly, but logically enough) that you actually have a C-shaped object instead of three circles. As soon as you start making changes to it as though it were really a C, Illustrator starts acting completely illogical. Jumping into Outline mode lets you see ?the secret truth behind the artwork, helping you to understand how the art was made.


