Additional Transformation Tidbits
Additional Transformation Tidbits
All this transforming may seem like some pretty amazing stuff. What’s really amazing is the bevy of little extras that Illustrator has thoughtfully provided to make transforming easier and faster. The following sections in this chapter show you how to use these extras. Here’s a list of what you can do:
-
Use the Transform palette: This palette keeps all the transformations in one handy place, where you can apply them by typing in numerical values.
-
Copy while you transform: Rotate a copy of your artwork.
-
Transform each piece of artwork separately: The Transform Each dialog box enables you to apply transformations to individual objects, instead of to everything at once. This feature is useful, believe it or not.
-
Repeat the last transformation: Do it again . . . and again . . . all with a simple menu command (or keystroke).
-
Transform a portion of a path: That’s right, you can select just a few points and move, scale, rotate, reflect, or shear them. (This capability is especially useful if you want to give that virtual caterpillar a Mohawk.)
The Transform palette
The Transform palette, shown in Figure 12-9, is a one-stop shopping location for all your transformation needs. Access the palette by choosing Window→ Transform. The palette’s quite powerful, as long as you don’t mind the math.
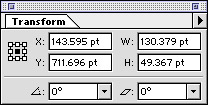
Figure 12-9: The Transform palette in all its glory.
By entering values in the Transform palette’s fields, artwork can be moved, scaled, rotated, and sheared. The palette pop-up menu has options for reflecting (Flip Horizontal and Flip Vertical). This menu also contains options for scaling strokes and effects and transforming the object, the pattern, or both. The W and H (width and height) fields can take both absolute measurements (sizes specified in inches, centimeters, and so on) or relative measurements defined by percentages. Just type the little extra bit after the number that specifies what kind of measurement the number represents — in for inches, cm for centimeters, or % for a percentage.
| Tip? |
If you hate to crunch numbers, rejoice! The Transform palette does the math for you! For instance, if you want an object to be one-third as wide as it currently is, just type /3 after the current value in the text box for width, and the artwork will shrink to 1/3 of its original width. |
Copying while transforming
All five of Illustrator’s transformation functions enable you to copy objects as well as transform them. To accomplish this dazzler, Illustrator applies the transformation to a copy of the original selection, just as if you used cut-and-paste to copy the object, pasted it directly on top of the original, and applied the transformation. In Illustrator, you can do all that in one step.
When using the transformation tools, you can press the Alt key (Option on a Mac) to make a copy of your selection while transforming. Just press the Alt key (Option on a Mac) after you start dragging (not before) and hold it down until after you release the mouse button. Illustrator creates a duplicate of the selection.
| Technical Stuff? |
Illustrator users do this sort of thing so often that they invented a couple of terms (Alt-drag for PCs, Option-drag for Macs), to mean copy an object. (Nine times out of ten, it means move a copy.) |
Figure 12-10 shows the way a sample of type looks after you transform it with the Shear tool while holding down the Alt key (Option on a Mac). The result is a cast shadow that appears in front of the original type (which Illustrator treats as an object).

Figure 12-10: To get this cool cast shadow with the Shear tool, I copied the text object and filled with a gradient.
| Tip? |
If you’re using a dialog box to accomplish a transformation, click the Copy button instead of OK to create a transformed duplicate of the object. The original artwork stays untransformed. |
Transform Each
The Transform Each dialog box (see Figure 12-11), accessed by choosing Object→Transform→Transform Each, does two things: First, it brings most of the transformations together into one dialog box. Second, it applies transformations to each of the selected objects separately, instead of all at once.
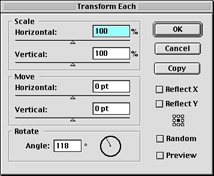
Figure 12-11: The Transform Each dialog box.
Oddly enough, this approach results in an effect that bears almost no resemblance to transforming everything at once. Figure 12-12 shows the results of regular rotation versus the results of rotation using the Transform Each dialog box. (Just don’t say I didn’t warn you.)

Figure 12-12: Original artwork (left) after it’s rotated with the Rotate tool (middle) and using the Transform Each dialog box (right).
Transform Again
After you transform something, you can repeat the transformation quickly by choosing Object→Transform→Transform Again; the keyboard shortcut is Ctrl+D (z+D on a Mac). This action simply repeats the previous transformation — whether by tool or dialog box or palette — and applies that transformation to the current selection. You can even deselect something, select something else, and apply the same transformation to the new selection.
The Transform Again command also works with copying selections, as shown in Figure 12-13.
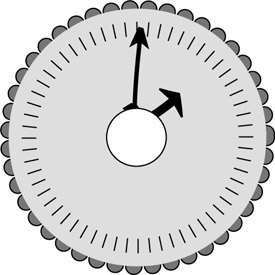
Figure 12-13: The tick marks on this clock were made with the Transform Again function by rotating a copy around the center in 6? increments.
Partial transformations
If you select just a section of a path, you can apply the five basic transformations to it, just as you do with an entire object. The result can be quite ordinary (as when you move a few points around) or rather unexpected (as when you scale, shear, or reflect just a few points), as shown in Figure 12-14.
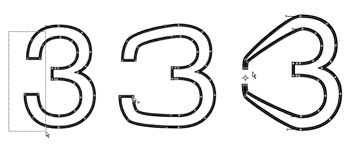
Figure 12-14: Moving and scaling a portion of a path.
The following steps select, move, and scale just a few points on a path (with some interesting results):
-
Using the Direct Selection tool, click and drag over a portion of a path.
As you click and drag with the Direct Selection tool, a rectangular marquee appears. Only the points inside this marquee are selected.
-
With the Direct Selection tool still selected, click a selected (solid) point and drag.
All the selected points move along with the one you click and drag. Be sure to click directly on a point that you’ve selected (indicated by a solid square); otherwise, you’ll accidentally drop the selection and select something else.
-
Release your mouse, choose the Scale tool, and then click the same point as Step 2 and drag.
Dragging toward the middle of the selected points brings them closer together. Dragging away moves them farther apart.
Tip? Don’t click too near the middle of the points, or they get all cantankerous and hard to control.


