Brushing Where No Stroke Has Gone Before
Brushing Where No Stroke Has Gone Before
Brushes are wildly creative strokes that you can apply to paths. If you think of them this way, brushes become much easier to get a handle on (especially if they make you, er, bristle with frustration).
Brushes, as shown in Figure 9-1, can be any of four different types: Art brushes, Scatter brushes, Calligraphic brushes, and Pattern brushes.
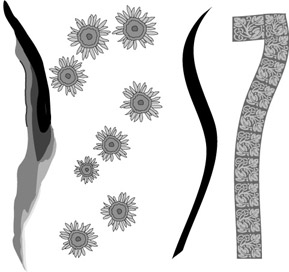
Figure 9-1: From left to right, examples ?of painting with an Art brush, a Scatter brush, a Calligraphic brush, and ?a Pattern brush.
-
Art brushes: Stretch a single piece of artwork along an entire path.
-
Scatter brushes: Scatter artwork around a path. The artwork is repeated, scaled, and rotated randomly. The Scatter brush is oddly similar to the Symbol Sprayer, but you find distinct differences, which I point out later in this chapter.
-
Calligraphic brushes: Emulate drawing or writing with a calligraphy pen.
-
Pattern brushes: Repeat artwork along a path that you draw with the Paintbrush tool. Unlike the random Scatter brush, the Pattern brush repeats the artwork in a precise pattern.
The Illustrator Brushes palette, shown in Figure 9-2, contains samples of each of the four brush types. (Choose Window→Brushes to display the Brushes palette.) In addition, see the “Creating a New Brush” section, later in this chapter, for help on taking virtually anything that you create in Illustrator and turning it into a brush.
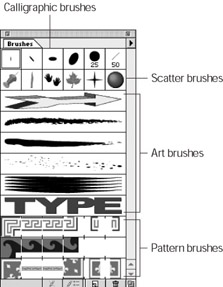
Figure 9-2: The default Brushes palette in Illustrator contains a smattering of the four different types of brushes.
Embracing your inner artist
Regardless of your artistic background or intentions, you can make astounding artwork by using the Paintbrush tool in combination with the different types of brushes. Of course, someone with an utter vacuum of talent (or more than the legally allowed measure of bad taste) may have an uphill battle to create something that looks good. Even so, you may be surprised at how quickly you can tool up some snazzy images, as shown in Figure 9-3, by using the Paintbrush — even if you’re new to computer graphics. (Your secret is safe with us.) Just follow these steps:

Figure 9-3: Creating wild and wacky strokes
-
Choose the Paintbrush tool from the Toolbox.
Your cursor changes into a little paintbrush.
-
Choose Window→Brush Libraries→Artistic Sample.
After you release the mouse button, the Artistic Sample brush palette appears quicker than you can say Jackson Pollock.
-
Click the Chalk Art brush.
Topmost in the palette, this brush looks like what you get by rubbing a stick of black pastel sideways against rough construction paper.
-
Click and drag with the Paintbrush tool to draw a path where you want your new stroke to be.
-
Release the mouse button.
The path you drew becomes the stroke of the brush that you chose. In this case, the Chalk Art brush’s rough pastel stroke stretches along the entire length of the path. With the path still selected, try clicking the other brushes to get a feel for how these brushes look.
| Tip? |
Because brushes reside on paths, you can change the position and dimensions of any brushstroke just as you modify any path. You can use the Pencil tool to reshape an existing path, or if you’re really brave, you can use the Direct Selection tool to push and pull points and handles around until the brushstroke looks the way you want. |
The Paintbrush tool options
The Paintbrush tool offers several options that you can use to customize the way it draws. All these options are found in the Paintbrush Tool Preferences dialog box, shown in Figure 9-4, which appears after you double-click the Paintbrush tool. These preferences function almost identically to the Pencil tool preferences, with one exception: the Fill New Brush Strokes option. When you leave the check box for this option unchecked (which I recommend), Illustrator automatically sets the Fill color option to None. For a more exhaustive and exhausting explanation of the other settings, refer to Chapter 8 where I discuss the Pencil tool preferences — the options are exactly the same in both name and function.
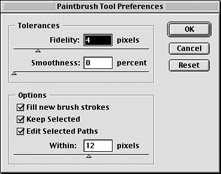
Figure 9-4: The Paint-brush Tool Preferences dialog box.
| Tip? |
Why set the Fill color option to None? The path you make with the Paintbrush tool can contain a fill color, but brushstrokes can also be randomly placed pieces of artwork or have unique shapes. The stroke can appear partly inside and partly outside the fill color, which makes the fill seem random and unrelated to your stroke. Brushes work better when you don’t use a fill color with them. |


