Creating a New Brush
Creating a New Brush
Although Illustrator ships with several hundred brushes, obsessively creative folks can’t stand to be limited to so few. To create your own brushes, go right ahead by using darn near any set of paths in Illustrator, as shown in Figure 9-5. Furthermore, the process works to create a new Art, Pattern, or Scatter brush (but not a Calligraphic brush, which doesn’t require external artwork).
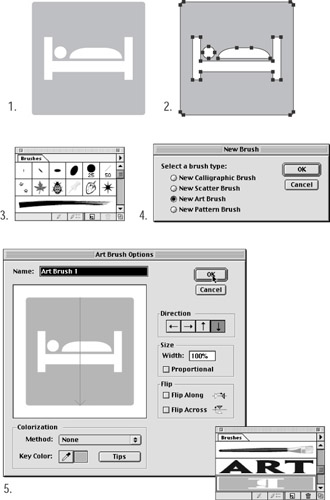
Figure 9-5: Creating a new brush
-
Create (or open a document with) artwork that you want to use as a brush.
-
Use any selection tool to select all the paths in the artwork.
-
Click the New Brush button (it looks like a piece of paper) at the bottom of the Brushes palette (or choose New Brush from the Brushes palette pop-up menu).
The New Brush dialog box appears and asks what type of brush you want to create.
-
Select New Art Brush, New Scatter Brush, or New Pattern Brush; then click OK.
(For the purpose of this example, I select the New Art Brush option.) The Art Brush Options dialog box appears.
-
Click OK to accept the default settings.
If you’re concerned about accepting the default settings in the Art Brush Options dialog box, keep in mind that you can always make changes to the Art Brush options by double-clicking the Art brush itself in the Brushes palette. I talk about all those different options in the section, “Working with the Different Brush Types,” later in this chapter. These options have the same effect whether you’re creating a new brush or modifying an existing one.
The new Art brush appears in the Brushes palette, ready for you to use.
| Tip? |
Create all sorts of interesting effects by using text as Art brushes. Because brushes can contain only paths (not text objects), you must first change the text into paths before you can make it into a brush. Select the text object with a selection tool and then choose Type→Create Outlines. |


