Creating Web-Specific Pixel Graphics
Creating Web-Specific Pixel Graphics
Most graphics on the Web are not vector-based but pixel-based because of compatibility issues. Regardless of which pixel format you use, Illustrator gives you the same dialog box from which to export your artwork. Choosing File→Save for Web displays the Save for Web dialog box, as shown in Figure 16-3.
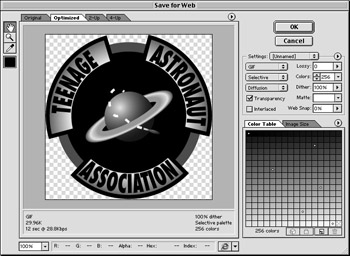
Figure 16-3: Preview your image in the Save for Web dialog box.
The Save for Web dialog box may appear a bit intimidating at first, but it’s actually quite easy to use. Although you do have to wade through a lot of settings, the dialog box provides you with a preview of the image, so that you can see how the settings affect the image’s quality. The dialog box also gives you the file size and an estimate of how long the graphic will take to download — important considerations in creating graphics for the Web.
The dialog box is slightly different, depending on the file format you’re working with, but the following few features remain consistent in any format you use:
-
Original, Optimized, 2-Up, 4-Up: These tabs let you view the image at different settings. Click the Original tab to view the image before any settings are applied. Click the Optimized tab to see how the image will look after you save it with the current settings. Click the 2-Up and 4-Up tabs to see the image at multiple settings at once. These last views are the most useful. Your goal when saving your image, no matter what format you use, is always to resemble the original as closely as possible while maintaining the smallest file size (and lowest download time). The ability to compare the image at different settings with the original is vital to achieving this goal. To use the 2-Up and 4-Up settings, click either of the tabs. Then click one of the images to select it. Any settings you make apply only to that selected image. Click a different image to apply different settings. Illustrator saves whatever image is selected (at whatever settings) after you click OK.
-
File Size and Download Time: These features tell you how large your file is and how long that file will take to download over a 28.8 modem. This information is very important. Think of every second required for a graphic to download as another second the viewer has to get bored and click away from your page. Weigh this download time against the quality of the graphic and ask yourself whether having those extra colors, a little less banding, or a better-looking graphic is worth the download time.
-
File Format: This drop-down menu is where you choose the format — GIF, JPEG, PNG-8, PNG-24, SWF, or SVG.
-
The remainder of the settings: The remainder of the fields around the File Format menu are the file settings and the unique settings of that format. After you choose a format, the remainder of the settings change to match the features of that format. These settings are covered in depth under each file format in the next few sections of this chapter.
-
Color Table: This tab shows you the exact colors used when you save the file in GIF or PNG-8 format. Here you can delete colors (or shift non-Web-safe colors to Web-safe colors).
-
Image Size: This tab lets you set the size (in pixels) of the image as you save it. This setting is the actual physical size of the image as it displays in the browser, not the file size.
-
Layers: Illustrator allows you to export your file as Cascading Style Sheet (CSS) layers. An advanced feature, CSS layers, enables you to selectively hide or show layers on your Web page. They also allow for transparent overlapping slices. For more on CSS layers, see the section, “Cascading Style Sheet layers,” later in this chapter.
-
Slices: The Slice Select tool enables you to select slices you made to your object in Illustrator. Slicing your artwork divides your artwork into individual pieces allowing your file to load in sections on your Web page. Slices also enable you to assign features, such as rollovers and links, to individual slices. There’s more on slices in the section, “Cascading Style Sheet layers,” later in this chapter.
Saving a graphic as a GIF file
To save your graphic as a GIF, follow these steps:
-
Choose File→Save for Web.
The Save for Web dialog box appears.
-
Select GIF from the File Format drop-down menu (refer to Figure 16-3).
-
Click the 2-Up or 4-Up tab at the top of the graphic.
After you choose either 2-Up or 4-Up, the first graphic is your original image, and the second is selected as the Optimized image. As you change your file settings, this graphic updates to preview those changes. Clicking the third or fourth graphic (in 4-Up view) lets you make different settings and simultaneously compare and contrast them to find the best settings. Adjust your settings to find the best balance of small file size and best image quality. Every setting you change affects both of those things. Watch the image carefully to see how the changes affect it.
-
Adjust the settings for the graphic:
-
Color Reduction Algorithm: This delightfully descriptive setting (the drop-down menu beneath the File Format menu) simply means that you take the many colors in your image and reduce them to 256 or fewer colors. How do you want to do that? Your choices are Perceptual, Selective, Adaptive, Web, or Custom. The first three are pretty much the same. The Perceptual setting makes the colors as close as possible to whatever colors the human eye perceives in the original image (so they say). The Selective setting does the same thing but uses as many Web-safe colors as possible. The Adaptive setting makes the remaining colors as mathematically close to the original as possible. The Web setting uses the closest Web-safe colors to the colors that are in the image. The Custom setting is for power users who want to create their own color-reduction algorithms.
Tip? Your choices are really between the Perceptual and Web settings. The Perceptual setting gives you an image as close as possible to your original creation. The Web setting gives you an image that looks the same no matter what computer or Web browser it’s on. Unfortunately, the Perceptual setting usually looks great, whereas the Web setting dithers things substantially. But look at the Web choice this way: This is as bad as the image is going to look. With any other setting, the graphic is going to look better or worse unpredictably. With the Web setting, you know exactly how much dithering is going on, and nothing more will happen to the image. Compare the second image in Figure 16-4 with the third, which is selected. The only difference between the two is the Color Reduction algorithm. Although noticeable dithering appears in the Web-safe image, it doesn’t look unacceptably bad, and the file size is a little smaller.
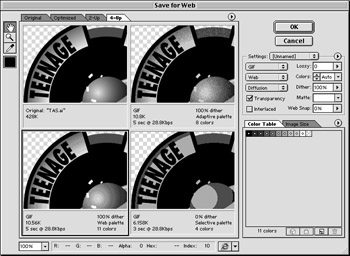
Figure 16-4: Saving a GIF in the Save for Web dialog box. -
Dithering algorithm: This is the actual shape of the dithering pattern. The No Dither setting won’t dither the image at all. The Diffusion setting randomizes the dithering pattern to make it less noticeable. The Pattern setting dithers in a fixed grid. The Noise setting is even more random than the Diffusion setting, making any dither even less noticeable. Sadly, the settings that produce the least noticeable dithering also create the highest file sizes. The Noise setting produces the largest files, and the Diffusion setting the second largest. The Pattern setting produces small files with noticeable stripes. The No Dither setting produces obvious bands of color in the image. Notice the sky in Figure 16-4. A No Dither setting causes the stripes. Here again, your goal is to strike a balance between the smallest size and the best quality.
-
Transparency: How do you want to treat the parts of your image that have no graphics? Do you want them to be transparent or filled with the Matte color (explained later in this list)? Check this box to make them transparent.
-
Interlaced: This setting makes the file larger so that it seems to be downloading faster, which seems like a contradiction. When a graphic is interlaced, it first loads a very low-resolution version to the Web browser, and then the full-resolution version. Graphics seem to load faster, but the Interlaced setting is just soothing the user by showing something useful happening. Without interlacing, the whole page has to download before you can look at it. (The page actually loads faster this way; it only seems to take forever.) Impatient people may want to select this box (unless, of course, they already skipped this list).
-
Lossy: This setting reduces file size by as much as 40 percent by eliminating pixels (at the expense of image quality). Use as much Lossy as you can get away with but don’t ruin your image.
Tip? The Lossy setting won’t work with the Interlacing setting turned on.
-
Colors: This setting is the total number of colors used in the image. Sometimes, reducing the number results in a smaller image, but doing so doesn’t usually have as much effect as the Dither and Lossy settings.
-
Dither: If you select the Pattern, Noise, or Diffusion settings for a dither method, you can use this setting to turn down the amount of dithering. Lower amounts result in smaller graphics with more noticeable dithering patterns.
-
Matte: If you don’t choose the Transparency box, the Matte color fills areas of your image where there are no graphics. If you’re using transparency and know what color you plan to use for the background of the Web page, you can set the Matte color to the background color and the pixels at the edge of your graphic will blend with the background, creating a more visually appealing image. If you don’t know what the background color will be, set the Matte color to None. Otherwise, the edge pixels may blend to a different color from your background, producing an obvious fringe around the graphic, as if it were snipped hastily out of a different background.
-
Web Snap: If you aren’t using the Web setting for your color reduction algorithm, you can use the Web Snap setting to convert some of the colors (starting with those used most in the image) to Web-safe colors. This setting is a great way to achieve a balance between quality and compatibility. By changing just the largest areas of color to Web-safe colors, you can avoid the dithering problem in places where it will be most noticeable. The higher the setting, the more colors Illustrator converts to Web-safe colors.
After you make your settings on several images and decide which image works best for you, click that image, and then click OK. The graphic saves as a GIF, ready for you to use on your Web page.
-
Saving a graphic as a JPEG file
In Illustrator, JPEGs are easier to make than GIFs. You only need to worry about one setting: Quality. Of course, quality can be specified in two ways. (Simplicity? Well, almost.)
To save your artwork as a JPEG, follow these steps:
-
Choose File→Save for Web.
The Save for Web dialog box appears.
-
Choose JPEG from the File Format drop-down menu.
-
Click the 2-Up or 4-Up tab at the top of the graphic.
For more on viewing options, see the earlier section, “Saving a graphic as a GIF file,” in this chapter.
-
Choose a Quality setting.
You can choose the Quality setting in two ways, but the effects are identical: by choosing it from the Quality drop-down menu or by entering a number into the Quality field.
-
The Quality drop-down menu: The menu offers you a choice of four preset values: Maximum, High, Medium, and Low. These options refer to the quality level of the image, not the amount of compression applied. A Maximum quality level produces (as you may expect) the largest file sizes and the highest-quality images.
-
The Quality field: In this field, just to the right of the drop-down menu, you type in any value from 100 (maximum quality) to 0. Use the lowest Quality setting possible that doesn’t destroy your image. You may notice that the loss of quality in your image shows up as weird patterns that weren’t there before. These patterns are especially noticeable where two large areas of different colors meet. Notice the weirdness (called artifacting) in the fourth image in Figure 16-5. A little of this is tolerable in the name of smaller files, but too much becomes distracting.
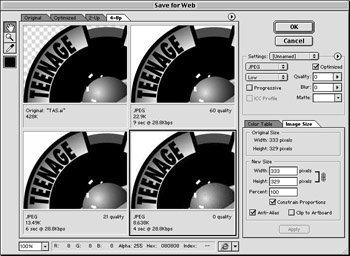
Figure 16-5: Saving a JPEG from the Save for Web dialog box.Tip? Note: Entering settings in the Quality field is identical to choosing values from the Quality drop-down menu. In the menu, the values of Maximum, High, Medium, and Low correspond (respectively) to settings of 80, 60, 30, and 10 in the Quality field.
-
-
Adjust the other settings.
-
Progressive: Like interlacing for GIFs, the Progressive setting creates the illusion that the image loads faster on Web browsers by loading a low-resolution version of the graphic first and then turning it into a higher-resolution image. In actuality, the image takes longer to load because Progressive files are larger, but viewers feel as though the download is going faster because they see things happening while they wait, rather than waiting for the whole download before they see anything.
-
Blur: Blur is a fairly useless setting. The goal is to reduce the artifacting in the image by blurring it. Unfortunately, the setting blurs the whole image, not just the artifacts, creating problems where none existed before. Leave this set to zero and ignore it. (Unless, of course, you’re feeling a little misty.)
-
Matte: JPEGs can have no transparent areas, so wherever no graphic exists, Illustrator fills in with this color. A setting of None fills in with white.
-
Saving a graphic as a PNG-8 or PNG-24 file
The settings for PNG-8 are identical to those for GIF except you don’t get a Lossy option. (Read through the earlier section, “Saving a graphic as a GIF file.”) Put PNG-8 wherever you see GIF. No settings exist for PNG-24, except Transparency, Interlacing, and Matte options; what you get is what you get. Choose the PNG-24 file format, and the compression scheme does its thing. Either you like the result (and click OK), or you don’t (and choose GIF or JPEG instead).


