Gray's Anatomy of a Path
Gray’s Anatomy of a Path
Paths can be a thorn in your side while you’re getting up to speed with Illustrator. At first, points may seem like a necessary evil (with evil the key word here), but the more you know about how they’re constructed, the easier it is for you to modify them. Eventually you may even stop cursing at your poor, defenseless monitor.
In Illustrator, it’s polite to point
Each path consists of a series of points. These are called anchor points because they anchor the path. Another type of point is called a direction point (a point that determines the direction and distance of a curve), but when most people refer to a point in Illustrator, they mean an anchor point, which appears only in a curved path. A path has at least two anchor points to determine where it starts and where it ends. Figure 2-9 shows a path and the locations of its anchor points.
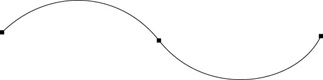
Figure 2-9: A path with several anchor points (shown as little squares).
You can handle the truth
For basic shapes with straight lines, points are all that paths need. But as soon as you want curves on a path, you need direction points (also known as handles among Illustrator insiders). Direction points are connected to anchor points by direction lines. They control how a path curves. Figure 2-10 shows the same path but with direction points showing.
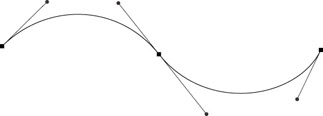
Figure 2-10: The same path from Figure 2-9 but with direction points and direction lines showing.
Handles work like magnets for the paths that extend from points. The farther you drag a handle away from the path, the more that path curves toward the handle. Figure 2-11 shows a few variations of a path between two points. In each of these variations, only the handle on the left has been moved.
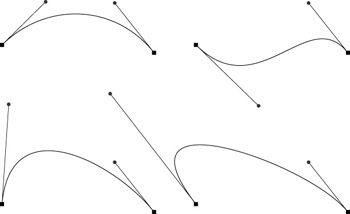
Figure 2-11: Variations of a path. The changes in the curve ?of the path occur as ?the handle on the left moves.
You can move the handles of paths by using the Direct Selection tool (the hollow arrow at the top of the Toolbox). Click the curve you want to adjust ?to select it. This action makes the direction points visible. Direction points are invisible unless the curve is selected with the Direct Selection tool. After the direction point is visible, click and drag the handle. Figure 2-12 shows a circle with handles showing. Even basic Illustrator shapes use handles to create curves.
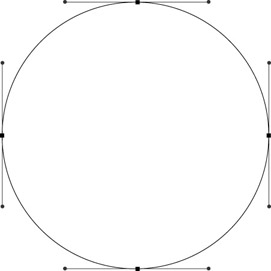
Figure 2-12: A circle with all the handles (direction points) showing.


