Pushing the Envelope
Pushing the Envelope
One of the deepest and most powerful features of Illustrator is enveloping. Intriguing, varied, and downright fun, enveloping can be applied to everything in your document — vector objects, text, pixel-based images, gradient meshes, patterns, and more. What’s even better is that the envelopes remain live so that you can keep revising your distorted objects to your heart’s content.
You have three ways to apply an Envelope distortion to your artwork: from a warp, a mesh, or a path. Depending on what kind of effect that you’re going for, one may be more suitable than the others.
At warp speed
To create an Envelope distortion by using a warp, follow these steps:
-
Select your artwork with the Selection tool.
Remember? Your artwork can be path- or pixel-based, or even text. This example includes a line of text and a pixel-based image of some cheesy Groucho-esque disguise glasses. I opened the image of the glasses, created the text with the Type tool, and then positioned it under the glasses with the Selection tool.
-
Choose Object→Envelope Distort→Make With Warp.
The Warp Options dialog box appears, offering an array of options.
-
Choose your desired style from the drop-down menu.
Each of the 15 styles offers a corresponding icon giving you an idea of the warp effect. Make sure to select (check) the Preview option so that you can see the results.
Note how the Envelope grid appears over the artwork. For this example, I chose the Squeeze option, which creates an hourglass effect.
-
In the Warp Options dialog box, select the Horizontal or Vertical options (if available and if you want to distort the proportions of the warp) and adjust the Bend and Distortion options.
My mutation includes selecting the Horizontal option and boosting the Bend option to 100%. Adjust the Horizontal and Vertical percentages to skew the style to the left, right, top, or bottom. Adjusting the Bend option to either end of the scale intensifies the effect. For this example, these options are at the default settings of 0.
-
Click OK and admire the results.
See the distortion in Figure BC11. Note how both the image and the type were distorted with the warp. If an image can stand a little tweaking, select the Direct Selection tool and click your Envelope path. Choose an anchor point on that path and drag to adjust the Envelope path. Your artwork distorts to fit the revised envelope.
What a mesh
The Make From Mesh method of Envelope distortion applies a grid of specified rows and columns over your artwork. Select the points on the mesh with the Direct Selection tool to distort the artwork underneath. See Figure BC12 to view the Envelope Mesh distortion in action.
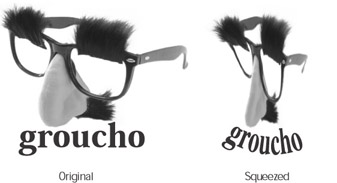
Figure BC11: Putting the squeeze on Groucho. Oucho!
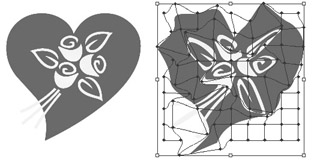
Figure BC12: Use an Envelope Mesh distortion to distort your image by manipulating points on a grid.
| Tip? |
You can add additional points on the mesh grid with the Mesh tool. See Chapter 10 for more on using the Mesh tool. |
Pathways
The last method of Envelope distortion enables you to use any path as the envelope for the distortion. This can be very handy when creating logos because objects, scans, and type can all fit neatly into a specified shape, such as an oval. Follow these steps to find out how to use a path for the envelope:
-
Create a path for your envelope and place it over your artwork.
Remember? The Envelope path must be the frontmost object.
In Figure BC13, a circle for the Envelope path is placed over the text and pixel-based apple image.
-
Select the path and your artwork with the Selection tool and choose Object→Envelope Distort→Make With Top Object.
Your artwork is distorted to fit inside the path, as shown in Figure BC13.

Figure BC13: Fitting an apple and some text nicely into a circle.
Here are a few other pertinent details regarding envelopes:
-
Change the contents within the envelope rather than the envelope itself: Select your envelope and choose Object→Envelope Distort→Edit Contents. Then feel free to modify your artwork — change the color, edit the text, and so on.
-
Release (undo) the envelope: Choose Object→Envelope Distort→Release.
-
Permanently apply your envelope: Choose Object→Envelope Distort→ Expand. Your art looks the same, but you’re no longer able to edit the contents or release the envelope.
-
Apply envelope distorts to linear gradients, pattern fills, or appearance attributes: You must select these options in the Envelope Options dialog box (Object→Envelope Distort→Envelope Options).


