Selecting without Tools: The Select Menu
Selecting without Tools: The Select Menu
Sometimes selecting objects in Illustrator without using tools is easier or more convenient than selecting with tools. Because selecting is so important, Illustrator provides a menu entirely devoted to selection commands.
A giant vat of really sticky stuff
By far, the most common selection method in Illustrator is a keyboard command. By pressing Ctrl+A (z+A on the Mac), you select all the objects ?in the document. You can also choose Select?All, but the keyboard command ?is so useful that you’ll probably memorize it in no time at all.
The opposite of All is Deselect, which deselects anything selected in the document (but you knew that). You don’t have to select everything to use the command. If you have just one thing selected out of a hundred objects, Deselect deselects it. The keyboard command is easy to remember: Ctrl+Shift+A (z+Shift+A on the Mac).
The Reselect command reselects whatever was last selected using the Selection menu. The keyboard command is Ctrl+6 (z+6 on the Mac).
The Inverse command selects the art opposite of what’s currently selected. ?In other words, everything that’s currently selected becomes unselected, and everything else becomes selected. For example, if you select one of four squares, using the Inverse command selects the remaining three squares and deselects the original square. Inverse works only with entire paths. (The same goes for Reselect.) Using the same example, if you have only a single anchor point selected on the first square, the Inverse command still selects the other three squares and ignores the unselected three anchor points on the first square.
The Next Object Above and Next Object Below commands select objects based on their stacking order. For example, say you draw a square, a circle, and then a polygon. If you then select the square and choose Select?Next Object Below, Illustrator selects the circle. If you choose the command again, Illustrator selects the polygon, and so forth.
The Save Selection command allows you to save selections. Select an object (or objects) and choose Select?Save Selection. In the Save Selection dialog box, name the selection and click OK. The saved selection now appears at the bottom of the Select menu, just begging to be chosen. You can delete the saved selection or modify its name by choosing Select?Edit Selection and making the necessary changes in the Edit Selection dialog box.
The Select?Object?All on Same Layer command selects everything that resides on the currently active layer (the one that’s highlighted in the Layers palette).
Specialized selection functions for important occasions
The Select menu contains a lot of other selection functions besides those mentioned in the earlier section, “A giant vat of really sticky stuff.” Located under the Same and Object submenus, these functions are designed to select objects that are similar in some way (such as style or fill color) to the object(s) already selected. Figure 6-7 shows the Select menu.
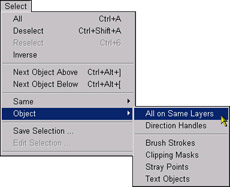
Figure 6-7: The Select menu provides a whole slew of selection goodies.
The four options that fall under the Object submenu are a bit less obvious:
-
Brush Strokes: Selects all paths in the document that have brush strokes assigned to them.
-
Clipping Masks: Selects paths used as masks in the document.
-
Direction Handles: Selects the direction handles of the B?zier curves ?of selected objects. (For more on direction handles, see the next section, “Editing and Adjusting Points.”)
-
Stray Points: Selects paths in your document that contain only a single point.
These commands can be vastly helpful in streamlining the editing process. For instance, if your client loves everything about the image except for that certain shade of blue, you can select one object that has that blue color in it, and then choose Select?Same?Stroke Color or Fill Color. With everything in that color selected, you can edit them all at once! If you’re having trouble printing lines of a certain stroke weight, choose Select?Same?Stroke Weight and increase the stroke weight of all the lines. (See Chapter 5 for more information on fills and strokes.) Other commands select items that have a history of problems printing on certain printers, such as stray points, brushstrokes, and masks. Selecting such items lets you modify them before printing. (See Chapter 15 for more about printing.)


