Working with Illustrator and Photoshop
Working with Illustrator and Photoshop
Illustrator and Photoshop, both from Adobe, provide unique and useful integration capabilities. You can take files from either application and put them directly into the other application in five ways: dragging and dropping; copying and pasting (almost identical to cutting and pasting); placing; exporting and importing; or opening. Each method produces slightly different results to meet your every need, whim, or desire. (Well, okay, just the desires that center on moving files between graphics applications. You have those all the time, right?)
| Tip? |
If you ever bring something from Illustrator into Photoshop (or vice versa) and something weird happens (parts of the image are missing, odd lines streak through the image, nothing happens, or your computer crashes), try saving the file as an earlier version, such as Illustrator 8 or Illustrator 6. Close the file and open it again before you try to copy and paste. Saving a file in an earlier version enables the application to “understand” the file. |
Making life easy: Copy and paste, drag and drop
The copy and paste and drag and drop methods of getting a file from one program to the other are incredibly easy. Open a file in Photoshop, and then open a file in Illustrator. Make a selection in either program, choose Copy from the Edit menu, and then go to the other application and choose Paste from the Edit menu. Or simply click a selection in either program and drag the selection from that one application into an open window in the other application. In Illustrator, you can use any selection tool to do the dragging. In Photoshop, you need to use the Move tool.
After you move graphics this way, they appear at the height and width that they were when created in the other program. After you drag a graphic from Illustrator to Photoshop, the graphic rasterizes automatically. Rasterize is a two-dollar word for the process that converts vector-based data into pixel-based data.
Whenever you copy and paste a graphic from Illustrator into Photoshop, the Paste dialog box appears, as shown in Figure 17-3. Choose from the three radio buttons there to select your pasting preference: pixels, paths, or shape layer.
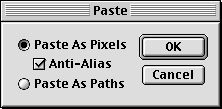
Figure 17-3: Pasting Illustrator data into Photoshop.
Your first impulse may be to paste the graphic as paths. After all, Illustrator uses paths, not pixels, so you expect this method to preserve your original Illustrator files as they are. Unfortunately, although Photoshop uses paths similar to Illustrator’s paths, they work very differently in Photoshop than they do in Illustrator. For example, paths in Photoshop can’t have strokes or fills, although paths can be used to fill or stroke an image in Photoshop and to do other important Photoshop-specific things. You just can’t use the path to print or display information on the Web.
Your other option is to paste your graphics as a shape layer. Shape layers were first introduced in Photoshop 6 and allow vector-based data to be retained without rasterization. In order to retain the vector-based data of shape layers, however, they must reside in a layered file, which limits your file formats to TIFF, PDF, or native PSD. Paste the Illustrator graphic as pixels if your end goal is to create and save a pixel-based Photoshop image.
Copying and pasting or dragging and dropping from Photoshop to Illustrator is easier than going from Illustrator to Photoshop (and that’s pretty darn easy). You don’t have to worry about the paths-to-pixels issue. Just make your selection and drag it by using the Move tool; or copy the image, go to an open Illustrator document, and paste the image. That’s it!
You may assume (quite logically) that because moving Illustrator files into Photoshop rasterizes the files, moving Photoshop files into Illustrator must “vectorize” them. Not true. The pixels in a Photoshop file stay pixels, subject to all the laws and limitations of pixels anywhere else. For example, Illustrator vector-based data prints out at the highest quality no matter how much you scale, skew, rotate, or distort the data. But pixel-based data within Illustrator starts to degrade (the data gets blurry or worse) if you enlarge it or shrink it. Rotating, skewing, or distorting the pixel-based data has similar negative effects. Although you don’t have to worry about resolution for vector-based data, you do have to make sure that your pixel data has a high enough resolution: 72 points per inch (ppi) for the Web and anywhere from 150 ppi to 300 ppi or higher for print.
When you drop or paste into Photoshop, the artwork appears inside a preview box, as shown in Figure 17-4. I cannot overstate the handiness of this preview box. While inside the preview box, the graphic isn’t really in Photoshop yet. You can position the graphic, rotate it, and then scale the preview. Then double-click inside the preview box (or press Enter for Windows or Return for Mac), and Photoshop rasterizes the graphic at the best quality possible. If you rotate and scale the image after it’s been rasterized, you blur and otherwise degrade the image.
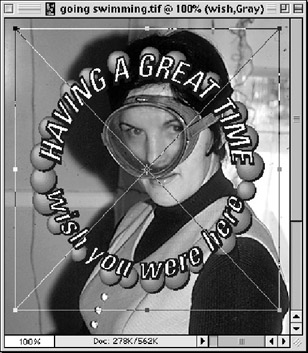
Figure 17-4: The Place preview box in Photoshop provides the highest quality and greatest flexibility for Illustrator files brought into Photoshop.
| Tip? |
Photoshop graphics that are dragged and dropped or copied and pasted into Illustrator files are always embedded. |
Placing files
Placing files into Photoshop or Illustrator is one of the more versatile ways to bring data into the application. Each application provides a variety of options that aren’t available by using any other method.
Placing Illustrator files in Photoshop
To place an Illustrator file into Photoshop, open a Photoshop file and choose File→Place. Select a saved Illustrator file (it doesn’t need to be open) from the Place dialog box and click OK. The file opens in Photoshop inside a preview box just like it does when pasting or dropping.
Placing Photoshop files in Illustrator
Placing Photoshop files into Illustrator is identical to placing any other graphic into Illustrator. See the section, “Bringing Files Into Illustrator,” earlier in this chapter.
Now opening in an application near you
Native files can be read by the “opposite” application. In other words, Photoshop can read Illustrator files, and Illustrator can read Photoshop files. One advantage of this capability is that you don’t need to have any document already open.
To open a Photoshop file in Illustrator, choose Open from the Illustrator File menu and select the Photoshop file. The Photoshop file opens in a new document within Illustrator, in the color mode of the Photoshop file.
To open an Illustrator file in Photoshop, choose Open from the Photoshop File menu and select the Illustrator file. The Photoshop Rasterize dialog box appears, as shown in Figure 17-5. If you saved a file as an EPS or if you exported it in an Illustrator 10 or earlier format, this dialog box’s name is Rasterize Generic EPS Format. If you save the file in Illustrator CS format, this dialog box is Rasterize Generic PDF. Otherwise, these dialog box options are identical, no matter which name you see.
In the Rasterize dialog box, you set the width, height, resolution, and color mode of your graphic. Your exact settings should reflect, as closely as possible, the final purpose of the graphic. You should determine whether the graphic is going to be viewed on-screen (Web, multimedia) or if it’s going to be printed (desktop or offset). The more you alter these settings after you rasterize the graphic, the more you degrade it.
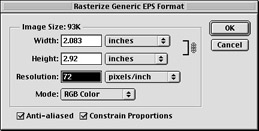
Figure 17-5: Use the Rasterize dialog box to refine your graphic settings.
Exporting a graphic
Exporting is almost the opposite of placing. Instead of bringing a graphic into an application, you’re getting it out of an application. Exporting has two big advantages. First, you don’t need a copy of the other application to create the graphic in that format. Second, Illustrator layers export as separate Photoshop layers, instead of as one flattened graphic (layers don’t stay intact when pasting, dragging, or placing an Illustrator file into Photoshop). (See Chapter 13 for more info on Illustrator layers.) Sadly, Photoshop layers don’t export to layers in Illustrator (though you can get Photoshop layers by using the Open command on a Photoshop file).
You can export any path that you create in Photoshop as an Illustrator file. To export paths from Photoshop, choose File→Export→Paths to Illustrator. The Export Paths dialog box opens from which you specify those paths to export. Select a path, click Save, and an Illustrator file is created that contains your path.
Exporting from Illustrator is much more powerful than exporting from Photoshop because you can choose to export all your Illustrator layers as separate Photoshop layers. This option provides great versatility in case you want to further edit your graphics in Photoshop.
To export your Illustrator graphic as a Photoshop file, choose File→Export. Name the file in the Name field and choose Photoshop (PSD) as your format. After you click OK, the Photoshop Options dialog box appears, as shown in Figure 17-6.
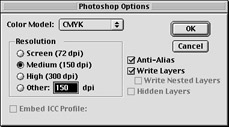
Figure 17-6: Set resolution in the Photoshop Options dialog box.
In the Photoshop Options dialog box, you determine color model, resolution (for more on resolution and which is best for what purpose, see Chapter 2), anti-aliasing, and whether to export the graphic as a single, flattened layer or as multiple layers. Select the Write Layers check box to export the Illustrator layers as Photoshop layers. With this option unchecked, you export the file as a single, flattened layer. With this option checked, your layers export as separate Photoshop layers.
| Tip? |
When in doubt, select the Write Layers option. You can easily delete or flatten the layers in Photoshop (by using the Photoshop Layers palette) if you decide you don’t want them. |
You also have the option of exporting your file with slices and image maps for use on the Web. For more on Illustrator and the Web, see Chapter 16. Also, you can export your image with compound shapes. When you bring compound shapes into Photoshop, they become editable clipping masks. Conversely, your Photoshop clipping masks become editable compound shapes when brought into Illustrator.


