Typing on a Path
Typing on a Path
Many people think that Illustrator is paths. A path is a series of anchor points and straight and curved line segments that define shapes. (For more information on paths, see Chapters 7 and 8.) And putting type on a path has long been one of the greatest capabilities of Illustrator. That said, you’re up against a bizarre learning curve when using type in Illustrator. Initially, getting the type onto the path is pretty straightforward — but manipulating the type after that is a bit harder, and the effort required, such as for putting type on both sides of a circle, is downright silly.
Getting type to stick to a slippery slope
To place type on a path, such as the one shown in Figure 14-20, follow these steps:
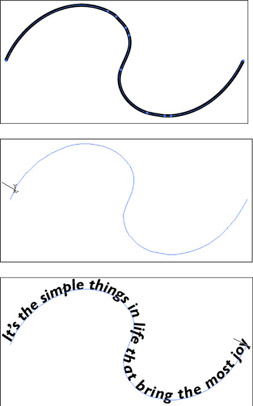
Figure 14-20: Creating type on a path.
-
Select the Pen or Pencil tool from the Toolbox. Using the Pen or Pencil tool, create the path on which you want to place your type.
Tip? For more information on creating paths, see Chapters 7 and 8.
Don’t be concerned with the fill and stroke of the path; they become invisible as soon as you type on the path.
-
Select the Path Type tool from the Toolbox.
The Path Type tool is hidden in the Type toolslot.
-
Click the path at the place where you want the text to begin.
A blinking insertion point appears at that juncture.
-
Start typing.
The text runs along the path while you type. When you’re done typing, select the regular Selection tool.
After the type appears, you can edit it just as you would edit regular type — with the exception that the type is stuck to your path. However, with the type attached to the path, you can move the type along the path in either direction, as shown in Figure 14-21. Just follow these steps:
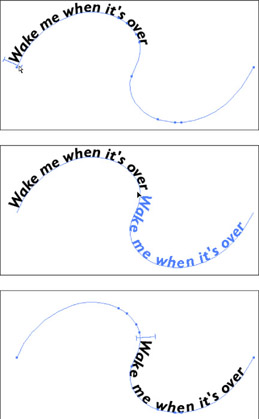
Figure 14-21: Moving type along a path.
-
Using a selection tool, click the path that contains the path type.
An I-beam cursor appears at the left edge of the type.
-
Click the I-beam and drag it along the path.
The type moves while you drag.
-
Release the mouse button when the type is where you want it.
| Remember? |
Be careful when you drag the I-beam cursor along the path. If you accidentally move the tip of your cursor below the path, the type flips upside down on the path. (As industry wags say of weird stuff that consistently happens on-screen, “That’s a feature, not a bug!” In this case, it is a feature, believe it or not.) Don’t panic; just move the cursor back above the path and watch while the type rights itself. |
Press the Alt key (Option on a Mac) to duplicate text while you drag it along a path. Doing so duplicates both the type and the path. (Even though you don’t actually see the duplicated path, it’s there.)
In the next section, you find out how to use this technique to create type on both the top and bottom of a circle.
Solving the age-old type- on-a-circle mystery
To place type on a circle, you simply click a circle (path) with the Path Type tool and begin typing. Putting text on both the top and the bottom of a circle (without half the text turning upside-down), however, isn’t as easy. All the type on a path must have the same orientation, which can be right-side up or upside down but not a mix of the two.
Read through the following steps to discover how to place type on the top of a circle (shown in Figure 14-22). Then read through the next set of steps to discover how to put type on the bottom of the same circle (shown in Figure 14-23).
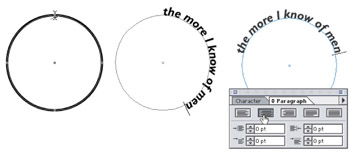
Figure 14-22: Putting type on the top of a circle.
Follow these steps to put type on the top of a circle:
-
Select the Ellipse tool (which looks like an oval) from the Toolbox to draw a circle. Press the Shift key while you draw to change the oval into a perfect circle.
See Chapter 4 for more on the Ellipse tool.
-
Select the Path Type tool from the Toolbox and click the top of the circle.
A blinking insertion point appears on the top of the circle.
-
Type your text.
Notice that the type starts to run down the right side of the circle. Don’t worry; it’s all part of the plan.
-
In the Paragraph palette, click the Align Center button.
| Tip? |
You can find the Paragraph palette by choosing Window→Type→ Paragraph. The Align Center button is the second button from the left along the top row of buttons in the Paragraph palette. After you click the Align Center button, the text centers itself on the top of the circle. |
Here’s how to put type in the bottom of a circle (see Figure 14-23):
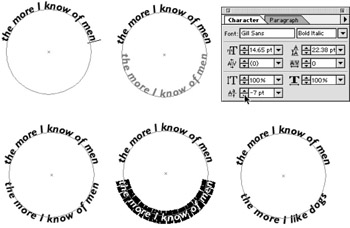
Figure 14-23: Putting type on the bottom of a circle.
-
Select the regular Selection tool from the Toolbox and then click the circle text that you created in the previous step list.
An I-beam cursor appears at the point where you click.
-
Press the Alt key (Option on a Mac), hold down the mouse button, and with the Selection tool drag the I-beam to the bottom of the circle.
Tip? Don’t release the mouse button until you move the cursor up into the circle just a bit.
Holding the Alt key (Option on a Mac) duplicates the text while you drag it. Doing so also duplicates the circle that the text is on — but because that circle is invisible, you won’t see it. Moving the cursor into the circle flips the type so that you can read it right-side up on the bottom and at the top of the circle.
-
In the Character palette, click the down triangle of the Baseline Shift field until the type appears outside (below) the circle.
The Baseline Shift field is at the bottom left of the Character palette. If it isn’t visible, choose Show Options from the Character palette’s pop-up menu.
-
Select the Type tool from the Toolbox and then select the type at the bottom of the circle.
-
Type the text that you want to appear at the bottom of the circle.
In this set of steps, you actually create two separate circles with type on them. Because the circles overlap precisely, however, you get the illusion that the type is on just one circle. If you click and drag the circle with the Selection tool, you drag away the circle with the text in the bottom, thus destroying the illusion.


