Creating Super-Precise Curves with the Pen Tool
Creating Super-Precise Curves with the Pen Tool
The Illustrator Pen tool is a model of precision and accuracy. With it, you can draw virtually anything (or draw anything virtually). That is, of course, after you master drawing curves.
The Pen isn’t designed to be maddening (as far as I know), but using it to draw successful curves does seem to require a psychological breakthrough. Illustrator users who struggle to figure out the Pen tool by themselves, without the handy guide you hold in your hands, may slog through months (or even years) of frustration before the breakthrough occurs. They happen upon shapes and curves that work for them — and then they finally “get it.”
Therefore, I vow to spare you the pain of all that trial and error. The following sections begin this noble quest, in which you find the knight. . . .
Taming the draggin’
(Sorry about the bad pun.) Where do you want your curve to go? Just drag in that direction. I know, I know, I told you not to drag. But in that situation, you were making straight lines. What’s even less helpful, dragging is perhaps the most anti-intuitive action imaginable for creating curves. Regardless, I charge into the fray.
If you click and drag with the intent to create a curve, you get what looks like a straight line, as shown in Figure 7-6. (Weird, isn’t it?) Oddly enough, the “line” you get is twice as long as the distance you drag, extending in two directions from the spot where you initially click. After you release the mouse button, this “line” is still a straight line and still no curve in sight.
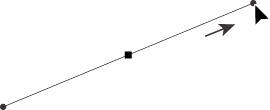
Figure 7-6: When creating a curve, drag out a straight line; the arrow shows the direction of the drag.
At this stage, what do you suppose is the most natural thing in the world to do? Sure — it’s to drag in another direction (typically at a 90? angle) from where you last released the mouse. And what are the most natural results? An ugly, curvy bump; a new “straight” line extending in both directions from the second anchor point; and a sudden yearning to direct a few choice expletives at Illustrator.
The problem is the second anchor point. Instead of clicking and dragging at a spot near where you first released the mouse button (a big no-no), you always click and drag (you don’t have to drag, but I get to that later) away from where you released the mouse button as shown in Figure 7-7. You understood correctly — away. Weird, isn’t it?
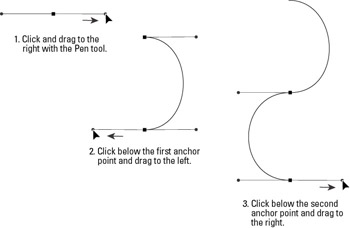
Figure 7-7: Creating gentle, smooth curves. (Friendly arrows indicate the direction to drag.)
To create a lovely, flowing curve for your own purposes, just follow these steps:
-
Click and drag with the Pen tool.
A line extends from the anchor point where you clicked. That’s okay; ?it’s supposed to happen that way.
Tip? The line you see is actually a set of two direction points (connected to the curve by direction lines), cleverly disguised as lines with little control-handle boxes at each end. Whether you call them direction points or control handles, lines, or boxes, they don’t print out. They’re just tools for controlling the direction of the line segment that you’re drawing.
-
Without clicking, place your cursor away from both the anchor point and the direction points. Then click and drag in the direction opposite the direction you dragged to create the first anchor point.
At this stage, the best approach is to place that second click perpendicular to the direction lines. Note that as you drag, you can actually see the curve between the two anchor points take shape and change. If you drag the same distance that you dragged for the first anchor point, you create an even-looking curve.
-
Finally, place your cursor away from the second point, still moving away from the first anchor point, and click and drag back in the same direction you dragged for the first anchor point.
After you release the mouse button, you see an S shape (or a backward S, depending on which way you first dragged). Rejoice! If you don’t see the S or reverse-S shape, breathe deeply, count to 10, and try again, exercising superhuman patience and care. Think Clark Kent.
| Tip? |
Remember that whole song and dance about pressing the Shift key so that new anchor points appear angled at a multiple of 45? relative to the last anchor point? Well, you can also use the Shift key to constrain the angle of control-handle lines to 45?, if you prefer. This action lets you make much more accurate curves than by drawing freestyle. Just don’t press and hold the Shift key until after you begin dragging with the Pen tool. If you press the Shift key before you drag — and release the key while you’re dragging — you get the 45? anchor point. If you continue to hold down the Shift key, you get the whole shebang: 45? control-handle lines as well as the anchor point. |
Following the one-third rule
The optimal distance to drag a direction point from an anchor point is about one-third the distance you expect that line segment to be. So, for instance, if you plan to draw a curve that’s about three inches long, drag the direction point out about one inch from the anchor point.
The one-third rule is perfect for creating the most natural, organic-looking curves possible. Breaking the rule can have the following dismal results:
-
If you drag too little, you get curves that are too shallow around the middle of the line segment and too sharp at the anchor points.
-
If you drag too much, you get curves that are quite sharp (like Dead Man’s Curve) around the middle of the line segment and too straight around the anchor points (like that curve on the right in Figure 7-8).
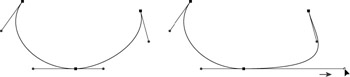
Figure 7-8: Left: Anchor points with direction point lines one-third the distance along the path. Right: Dragging too much.
Fortunately, on the left, Figure 7-8 shows a “perfect” curve created with the proper use of direction point lines set to one-third the length of the path. Because you can use the Direct Selection tool (the hollow arrow) to adjust the position of the direction points after they’re drawn, try to follow the one-third rule whenever possible. Doing so may keep you out of trouble and your vocabulary fit for sensitive listeners.
Following rules for the other two-thirds
The one-third rule is the most important rule when you’re using the Pen tool to draw curves. Of course, you still have to deal with the other two-thirds of the line segment; that’s where a few humble rules can serve you well. Even if you don’t plan to follow them right away — because you’re still at that awkward, rebellious age — you at least want to be familiar with these rules:
-
Drag in the direction of the path. Dragging back toward the line segment you just drew results in hard-to-control curves and awkward-appearing line segments between the previous anchor point and the anchor point you’re working with. If you need to go back toward the line segment, place an anchor point closer to the previous anchor point you created.
-
Focus on the upcoming segment as well as the current one. You may notice that the line segment between the prior anchor point and the current anchor point can distract you because it changes as you drag. ?If you concentrate only on this line segment, the direction point you’re dragging out for the next line segment probably won’t be the right length or angle. You must master the past, present, and future when you use the Pen tool. (Aside from that, it isn’t hard at all.)
-
Don’t overcompensate for a misdrawn curve. If you mess up on that last outgoing direction point, don’t try to “fix” the line segment with the anchor point you’re currently dragging. Instead, focus on the next segment; try to ignore the goof-up for now. You can always use the Direct Selection tool to fix the poor thing after you finish the path. Chapter 6 has the lowdown on how you can adjust your path after you draw it.
-
Use different lengths for each direction point, as necessary. This rule is the exception to the previous two rules. (You knew there had to be an exception.) If you click and drag and get a segment just right — only to realize that the next segment requires a longer or shorter control-handle line but the same angle — release the mouse button when the segment is just right. Then click the same anchor point again (not the direction point) and drag in the same direction as you previously dragged. Note that as you change the angle of the direction point on the “other” side (where the previous segment is), you aren’t changing the length of that direction point line. And you can match the angle pretty easily because you can see both “before” and “after” versions of the previous line segment.
-
Place anchor points at curve transitions. A curve transition is a place where the curve changes. Maybe it changes direction (going from clockwise to counterclockwise or vice versa). Maybe the curve gets smaller or larger. Figure 7-9 shows a nice curvy path with anchor points placed properly at the transitions.
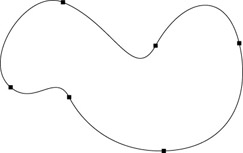
Figure 7-9: This path has points placed at the "correct" locations for the best possible curve. -
Be environmentally conscious in your anchor point usage. Don’t place anchor points where they’re not needed. This rule goes for all types of anchor points. The fewer you have makes editing sections of the path easier (keeping in mind the previous rule, of course). Fewer anchor points also allow for quicker and trouble-free printing.
| Tip? |
Holding down the Ctrl key (zon the Mac) changes the currently selected tool into whatever selection tool you used last. This is very handy when you’re drawing with the Pen tool because it enables you to move points while keeping the Pen tool selected. Click the Direct Selection tool before you choose the Pen tool. If you click, start to drag, and then realize that you clicked in a spot that just isn’t going to work, just press the Ctrl key (z on the Mac). This temporarily changes the Pen tool into the Direct Selection tool. Move your anchor point to a new location. Release the Ctrl key (z on the Mac) and your anchor point moves to the new location, just like that! |
Drawing the tricky anchor points with the Pen tool
A bit of practice with curves and smooth anchor points may get you used to smooth transitions from one line segment to another. Those anchor points are fairly easy to create — just click and drag a new point, and whammo! you have a smooth anchor point. But both the curved-corner anchor point and the combination-corner anchor point are a little trickier — they always require two steps. Still, they can’t scare a veteran of the draggin’ wars. Not a bit.
Curved-corner anchor points revisited
Because curved-corner anchor points have two curves sticking out of them (one on each side), they need two direction points (one for each curve). But because these points are anchoring independent curves, you have to make those direction points independent of each other. Here’s the move: As you’re dragging out a smooth anchor point, you can quickly change it into a curved-corner anchor point by pressing and releasing the Alt key (Option on the Mac). Doing so “breaks” the control-handle lines into independent lines.
Be sure to make your original line segment the proper length and angle before you press the Alt key (Option on a Mac). After you press the key, the only way to edit the line is to stop drawing and modify it with the Direct Selection tool. See Chapter 6 for all sorts of great tips on how to get the most out of point adjustment by using the Direct Selection tool.
Combination-corner anchor points revisited
Using a similar fancy move, you can create combination-corner points from smooth or straight-corner anchor points — while you’re drawing. Here’s how:
-
To go from a straight line into a curved line, as you’re drawing a smooth anchor point, press the Alt key (Option on a Mac) after you click but before you release the mouse button. This action lets you drag the direction point for the next line segment without affecting the previous segment as Illustrator normally does. To create the curve, drag the direction point to wherever you need it.
-
To go from one curved line into another (with a curved-corner point instead of a smooth point), click and drag as though you were creating ?a smooth point. After you have the first curve the way you want it, but before you release the mouse button, press the Alt key (Option on a Mac). As soon as you press Alt (Option on a Mac), the second direction point moves independently of the first. Use this Alt (Option on a Mac) technique to move the direction point to wherever you need it.
These two techniques take a little practice because so much depends on the timing of when you press Alt (Option on a Mac). Don’t worry, though. If you don’t get it right the first time, you always have the Convert Anchor Point tool to fall back on.


