Putting Shapes Together
Putting Shapes Together
The basic shape-creation tools are great starting points for creating more complex illustrations because most complex shapes are simply many basic shapes put together. You may be astonished at what you can create simply by combining one basic shape with another. One of the quickest and easiest ways to do so in Illustrator is by using the Pathfinder palette.
The Pathfinder palette has a misleading name. All it really does is combine or separate two or more shapes in a variety of ways. You can use the Pathfinder palette to join two or more objects into one object, remove the shape of one object from another, cut apart two shapes where they overlap, or combine objects in many other ways.
To access the Pathfinder palette, choose Window→Pathfinder. The Pathfinder palette appears, as shown in Figure 4-9.
The Pathfinder palette is divided into two sections — Shape Modes and Pathfinders. Using the Pathfinder palette is simplicity itself: Just overlap two or more objects, select them all by clicking them with any selection tool (to select multiple objects, hold down the Shift key while clicking each object), and click the button that does the operation that you desire.
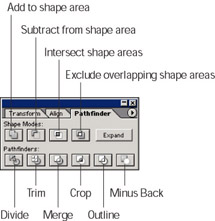
Figure 4-9: Use the Pathfinder palette to work with complex shapes in a variety of ways.
| Remember? |
Knowing which button to click isn’t always obvious, but don’t worry about that. Simply keep in mind that when you want to combine or separate two or more objects, you’re likely to find a button to help you in the Pathfinder palette. Click a button; if it doesn’t give you what you want, choose Edit→Undo and try a different button. |
The results of the Pathfinder palette depend heavily on which object is in front and which object is behind. To change the stacking order of objects, select a single object with the Selection tool and choose Object→Arrange. In the Arrange submenu, you can send the object to the back, bring it forward, or move it backward and forward one level at a time. To get a better idea of how the Pathfinder palette functions, use it on two basic objects (in this case, a circle and a star), as shown in Figure 4-10.
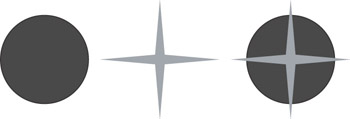
Figure 4-10: Two basic shapes overlap ?from the Pathfinder palette.
Compound shapes
Not only does the Pathfinder palette enable you to create complex artwork from basic shapes, all the artwork you create remains fully editable. The Shape Modes portion of the palette is also easy to use. Overlap two or more objects, select them all, and click the button of the effect you want. The commands under the Shape Modes consist of the following:
-
Add to Shape Area: Groups multiple objects so they’re selectable as a unit but can also be selected individually with the Direct Selection or Group Selection tools. The resulting objects use the fill and stroke of the object that was on top before the objects were added together. By clicking the Expand button or by choosing the Expand Compound Shape command from the Pathfinder palette pop-up menu (accessed by clicking the triangle in the upper-right corner of the palette), the added objects are joined into a single physical object.
Tip? In all Shape Modes, the Expand Compound Shape command flattens the compound shape into a single path.
Tip? You can add additional shapes in a compound shape at any time. Also, use the Direct Selection tool to edit any path or anchor point on the compound shape.
-
Subtract from Shape Area: Cuts away all selected objects in front of the backmost object, leaving a hole in the backmost object in the shape of whatever was in front of it. In Figure 4-11, Subtract from Shape Area cuts away the star in front of the circle but also leaves the portion of the path that makes up the star tips that did not overlap the circle. By clicking the Expand button or choosing the Expand Compound Shape command from the Pathfinder palette pop-up menu, those star tips will be shaved off.
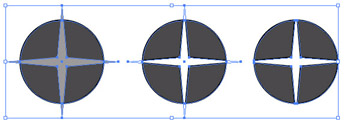
Figure 4-11: The results of using the Subtract from Shape Area command, and then with Expand. -
Intersect Shape Areas: Cuts away all parts of the objects that don’t overlap. The resulting object uses the fill and stroke color of the object that was on top before the objects were intersected. Here, Intersect Shape Areas joins the circle and star, using the fill and stroke color of the star (which was on top before the objects were intersected). Intersect also works on more than two objects. Clicking the Expand button or choosing the Expand Compound Shape command from the Pathfinder palette pop-up menu further simplifies the objects and deletes the remaining nonintersected portions of the paths of the original objects, as shown ?in Figure 4-12.
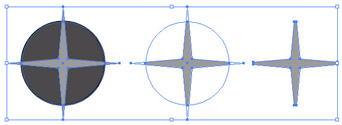
Figure 4-12: The results of using the Intersect Shape Areas command, and then with Expand. -
Exclude Overlapping Shape Areas: Removes all parts of the objects that overlap and unites what’s left into a single object (the opposite of Intersect). The remaining object uses the fill and stroke of the object that was on top before the objects were united. In Figure 4-13, the Exclude Overlapping Shape Areas command cuts away all parts of the circle and star that overlap, uniting what is left into a single object that uses the fill and stroke color of the star (which was on top before the objects were united). Clicking the Expand button or choosing the Expand Compound Shape command from the Pathfinder palette pop-up menu eliminates any unnecessary anchor points.
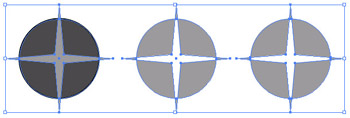
Figure 4-13: The results of using the Exclude Overlapping Shape Areas command, and then with Expand.
The Shape Modes effects can be combined, so knock yourself out. Unlike the Pathfinders commands, if you want to undo your compound shapes, simply select the Release Compound Shapes command from the Pathfinder palette pop-up menu. By clicking the Expand button or selecting the Expand Compound Shape command from the Pathfinder palette pop-up menu, you can further clean up or simplify your paths by eliminating unnecessary anchor points. The compound shapes are flattened and condensed into a new simplified shape. But be warned: After you use the Expand Compound Shape command, you can no longer release your compound shape by using the Release Compound Shapes command. The Expand feature permanently fuses your effect, so there’s no going back.
Pathfinders
The commands under the Pathfinders portion of the Pathfinder palette are a mixed bag of effects. The Divide and Minus Back commands achieve results by cutting away specific parts of the image. Figure 4-14 demonstrates the results of applying these two commands: Minus Back and Divide. The Trim, Merge, Crop, and Outline commands provide the means for tidying up your artwork before sending your creation out into the world. In Figure 4-15, this cleanup crew takes a bow.
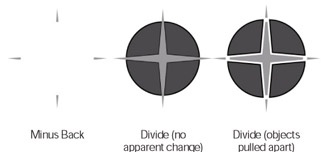
Figure 4-14: The results of using Minus Back (left ) and Divide (two images on the right).
Figure 4-15: Cleaning up and checking the circle and star, using (left to right) the Trim, Merge, Crop, and Outline commands.
Here’s a quick rundown of the Pathfinder commands found under the Pathfinder palette:
-
Divide: Breaks two overlapping objects into separate objects. This operation may look as though it hasn’t done anything after you first apply it (middle, Figure 4-14). However, after you divide an object, you can move or color each piece individually (right, Figure 4-14). After the Divide button first breaks the overlapping star and circle into distinct paths, they look as if you’ve done nothing to them, even though the star and circle can be individually moved or colored (far right, Figure 4-14).
-
Trim: Removes any parts of objects hidden by other objects and also removes any strokes. As with Divide, this command may not produce visible results immediately (it affects only hidden items) as shown in Figure 4-15. In Figure 4-15, the Trim command removes any parts of the circle hidden by the star and also removes any strokes. At first, the command’s results aren’t visible (left) until you start changing the position of the pie slices of the circle (right) — and they move as separate objects.
-
Merge: Removes any parts of objects hidden by other objects, removes strokes, and merges overlapping objects that have the same fill colors. This command functions almost the same way as the Trim command does, with the key difference being that this commands merges objects of the same color together into a single object while Trim leaves them as separate objects. In Figure 4-15, the Merge command removes any parts of the circle hidden by the star, removes strokes, and merges overlapping objects that have the same fill colors (which the star and the circle do not).
-
Crop: Divides two overlapping objects into separate objects where they overlap and then deletes everything outside the boundaries of the topmost object. In Figure 4-15, the Crop command divides the star and circle into separate objects where they overlap and then deletes everything outside the boundaries of the star (the topmost object).
-
Outline: Breaks objects into separate line segments with no fill colors. Of the two outlines shown in Figure 4-15, the one on the left shows the visible effects of the command; the one on the right shows the now-separate line segments moved apart.
-
Minus Back: Cuts away from the frontmost object all selected objects that are behind the frontmost object. The remaining object uses the fill and stroke color of the frontmost object. Here Minus Back cuts away the circle from the star and unites what’s left (those four forlorn-looking points; refer to Figure 4-14) into a single object that uses the fill and stroke color of the star (which is the frontmost object).
| Remember? |
If you stumble upon the Pathfinder commands under the Effects menu, don’t confuse them with those found under the Pathfinder palette. The commands under the Effects menu change the appearance of an object without changing the underlying object itself. The Pathfinder commands found under the Effects menu are designed to be applied to groups of objects, layers, and type objects. They usually have no effect on a few overlapping shapes. For more on appearances and effects, see Chapter 11. |


