Creating Web-Specific Vector Graphics
Creating Web-Specific Vector Graphics
Vectors have several advantages over pixels. One of the chief advantages is their small size, especially for basic graphics such as logos and buttons. Another advantage is their ability to be scaled without any loss of quality.
Saving a graphic as a Macromedia Flash file
Flash is a very versatile format developed by Macromedia. Not only can you use Flash to show vector graphics on the Web, you can also animate and add sound and interactivity to them. In Illustrator, you can create the graphic and do limited animation with it Beyond that, you have to use another application (such as Adobe LiveMotion or Macromedia Flash) to take full advantage of the format. For this reason, the Export to Macromedia Flash (SWF) command is really intended to prepare artwork for export to one of these other applications, rather than to create artwork to go directly to the Web. Not that you can’t put a Flash file created in Illustrator directly on the Web. You certainly can, but then you’re tapping into just a fraction of what Flash can do.
Still, if you want your Illustrator artwork on the Web as vector data, Flash is currently the way to go. The one drawback to the format is the need for a browser plug-in in order for people to see your graphic in their browsers. This situation can make your graphic inaccessible to some people. However, Flash is such a popular format that many people have the plug-in installed in their browsers. Chances are quite good that many people will be able to see your work without problems.
So if your primary concern is that your graphic appears on the Web with no-holds-barred top quality (and print with the best possible quality to boot), use the Flash format.
To save a graphic in Flash format, just follow these steps:
-
Choose File→Export.
The Export dialog box appears.
-
Specify a name, location, and file format for your document.
In this case, choose Macromedia Flash (SWF) from the file format drop-down menu.
-
Click OK.
The Macromedia Flash (SWF) Format Options dialog box appears, as shown in Figure 16-6.
The Macromedia Flash (SWF) Format Options dialog box gives you the following options.
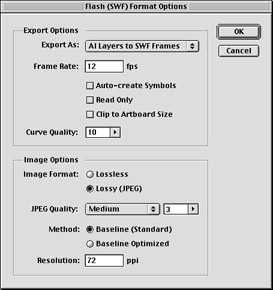
Figure 16-6: Exporting an AI file to an SWF file with the Macromedia Flash (SWF) Format Options dialog box.
-
Export Options: These options enable you to establish, among other things, how the layers in your file are handled and how fast those layers appear in the animation.
-
Export As: This drop-down menu has three options: AI File to SWF File, AI Layers to SWF Frames, and AI Layers to SWF Files. (AI is short for Adobe Illustrator and refers to the file you’re currently saving. SWF is another term for a Flash file.) The option you choose determines how Illustrator layers (see Chapter 13) are handled when you save them. The AI File to SWF File option flattens all the layers into a single image, just as if you were printing the illustration. The AI Layers to SWF Frames option builds a special file that, when loaded to a browser, displays each layer in sequence starting with the first layer and stopping with the last. You can use this option to create a slide show by putting a different graphic on each layer, or to do simple animations. The final option, AI Layers to SWF Files, exports each layer as a separate Flash file.
-
Frame Rate: This setting determines how fast the Flash file flips through the different Illustrator layers after you choose the AI Layers to SWF Frames option from the Export As menu. Each layer is considered a frame, and the number you enter here is the number of frames you want to appear every second.
-
Looping: Select this setting to create a file that plays repeatedly when you choose the Export As AI Layers to SWF Frames option.
-
Generate HTML: Select this setting to generate a HyperText Markup Language (HTML) file so that your Flash (SWF) file appears in your browser at its correct and original size rather than filling the window. No more additional editing hassles.
-
Read Only: Select this setting to create a file that people can view but not change in any way. Also, the file cannot be edited in any Flash application.
-
Clip to Artboard Size: Select this setting to crop out any artwork that is off the Artboard.
-
Curve Quality: The higher this setting (from 1 to 10), the closer the graphic is to your Illustrator file and the larger your file size. Lower settings provide lower quality with smaller file sizes. Yet again, you’re plagued by the agonizing compromise between file size and image quality!
-
-
Image Options: These options may never come into play in the graphic you’re exporting; they only matter if you have a pixel-based image (such as a scan) incorporated into your Illustrator file or if you create your artwork using transparencies, complex gradients (gradients with more than eight colors), gradient meshes, or effects. (See Chapter 10 for more info.) The Flash format doesn’t support these features, so it turns them into pixels in the final Flash file (your other Illustrator graphics remain vector-based). The following Image Options determine how to handle these pixel graphics:
-
Lossless: Select this radio button to save the pixel graphics in PNG-24 format. Don’t worry; the Flash plug-in takes care of any compatibility issues with the PNG format. Use this option if you’re exporting your graphic for further editing in Flash because you can apply further compression settings in those programs. The Lossless option lets you start with the highest possible quality.
-
Lossy: Select this radio button to save the graphics as JPEGs. Choosing the Lossy option enables you to choose a corresponding JPEG quality. See the “JPEG file format” and the “Saving a graphic as a JPEG file” sections, earlier in this chapter, for more on JPEGs and compression settings.
-
Method: Stick with the Baseline (Standard) option to ensure a format that’s recognized by most browsers. Selecting the Baseline Optimized setting optimizes the color but isn’t recognized by all browsers.
-
Resolution: This setting determines how much information the graphics contain; 72 ppi (pixels per inch) is perfect for on-screen display, but if you want people to be able to print your graphics, you may want to go up to 150 ppi, or even 300. Watch out, though, because this high setting results in huge file sizes.
-
After you complete all your settings, click OK to save your file in Flash format.
You can export Flash (SWF) files that include symbols. When opened in a Flash application, the symbols are included in the Symbol library of the application.
Saving a graphic as a SVG file
Scalable Vector Graphics (SVG) are great, but . . . well . . . futuristic. Look at it this way. You go to your local car dealer and you find the car of your dreams, with every feature that you ever wanted and some that you didn’t know even existed. The gas mileage is great, the color you want is in stock, and you can drive the car off the lot today! And the price? It’s about half the price you’re willing to pay! But just as you’re about to sign on the dotted line, the dealer informs you that there’s one little catch: The car runs on a special kind of gas. All the major gas stations have committed to start carrying the special gas in the future, but right now the special gas is not available. What do you do? Take the risk and invest the money, or purchase a car for which you know you can get gas?
SVG is technically great. It offers everything that Flash does, with promises for a whole lot more, such as total support for everything you can create in Illustrator. Also, the format is much more “open” than the Flash format. To create Flash files, you must use an application that specifically supports Flash format, such as Illustrator or LiveMotion. However, if you knew how, you could write SVG files in any word-processing program. In the future, SVG files may integrate seamlessly with Web pages without requiring plug-ins or anything else, meaning that you may get maximum quality and maximum compatibility, and issues such as file formats, dithering, and Web-safe colors, will become concerns of the past.
Unfortunately, for now, you may still have a hard time finding that special gas. All the major software companies have pledged support for SVG, but that support isn’t there yet. The industry moves so fast that no one can say how long SVG may take to catch on. By the time you read this, that transformation may have occurred. As a matter of fact, Adobe has begun this transformation. But it may be years until SVG rolls off the tongue as easily as JPEG. (PNG has been around for years and is only just beginning to be adopted.)
So if you want to live a life of action and adventure on the leading edge of technology, start saving your files as SVG right now. Create graphics so insanely great that people are forced to risk computer crashes and other frustrations to download and use the unstable plug-ins that they need to view your SVG files. Go on. I dare you. I double-dare you. I double-dog dare you. If you can pull it off, you’re the coolest kid in town and will be far ahead of everybody else. If you can’t, you still have GIFs and JPEGs and Flash files to fall back on.
To create an SVG file, just follow these steps:
-
Choose File→Save.
The Save dialog box appears. The SVG file format can be saved directly rather than exported. You can also open an SVG file directly into Illustrator. And if that isn’t enough, Illustrator lets you open SVG files that were created in other SVG-savvy applications.
-
Choose SVG (SVG) from the Format drop-down menu. Specify a name and location for your document.
-
Click Save.
The SVG Options dialog box appears, as shown in Figure 16-7.
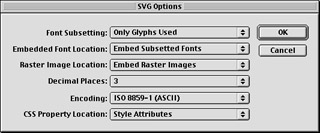
Figure 16-7: Saving an SVG file with the SVG Options dialog box. -
Establish your desired settings and click OK.
Check out the following list to get the lowdown on each option.
The SVG Options dialog box offers the following options:
-
Fonts: This option enables you to embed various font groupings in your SVG file.
-
Subsetting: The SVG format lets you embed the fonts that you use in the document in the SVG file. Fonts have been one of the major stumbling blocks for designers on the Web. Simply put, whoever has different fonts from yours installed on his or her computer may see your text, but not necessarily as you created it. Your font subsetting choice eliminates this problem by making the fonts you used part of the SWF file. You have seven choices for subsetted fonts.
Select the None (Use System Fonts) subsetting option if you don’t want to embed any fonts, if you didn’t use text in your graphic, or if you converted your text to outlines.
Select the Only Glyphs Used option to embed just the font info for the specific letters you used. This option creates a smaller file, but the graphic is less editable than when you include all glyphs because you can use only letters that are already used in the file. If you just want people to see the graphic the way you created it, select the Only Glyphs Used option.
Technical Stuff? Glyph is just a weird name for letter; you’ve seen it before in the word hieroglyphics.
Select the All Glyphs option to include all the characters of all the fonts you used. Even if you used just one letter out of Futura Condensed, all the letters, upper- and lowercase, and all special characters are included. If you want people to be able to make changes to your text, select the All Glyphs option.
Like the All Glyphs option, the other values — Common English, Common English Glyphs Used, Common Roman, and Common Roman Glyphs Used — are useful when the textual content of the SVG file may change.
-
Location: You can choose to have your fonts built directly into the file (Embed) or collected in another location (Link). The Embed option results in a larger file, but you have only one piece to take care of. The Link option results in multiple files.
-
-
Images: Like with fonts, you can choose to have any placed pixel images in your document built into the SVG file (Embed) or stored externally (Link). The Embed option creates a larger file that is completely self- contained. The Link option creates a separate folder for pixel graphics.
-
Preserve Illustrator Editing Capabilities: Select this check box to include a fully editable Illustrator file with your SVG file so that you can make revisions easily and more efficiently. Beware that checking this option increases your file size.
The following options appear when you click the Advanced button in the SVG Options dialog box (refer to Figure 16-7).
-
CSS Properties: This option lets you determine where your Cascading Style Sheet (CSS) properties are located. Cascading Style Sheets are a standard method of imposing consistent display characteristics on HTML documents. Many Web sites use CSS as a dynamic and flexible way to format Web pages. Talk with your Webmaster about the best settings to use.
-
Decimal Places: Higher values (from 1 to 7) for this setting result in better image quality with (what a big surprise!) larger file sizes.
-
Encoding: The SVG format provides several encoding methods to support alphabets in different languages, such as Kanji. The default setting of Unicode (UTF-8) is fine for 95 percent of the SVG files you ever create.
-
Optimize for Adobe SVG Viewer: Select this check box to optimize the image (you see the image faster) for the Adobe SVG Viewer (a plug-in you use to view SVG files in your browser).
-
Include Slicing Data: Select this check box to preserve all slicing information. Slicing carves up your image to allow for better optimization and the ability to assign separate animation features to each chunk. For more on slicing, see the section, “Slicing and Dicing Your Graphics,” later in this chapter.
-
Include File Info: Includes metadata, such as author and creation/revision dates.
Forget about the last option here on variable data (Include Extended Syntax for Variable Data). It’s way above the scope of this book. But if you have a need to know, check out Illustrator CS Bible by Ted Alspach and Jennifer Alspach, published by Wiley Publishing, Inc.
Illustrator has a live SVG effects feature in which effects, such as shadows and blurs, can be added to vector objects. These effects are great because they aren’t rasterized (turned into pixels) until the file is actually viewed in the browser — the quality is maintained, regardless of size. File sizes are still small, and the new effects can be created and edited, although some XML expertise is needed.
| Remember? |
Although all this razzmatazz is great, you still need a plug-in to view SVG files. The SVG Viewer plug-in is installed when you install Illustrator. You can also get the latest version of the plug-in at www.adobe.com/svg. |
Although I focus in this chapter on a very specific part of Web graphics production (getting your graphic into a file format that can be displayed on the Web), this is just the start. Actually putting that graphic where people can see it is another saga entirely, one that involves Web-authoring tools (or hand-coding HTML), service providers, and a whole alphabet soup of FTPs, URLs, and other confusing TLAs (three-letter acronyms). As you may have guessed, actually getting the graphic onto the Web in a real-live Web page goes beyond the scope of this one book.
The critical step in creating a Web graphic is saving the file. After you save a graphic for the Web, you have many, many options, all of which affect your graphic in different and significant ways. If you aren’t producing the Web site yourself, have a discussion with the site’s Webmaster before you save the graphic to find out what formats and options work best for the site.


