Filling with Patterns and Textures
Filling with Patterns and Textures
You can fill and stroke any path with a pattern. Patterns fill areas with repeating artwork.
Applying patterns to paths
To fill a path with a pattern, select the path, make sure the Fill box is active by clicking it in the Toolbox, and then click the pattern you want to use in the Swatches palette. The path fills with the pattern you selected. Figure 5-11 shows the same path filled with different patterns.
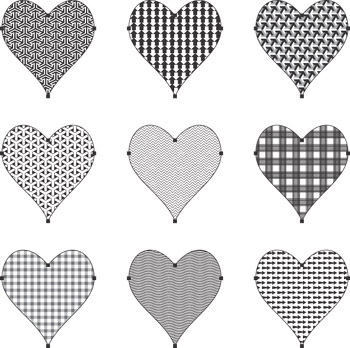
Figure 5-11: The same path with several different pattern fills.
You can apply a pattern to a stroke as well as to a fill. Applying a pattern is exactly like applying a solid color. (See the section, “The Swatches Palette,” earlier in this chapter.) Click the object, click the Fill or Stroke box to put ?the pattern in the proper place, and then click the pattern swatch in the Swatches palette. When you apply a pattern to a stroke, you may need to make the stroke extra thick for the pattern to be visible. (See the section “Making a bold stroke” earlier in this chapter.)
Making patterns
You can easily turn most path-based artwork into a pattern (which hotly ?pursues the steps required to create a pattern out of paths).
To create a pattern out of paths, just follow these steps:
-
Create the artwork that you want to use for a pattern.
For this example, a hammer.
-
Select the artwork by using any of the selection tools.
-
Drag the artwork from the Document window onto the Swatches palette and release the mouse button.
A new swatch appears in the Swatches palette containing a very tiny version of your artwork. Give the new swatch a name to make it easier to identify later.
-
To name the new swatch, double-click it to open the Swatch Options dialog box.
-
In this dialog box, enter the name of the pattern.
-
Click OK.
The custom pattern appears in the Swatches dialog box.
-
Apply your custom pattern to any path.
My pattern inside the oval certainly hammers home the point (sorry about that). Check it out in Figure 5-12.
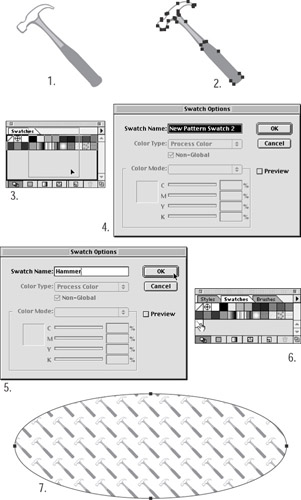
Figure 5-12: Creating a pattern from vector art of a hammer.Tip? Occasionally, you may want to space out your pattern artwork so that the repeated pieces of artwork are farther away from each other. You can easily trick Illustrator into doing this by drawing an invisible rectangle (a rectangle with a fill and stroke of None) over your artwork. The bigger the rectangle, the farther apart the repeated pieces are. Select the artwork and the rectangle before you make your pattern. Illustrator isn’t quite smart enough to realize that the rectangle is invisible. The program sees only the paths that make the rectangle and repeats the artwork based on those edges.


