Selecting with Different Methods
Selecting with Different Methods
Suppose you create a mondo-cool logo. With Illustrator, you can select
-
The entire logo
-
Any group of paths within the logo
-
Any single path within the logo
-
Any portion of any path or paths
When selecting in Illustrator, you may find a couple of oddities. For example, if you select just a point on a path, the point is all that you’ve selected. It shows up solid, but the rest of the points on the path remain unselected and show up as hollow. Then things get weird. Even though only one point is selected, any change that you make to the fill or stroke affects the entire path. (For more information on fills and strokes, see Chapter 5.)
Another odd thing is that you can select a line segment, but Illustrator never shows you that the line segment is selected. If you click a segment, all the points on its path show as unselected (hollow). Nothing appears on-screen to indicate that only the segment is selected — but once again, changing the fill or stroke affects the entire path.
All these possibilities make selecting in Illustrator seem a rather daunting task. As if that weren’t enough, Illustrator gives you five different selection tools, as shown in Figure 6-1. In the following sections, you find out about these tools and what happens when you use them.
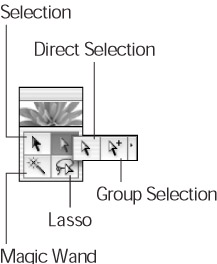
Figure 6-1: Illustrator has more tools for making selections than for ?any other single purpose.
Natural selection
Of the five selection tools in Illustrator — Selection, Direct Selection, Group Selection, Lasso, and Magic Wand — the Selection tool is more-or-less the main selection tool. It simply selects whatever you click. (The names of the other selection tools aren’t quite as accurate in describing their functions, but hey — Selection tool was already taken.) To keep the confusion to a minimum, I call the tools by their Adobe-given names — in part so you know what the cute label refers to when you pause the cursor over a tool and see the name in the ToolTip.
![]() ?You use the Selection tool to select objects or groups of objects. When you click a path, you select the entire path. If the path is part of a group, you select that group as well. A group is two or more separate objects that are joined together by choosing Object?Group. You join objects into a group to get the advantage of selecting all of them at once when you use the Selection tool to select them — which saves all that tedious clicking. (The Object?Group command is just one of the fiendishly clever ways you can organize things in Illustrator — explore ’em all in Chapter 13.)
?You use the Selection tool to select objects or groups of objects. When you click a path, you select the entire path. If the path is part of a group, you select that group as well. A group is two or more separate objects that are joined together by choosing Object?Group. You join objects into a group to get the advantage of selecting all of them at once when you use the Selection tool to select them — which saves all that tedious clicking. (The Object?Group command is just one of the fiendishly clever ways you can organize things in Illustrator — explore ’em all in Chapter 13.)
You can select on-screen items with the Selection tool in two ways:
-
Click the object that you want to select. The object and any other object that’s grouped with it are selected.
-
Click and drag with the Selection tool. As you do, a dotted rectangle called a marquee appears. Anything inside or touching the marquee is selected, enabling you to select more than one object or group at a time, as shown in Figure 6-2.
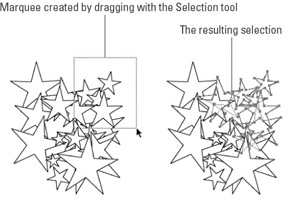
Figure 6-2: The Selection tool selects objects that are within (or touched by) the marquee.Tip? If you click another path when one path is already selected, the path that you click is selected — and the previously selected path is deselected. If you click an empty area, everything is deselected.
Also, if you click inside a path that’s filled with None, you can’t select that path. To select a path that has no fill, click the path itself. Similarly, when you’re in Outline view mode (a way of looking at your paths with all fill and stroke colors hidden, accessed by selecting View?Outline), you click your paths to select them. (See Chapter 5 for more info on fills and strokes.)
Direct selection
![]() ?Use the Direct Selection tool to select individual points, path segments, type objects, and placed images by clicking them one at a time. If you ?drag a marquee with the Direct Selection tool, everything that the marquee encloses gets selected — all placed images, type objects, and portions of paths. Figure 6-3 shows what’s selected when you drag the Direct Selection marquee around several objects. (Note especially the star in the very center of the selected objects at the right of the figure: Some of its points are included in the selection; others aren’t.)
?Use the Direct Selection tool to select individual points, path segments, type objects, and placed images by clicking them one at a time. If you ?drag a marquee with the Direct Selection tool, everything that the marquee encloses gets selected — all placed images, type objects, and portions of paths. Figure 6-3 shows what’s selected when you drag the Direct Selection marquee around several objects. (Note especially the star in the very center of the selected objects at the right of the figure: Some of its points are included in the selection; others aren’t.)
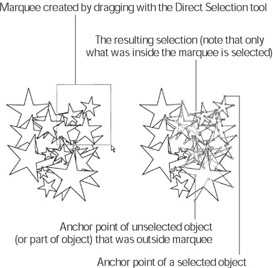
Figure 6-3: ?A selection in progress with the Direct Selection tool.
| Tip? |
With the Direct Selection tool, if you select the interior of a path (if it’s filled) rather than the edge or actual line of the path, you select the entire path rather than just the individual anchor point and path segments. |
Group selection
![]() ?Illustrator provides a special tool (Group Selection) for selecting — surprise! — groups. But the tool selects groups in a way different from the plain old Selection tool (which selects everything that’s grouped to the object that you select). The Group Selection tool selects only one subgroup at a time.
?Illustrator provides a special tool (Group Selection) for selecting — surprise! — groups. But the tool selects groups in a way different from the plain old Selection tool (which selects everything that’s grouped to the object that you select). The Group Selection tool selects only one subgroup at a time.
A subgroup is a group within a group. Remember Statistics 101? (Don’t make that face. What if it froze like that?) Suppose you want to create a graphic of a pencil. You start with the easy part — the lead. Then you go on to create something harder: that conical bit of wood that flares out around the lead and eventually becomes the rest of the pencil. After you get those two pieces positioned together the way you like, you want to keep them that way — so you group them together. (That way, you have to click only one of them with the Selection tool, and they move together.) Next, you create the rest of the pencil separately. After you bring all the pieces together, you want to keep them that way — so you group the lead and the cone with the rest of the pencil. All three objects are now a group. The lead and the cone are a subgroup of that group. You can continue grouping things, having as many subgroups as you want. Illustrator remembers the order in which you group things from the first subgroup to the last big group. When you click multiple times with the Group Selection tool, the first click selects the pencil lead, the second selects both the lead and the wood, and the third click selects the lead, the wood, and the rest of the pencil.
The Group Selection tool selects only one subgroup at a time, such as an object within a group, a single group within multiple groups, or a set of groups within the artwork. To find out how the Group Selection tool works, follow these steps:
-
Select the Group Selection tool from the Toolbox.
-
Click a path that’s part of a group.
The path is selected entirely (all the points are solid; none are hollow), but the other objects in the group are not selected. (This result is an oddity of the tool. It first selects a single object, even though an object isn’t really a group.)
-
Click the same path again.
The next higher level of grouped objects is selected, as well as anything that has already been selected. Each time you click, you select the next higher level of grouping, until finally the all-encompassing group-of-all-groups is selected.
If you continue this crazed clicking, you wind up with groups of groups. For example, if you make several on-screen drawings of pencils, you can group them so that you can move them all at once, draw a pencil box, and then group the pencils with the box. The Group Selection tool lets you select “up” from a single object to the group that the object belongs to, and so on. Figure 6-4 applies this principle to the objects that form a pencil when grouped together.
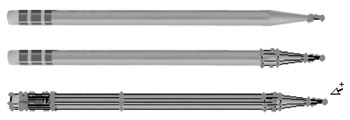
Figure 6-4: The Group Selection tool selects first the path, then the group that the path is in, and then the group that the first group is in.
Selecting more or less of what you have
Suppose you want to select a path on the left side of your document, and you also want to select a placed image on the right side of your document, but lots of paths are in between. You can’t drag a marquee because you get all those unwanted paths in the middle. So you select the path on the left and then click the object on the right — and the path on the left becomes deselected. Drat!
Use the Shift key to select more than one item at a time. If you hold down the Shift key and click a path with the Selection tool, you add that path to whatever is currently selected. If two paths are selected, pressing the Shift key and clicking another path results in all three paths being selected. You can also use the Shift key in conjunction with a selection marquee. The process is called Shift-clicking, and you can also use it to select fewer paths. For example, if you Shift-click one of the three selected paths shown in Figure 6-5, you deselect that path, leaving only two selected paths.

Figure 6-5: On the left are three selected paths. Shift-clicking the middle path leaves only two paths selected, as shown on the right.
| Tip? |
Shift-clicking also works with the Direct Selection tool, except this action adds or subtracts single points instead of complete paths, unless you click the interior of a filled path, in which case you add or subtract complete paths. |
Freeform selections
![]() ?The Lasso tool acts similarly to dragging out a selection marquee, except this marquee can be any shape, not just rectangular. To use the tool, click and drag around the area that you want to select. When you release the mouse button, all points in that area are selected.
?The Lasso tool acts similarly to dragging out a selection marquee, except this marquee can be any shape, not just rectangular. To use the tool, click and drag around the area that you want to select. When you release the mouse button, all points in that area are selected.
| Tip? |
Pressing the Shift key with the Lasso tool allows you to add selections to anything that’s already selected . . . but you probably guessed that already. What you haven’t guessed (unless you’re a bona fide psychic) is that you use the Alt (Option on the Mac) key to subtract from a selection. If you accidentally select something, you don’t need to reselect. Press the Alt (Option on the Mac) key and drag around the points you don’t want selected. |


