Using Adobe Illustrator with Nearly Everything Else
Using Adobe Illustrator with Nearly Everything Else
Illustrator works great with Photoshop and InDesign. But what happens when you want to use Illustrator with other products? To make your Illustrator files compatible with as wide a range of applications as possible, you need to go with the standards. Standard file formats are the formats that the majority of applications can use. Whenever you save something using a standard file format, you’re almost guaranteed that anyone can open it, regardless of platform or application, just as long as he or she is using an industry standard application, such as QuarkXPress.
For Web graphics, the standard formats are GIF and JPEG. As of this writing, PNG, Flash, and SVG don’t have the universal acceptance needed to declare them standards. Keep an eye on them, however; times change fast. For more information on saving files in these formats, see Chapter 16.
For printing hard copy, the standard format for vector-based graphics is EPS; the Illustrator options for this format appear in the EPS Format Options dialog box (Figure 17-7). Virtually all page layout, word-processing, and graphics applications accept EPS files. PageMaker, InDesign, and QuarkXPress all accept EPS files and work well with the file format.
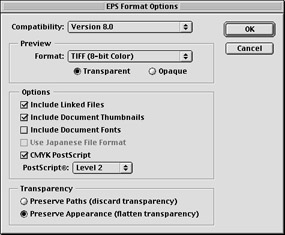
Figure 17-7: Set compatibility, preview, and other options in the EPS Format Options dialog box.
Fortunately, saving EPS files is vastly simpler than saving for the Web. Choose File→Save As, name the file there, and choose Illustrator EPS for the format. Click Save, and the EPS Format Options dialog box opens. (Refer to Figure 17-7.) Typically, running with the defaults (just click OK without changing any settings) works fine. In case you want something different, bone up on the other settings in this dialog box:
-
Compatibility: You can open and edit Illustrator EPS files just as you do any other Illustrator files. Suppose a friend is helping out with a graphics project and doesn’t have the latest version of Illustrator. To give an EPS file to this person for editing, set the Compatibility option to match whatever earlier version your friend is using. Otherwise, leave the file set to Version 11.
Warning? Saving your file to be compatible with an earlier version can alter your graphic. For example, Illustrator 3 doesn’t support gradients. If you used gradients, they get broken up into separate objects for every different color in the gradient. The graphic looks the same, but editing can be a problem. The fact that you can save files in the Illustrator 3 format is a testament to Illustrator’s compatibility with other applications. Illustrator 3 was outdated almost ten years ago! (That’s the computer equivalent of being fluent in ancient Greek.)
-
Preview: Use these options to set how the Preview image displays when linked (Format) and whether the Preview image is transparent or opaque.
-
Format: This option determines how you create the Preview image, which displays when the graphic is linked to a document in another application. Preview doesn’t affect how the image is printed — only how it displays on-screen. Choose the TIFF (8-bit Color) setting for Windows (which most Mac applications can read) or the Macintosh (8-bit Color) setting for Macs (which most Windows applications can read). However, if your PC has problems reading the Mac file, change your preview to the TIFF (8-bit color) setting.
-
Transparent or Opaque: These radio button options exist only when you choose the TIFF (8-bit color) setting for your Preview image. Select one to determine how transparent areas in your graphic are handled. Typically, you want to set this to the Transparent option, but if you’re using the graphic in any Microsoft Office application, you need to select the Opaque option for full-compatibility.
-
-
Include Linked Files: Select this check box to embed any linked files in your image.
-
Include Document Thumbnails: In the Open dialog box of some applications, you get a thumbnail picture of the file, which lets you see the picture before you open the file. Select this check box to create one of those thumbnails.
-
Include Document Fonts: Select this check box to build any fonts that you use in your document into the EPS file. Although selecting this option increases file size, it also ensures that your document displays and prints properly if the fonts don’t exist on the computer used to open the file.
-
CMYK PostScript: If you use any RGB colors in your document, this option enables them to print on a four-color, CMYK PostScript printer. This check box is a good one to select, just in case.
-
PostScript: Choose levels here to set the PostScript level at which the file prints. PostScript is the language that printers use. You want to use the highest level that the printer is capable of. The latest printers support Level 3, but these files don’t print properly on older printers. If the file doesn’t print, try using a lower level. Be aware that lower levels can print more slowly and with less quality than Level 3. (But hey, that’s better than not printing at all!)
Warning? If you save your file with Illustrator CS compatibility, you can’t save it with Level 1 PostScript. Export the file as an Illustrator 8 files (or an earlier version) to change to Level 1.
Tip? Quite frankly, if you have to print at Level 1, you may want to hunt down a better printer. Level 1 printers probably cost you money every time you print to them because they’re slow and don’t print well.
-
Transparency: This setting appears whenever you set the Compatibility option to any version prior to Illustrator 9. (Transparency was introduced in Illustrator 9. See Chapter 10 for more info.) This feature enables you to make an object semitransparent so that an object beneath it shows through as a blend of the two objects. (Think of a semitransparent red circle overlapping a blue circle, making the overlapped portion appear purple.) Because this is an Illustrator 9 feature, earlier versions don’t support it. When you save an Illustrator CS file as Illustrator 8 or earlier, use a Transparency option to determine how to translate transparent objects into something that earlier versions can understand.
Choose from two radio buttons to either discard or flatten transparency: Preserve Paths and Preserve Appearance, respectively. The Preserve Paths option discards transparency altogether, keeping the same shapes that you originally created but making the graphic look very different. For example, a red and blue overlapping circle would look just like that, with no purple area where the two overlap. Select the Preserve Appearance option to create new shapes to maintain the look of the transparency. For instance, new paths are created for the purple area where the two circles overlapped. The Preserve Appearance option is almost always the way to go; it keeps your artwork looking exactly the way you created it.
| Warning? |
If you use the Transparency option when you save an Illustrator document in an older format, you may get some strange and unexpected results. Save in the latest format (Illustrator CS) if you can. |
After you complete your settings, click OK. Your Illustrator file is saved as an EPS file, ready to use just about anywhere!
After you master saving your Illustrator artwork as an EPS, you can create graphics that are compatible with every major print publishing application available. Saving graphics as GIFs or JPEGs (which I cover in Chapter 16) enables you to make artwork that can be displayed in nearly every Web browser in existence. Add the ability to move files back and forth between Illustrator and Photoshop, as well as the many export options, and you can create graphics that work anywhere.


