Cherishing the Multipurpose Pencil Tool
Cherishing the Multipurpose Pencil Tool
If you ever had one of those pocketknives with enough blades to do or fix anything, you can appreciate how much more the Pencil tool does than a mere pencil! Use the amazing Pencil tool to edit existing paths, create new paths, append one path to another, and close existing paths.
![]() ?
?![]() ?But wait, there’s more! You can set the Pencil tool to work in a variety of ways so that it accurately reflects the way you want to draw, by setting its preferences. You can also use variations on the Pencil tool: the Smooth tool and the Eraser tool. The Pencil toolslot contains these two other pencillike tools. Use the Smooth tool (which looks like a striped pencil) to make paths less bumpy, with nary a smear. Use the Eraser tool (an upside-down pencil) to zap away portions of paths, leaving no rubber crumbs to get into your keyboard.
?But wait, there’s more! You can set the Pencil tool to work in a variety of ways so that it accurately reflects the way you want to draw, by setting its preferences. You can also use variations on the Pencil tool: the Smooth tool and the Eraser tool. The Pencil toolslot contains these two other pencillike tools. Use the Smooth tool (which looks like a striped pencil) to make paths less bumpy, with nary a smear. Use the Eraser tool (an upside-down pencil) to zap away portions of paths, leaving no rubber crumbs to get into your keyboard.
Making the Pencil tool work just for you
You can set preferences for the Pencil tool by double-clicking the Pencil tool in the Toolbox. Figure 8-2 shows the Pencil Tool Preferences dialog box. Straight out of the box, the Pencil tool works pretty well. But to be honest, it’s really set up to work reasonably well for everyone and not set up to work as well as it possibly can for you. Use the Pencil tool preferences to make the tool work just for you, and don’t settle for less than the best!
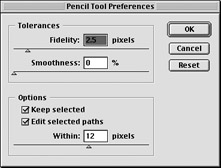
Figure 8-2: With the Pencil Tool Preferences dialog box, you can change the attributes ?of the Pencil tool.
Hi-fi and lo-fi paths
The first slider under Tolerances (at the top of the dialog box; refer to Figure 8-2) is labeled Fidelity. Nope, nothing to do with divorce courts — this kind of fidelity affects how closely the path follows where you drag the Pencil tool. A high setting (toward the left of the dialog box) means that the path matches precisely what you drew with the Pencil, adding as many points and corners as necessary. A low setting (toward the right of the dialog box) means that the path loosely follows what you drew, making a smoother line with fewer points. Paths created with the Fidelity slider all the way to the left appear more natural and bumpy; paths drawn with the slider all the way to the right appear smoother and more computerlike. Compare the images shown in Figure 8-3. This Fidelity setting isn’t just an arbitrary special effect; it’s a way to make the Pencil tool match your personal drawing style.

Figure 8-3: The path on the left was drawn with a Fidelity setting of .5 pixels; the path on the right was drawn with a Fidelity setting of ?20 pixels.
Fidelity is measured in pixels. A pixel can mean many things as a unit of measurement. In this case, a pixel refers to a distance on your screen. (For more information, see the sidebar “Just how big IS a pixel?”)
Drawing with the mouse is about as easy as drawing with a brick; the lines you make tend to be pretty shaky. The Fidelity slider determines how shaky your hand can be and still produce a smooth line. As you use the Pencil tool, you create a breadcrumb trail (a dotted line). After you release the mouse button, your computer pauses for a split second to create an imaginary line that’s the average of all the movement you just made with the mouse. Then Illustrator compares that imaginary line with your breadcrumb trail and creates the actual path based on the Fidelity slider’s setting.
Suppose that your Fidelity setting is 20 pixels — the lowest Fidelity setting possible. As you draw your naturally shaky line, you move away from the imaginary average line. With a setting of 20 pixels, Illustrator assumes that everything less than 20 pixels away from that imaginary line is unintentional shaking, induced by the unwieldy nature of the mouse (or by too much ?caffeine), so Illustrator just ignores that stuff when it creates the path. Every-thing more than 20 pixels away is considered intentional, which prompts Illustrator to put in a curve or a corner point.
All this is just an extended way of saying that if you’re at one with yourself and the Universe and are a Zen master of mouse movement, you want to keep your Fidelity settings high. That way, you only move the mouse to exactly where you want the path, and you don’t have Illustrator second-guessing what you really intended. However, if you have really shaky hands (as most of us do when we get too much caffeine and not enough sleep), you probably want to use a low Fidelity setting. More than likely, you fall somewhere between these two extremes. So just double-click the Pencil tool and set the Fidelity slider to match your style!
Now, that is smooth!
The second slider (refer to Figure 8-2) is a little harder for most people to figure out. The slider reads Smoothness — but didn’t the first slider smooth out the image? Drawing with the mouse can be pretty shaky, so this setting helps compensate for the shakiness in a slightly different way from the Fidelity setting. The Fidelity setting helps Illustrator determine whether you drew the path because you meant to — or if it was just because of the shaky mouse.
The Smoothness setting helps Illustrator figure out what kind of corner you meant to create when you deliberately changed the direction of the path. When you change the direction of a path, you can do it with a sharp corner point or with a smooth, curving point. When Illustrator converts your breadcrumb trail into a path, it must determine which of these points you truly intended to use. A Smoothness setting of 0% makes the Pencil tool use a corner point almost everywhere that the path changes direction. A Smoothness setting of 100% makes the Pencil tool use a smooth point in all but the most extreme path direction changes.
Again, the setting that works best for you is a matter of your personal style. If your lines are as shaky as a balloon vendor at a porcupine convention, set your Smoothness setting to 100%. If your hands are as steady as a gunslinger in a Western movie, leave it set to 0%. Otherwise, experiment until you find the right setting for you. Figure 8-4 shows the same image created with different Smooth- ness settings. Note how the settings change the way the drawings look.
| Technical Stuff? |
At first glance, the differences between the drawings on the right in Figures 8-3 (low Fidelity) and 8-4 (high Smoothness) appear minimal. However, looks can be deceiving. The Smoothness and Fidelity settings are actually two distinct approaches to making a path: A low Fidelity setting creates a simplified curve by following the path you draw more loosely and using fewer points; a high Smoothness setting creates a smoother curve by using different types of points (smooth points as opposed to corner points) to create the path. Which is better? It really depends on your drawing style — and some experimenting! |

Figure 8-4: At left, a Smoothness setting of 0%; at right, a Smooth-ness setting of 100%.
Tweaking the Pencil tool: It’s your option
Under Options in the Pencil Tool Preferences dialog box, you find two options: Keep Selected and Edit Selected Paths. These settings determine what happens to the path after you draw it and how the Pencil tool interacts with that path (or with other selected paths).
-
With Keep Selected checked: The path you just created with the Pencil tool stays selected after you finish drawing and release the mouse button.
-
With Keep Selected unchecked: The path you just created doesn’t stay selected. (But you knew that.)
The Keep Selected option also determines how the Pencil tool affects selected paths, as follows:
-
Edit Selected Paths: When you use the Pencil tool near any selected path (with the Keep Selected option checked), the path you just drew with the Pencil tool replaces the previous path. You can even adjust how close you need to be to that path to edit it; just tweak the Within setting, located just beneath the Edit Selected Paths option.
Remember? When the Edit Selected Paths option is not checked, the Pencil tool works the same regardless of whether Keep Selected is checked or unchecked. When the Edit Selected Paths option is checked, it changes the way the Pencil tool works. Instead of moving on to create a new path when you draw near a selected path, you linger over the old one to modify it.
-
With Keep Selected checked: You can start drawing a path, stop, and then continue where you left off. If you decide to replace the path, you can place the Pencil tool near the path you just drew and start drawing a new one. (Poof. The old one disappears.) But beware: You have forbidden the Pencil tool to draw multiple paths that are close together.
-
With Keep Selected and Edit Selected Paths checked: Every stroke you make that’s close to another selected stroke replaces the old stroke with the new stroke.
-
With Keep Selected unchecked: The Pencil tool can change only the paths you tell it to change (by first using a selection tool). By removing the check mark from Keep Selected, you enable the Pencil to draw hair or grass (for instance) with utter abandon. With Keep Selected unchecked you can also edit hair or grass, but don’t forget to select the part you want to edit (by first using a selection tool).
Changing the path not penciled
A really amazing attribute of the Pencil tool is that you can use it to edit any path, and not just the paths created with it. For example, you can edit a circle, star, or path drawn with the Pen tool. You can replace any portion of any path with the Pencil tool, provided that the path is selected and the Edit Selected Path option is checked in the Pencil Tool Preferences dialog box. (See the section, “Making the Pencil tool work just for you,” earlier in this chapter.) Just make sure that the path is selected — and then click and drag near the path to reshape it. The following steps walk you through the process of editing an existing path:
-
Using any selection tool, select the path you want to modify.
The path need not have been created with the Pencil tool.
-
Select the Pencil tool.
-
Click near the part of the path you want to modify.
Tip? When the little X at the bottom right of the Pencil tool disappears, you know that you’re close enough to click.
-
Click and drag a new shape for the part of the path.
You can create any shape you want, but it must start and end near the existing path; otherwise, the new path won’t reconnect with the old path.
-
Release the mouse button.
The path reshapes itself into the new path you just drew.
Working with the all-natural “Smoothie” tool
Use the Illustrator Smooth tool to make your paths, well, smoother. (Not that you need me to tell you that, huh?) The Smooth tool lets you change the way a path looks after it’s drawn, in the same way that the Pencil tool lets you change the way a path looks as it’s being drawn.
Drag the Smooth tool over any selected path to smooth it. You aren’t limited to smoothing paths drawn with the Pencil tool; you can smooth any path in Illustrator. Your results, however, depend on the path that you’re smoothing (if you try smoothing a path that’s already smooth, you aren’t going to see much difference) and on the Smooth tool preferences.
You access the Smooth tool preferences by double-clicking the Smooth tool. The only two settings are Fidelity and Smoothness. These settings function identically to the settings in the Pencil Tool Preferences dialog box. (See the section, “Making the Pencil tool work just for you,” earlier in this chapter.) The only difference is that you apply them to lines that have already been drawn. Just sweep over them with the Smooth tool, and the result is as if you drew those paths by using different Pencil tool preferences settings.
| Technical Stuff? |
That question has no easy answer, my friend. In the olden days, a pixel was 1/72 of an inch because computer screens used a fixed grid of 72 pixels x 72 pixels for every inch of screen. Nowadays, we use multisync monitors that let us change the number of pixels on the screen. How big is a pixel? Take the current resolution of your monitor, divide by its size, and then. . . . Better yet, forget all that and just pay attention to how the Pencil tool works with different Fidelity settings. Choose the one that works best for you, and don’t worry about the numbers! |
As you may expect, using the Smooth tool is pretty smooth. Here’s the drill (or is it a sander?), as shown in Figure 8-5:
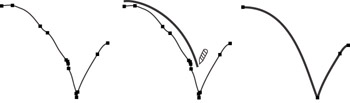
Figure 8-5: The Smooth tool in action.
-
Using any selection tool, select the path that you want to smooth.
-
Drag the Smooth tool on or near the path that you want to smooth.
Et voil?! The path is smooth.
Tip? The Eraser tool is so basic that it doesn’t even warrant its own section. To use the tool, simply click and drag the tool over the portion of the path you want to remove. It may take a couple of swipes to eliminate what you want, so be patient. The Eraser tool also works with any path — not just those created with the Pencil tool. Also, with the Eraser tool, you don’t have to set preferences.


