Messing Around with Meshes
Messing Around with Meshes
Illustrator is really great at filling areas with solid colors, continuous patterns, or gradients. Illustrator gets testy, though, when you try to create a continuous tone — such as the many skin tones that define a human face or the way colors fade into one another in a piece of folded fabric. However, the Illustrator Mesh tool is like a crotchety magician: If you talk nicely to it, it can help you bend the rules a bit. By using the Mesh tool, you can create amazing shading and tonal effects. Gradient Meshes overcome the limitations of gradients, the other Illustrator feature that enables you to blend colors. (For more on Gradients, see Chapter 5.) Simple gradients fill areas with linear and radial color blends. Period. Gradient Meshes have no such limitation. You can use them to assign colors to the specific points and paths that make up an object. Where the mesh lines cross, you can assign a different color to every line and every point. These colors blend with the colors of the other points. Take a look at Figure 10-1 for a sample of what you can do with a Gradient Mesh.
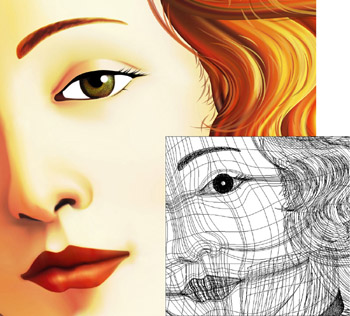
Figure 10-1: The artwork that made up the Illustrator Venus (left) was colored entirely by using the Mesh tool; the right side shows the paths and meshes that created tit.
Figure 10-1 may seem complex, but the difficulty lies much more in the artistry than in the technical aspects. The tool seems daunting at first, but you can tackle it if you begin by adding a highlight to a simple shape, as shown in Figure 10-2.
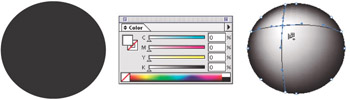
Figure 10-2: Use the Mesh tool to create a highlight in a path.
Adding a Gradient Mesh
To add a Gradient Mesh to a simple shape, just follow these steps:
-
Create a shape by clicking and dragging with any of the basic object tools (see Chapter 4 for more on basic objects) and fill the shape with a dark color. You can use any shape.
For this example, I create a circle and color it black.
-
Deselect the path. (You can deselect everything by choosing Select→Deselect.)
Deselecting the path enables you to pick a different color for the Mesh tool. If you choose a different color with the path selected, you change the color of the object.
-
Set the fill color to any light color.
Choose Window→Color to open the Color palette. Click the Fill box and choose a light color to use as a highlight. (Gradient Meshes use only fill colors and ignore stroke colors.)
-
 ?Choose the Mesh tool from the Toolbox and click the object to which you want to add a highlight.
As if by magic, two intersecting paths appear on the object, crossing at the spot where you clicked. This intersection is called the mesh point. These paths are the Gradient Mesh. The highlight appears where the paths intersect.
-
Click other areas within the path to add more highlights — as many as you want.
The paths that make up the Gradient Mesh can be edited the same as any other path. Click the mesh points in the path with the Direct Selection tool and move them to create different effects. Mesh points also have direction points, just like curved paths. (See Chapter 6 for more on paths.) These direction points can be moved to change the shape of the gradient mesh. You can also change the color of any point or path segment by clicking it and choosing a different color in the Color or Swatches palettes. Figure 10-3 shows different effects made by mashing the gradient mesh around.
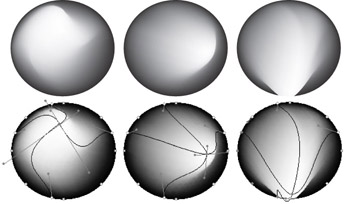
Figure 10-3: These objects use the same Gradient Mesh, but the mesh points have been moved by using the Direct Selection tool.
That’s really all there is to this tool! I moved those points by using the Direct Selection tool and then tweaked the colors by selecting a point or a path and choosing a new color in the Color or Swatches palettes.
You can automate the process by clicking the object you want and choosing Object→Create Gradient Mesh. This method adds a Gradient Mesh to the object automatically. Illustrator does its best to estimate where the mesh paths should go by looking at the shape of the object and figuring out where the mesh paths should go to shade the object so that it looks three dimensional. You can even have the Gradient Mesh create the shading for you.
After you select the Gradient Mesh command, the Create Gradient Mesh dialog box opens (shown in Figure 10-4). Set your options, click OK, and the command does the mesh-y work for you. Here’s the all-star lineup of options:
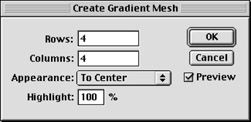
Figure 10-4: Set Gradient Mesh here.
-
Rows and Columns: These options set the number of mesh paths that the command creates. The higher the number, the more control you have over the colors in your object (but the more complicated the graphic is to work with).
-
Appearance: Select one of three Appearance options: To Center, To Edge, and Flat. The To Center option lightens colors to place a highlight in the center of the object, creating the appearance that the graphic is being pulled outward. The To Edge option places a highlight at the edges of the object, creating the appearance that the graphic is being pulled inward. The Flat option doesn’t change any colors but still creates the mesh, so you can change colors on your own. See Figure 10-5 for the differences between options.

Figure 10-5: The same Gradient Mesh, with Appearance settings of Flat, To Center, and To Edge. -
Highlight: When you select an Appearance option of To Edge or To Center, the Highlight setting is the maximum amount that the colors lighten to create the 3D effect.
Figure 10-5 shows an object with a highlight applied to it using the Illustrator automatic highlighting process.
Creating soft bevels with Gradient Mesh
You can use the Mesh tool to create a smooth beveled object. Follow these steps for a very basic, yet quite handy, method:
-
Create a square by choosing the Rectangle tool and clicking the Artboard and dragging. Fill the square with a nice strong solid color, such as grass green or fire engine red.
Other shapes work with this, but a square is the simplest.
-
Choose the Mesh tool, click just inside the upper-left corner, and again just inside the lower-right corner.
This creates a total of nine mesh patches on the square, as shown in Figure 10-6.
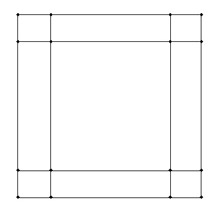
Figure 10-6: A square after two clicks with the Mesh tool. -
Choose the Direct Selection tool, drag a marquee around the four points along the top edge of the square. Then press the Shift key and drag a marquee around the unselected three points on the left edge of the square.
You have seven points selected now, around the top-left corner, all on the outside edge of the square.
-
Choose Window→Color.
The Color palette appears.
-
Switch to CMYK mode (if you’re not there already). Holding down the Shift key, drag the right-most triangle to the left about halfway.
You can change to CMYK mode (which shows CMYK sliders) in the Color palette by choosing it from the Color palette pop-up menu. The Shift key “tints” whatever color you selected in Step 1 when you drag a slider in the Color palette.
-
Choose the Direct Selection tool, drag a marquee around the three rightmost points along the bottom edge of the square. Then press the Shift key, and drag a marquee around the middle two points on the right edge of the square.
With the lower-right points selected, you’re now ready to darken this corner of the square.
-
Drag the K slider on the Color palette to the right until you’ve darkened the lower-right edge to your liking.
The result looks something like Figure 10-7.

Figure 10-7: The resulting beveled square.


