Performing with the Pen, the Path, and the Anchor Points
Performing with the Pen, the Path, and the Anchor Points
No, this section isn’t a retro look at obscure rock bands; it’s about telling Illustrator where to go — by creating the paths Illustrator relies on to create shapes and objects. Paths are instructions that tell your computer how to arrange straight- and curved-line segments on-screen. Each path is made up of anchor points (dots that appear on-screen). Between every two anchor points is the portion of the path called a line segment.
The Pen tool is probably as close as you ever get to calling up paths with the PostScript language — unless you’re an Adobe programming geek (in which case, the thought that you might need this book is frightening). For sanity’s sake, I assume otherwise and get right to the point. Make that points. Understanding the anchor points that make up paths is critical to using the Pen tool. Anchor points have the following traits:
-
At least two anchor points are required for every path. (“One point maketh not a path,” sayeth the sage.)
-
Any number of anchor points can appear on a path — dozens, even hundreds, as long as that number is not one or zero. (“Zero points make not a path, either, O wiseacre,” grouseth the sage.)
-
If an anchor point has a direction point (a black box you can grab and move with the mouse), the line segment extending from the anchor point is curved.
-
If an anchor point has no direction point, the line segment extending from the anchor point is straight.
-
You can use the Pen tool to create four types of anchor points (smooth, straight-corner, curved-corner, and combination-corner) to tell the computer how to get from one line segment to another. Care for a closer look? Coming right up.
Smooth anchor points
Smooth anchor points create a smoothly curved transition from one line segment to another. When you want a line that reminds you of the letter S ?(or some S-words, such as sinuous and snaky), use smooth anchor points. Figure 7-1 shows two direction points creating a smooth anchor point on a path. The curve bends to follow the two direction points.
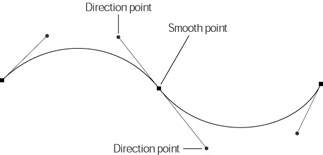
Figure 7-1: Smooth anchor points keep this path curving smoothly.
If you want to create circles or free-form shapes — such as puddles or shapes like those nonslip flower stickers for your bathtub floor — smooth anchor points are the way to go. Use the Pen tool to create a smooth anchor point by clicking and dragging with the mouse. As you drag, direction points, connected to the anchor point by direction lines, appear on either side of the anchor point (one at the tip of the Pen, the other on the opposite side of the anchor point). Think of those wacky direction points as magnets pulling the line segment toward them. The line segment bends to follow the direction point — just that easy, just that simple. (So far.)
Straight-corner anchor points
Straight-corner anchor points function as their name suggests and have both of the following characteristics:
-
One or two straight lines sticking out of them. In Figure 7-2, for example, the anchor point is where you find the hub if the two line segments were the hands of a clock.
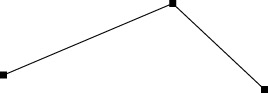
Figure 7-2: Use straight-corner anchor points when you need straight paths. -
No direction points sticking out of them. (Remember, direction points make curves.)
Think of these anchor points as the corner of an angle that you draw with a pencil and a protractor — except that you draw them on your computer (nobody bumps your arm so your nice sharp lead breaks off and . . . uh, never mind). To create straight-corner anchor points with the Pen tool, click and release; do not drag. Promptly release the mouse button the second you hear it click.
Use straight-corner anchor points to draw objects with hard angles — rectangles, triangles (note the whole “angle” theme here) — anything that consists entirely of straight lines and no curves. Snakes, clouds, and country roads are entirely out of the question.
Curved-corner anchor points
Think of the curved-corner anchor point (also referred to as a cusp point) as the m-curve anchor point, or the point where the two bumps on a lowercase m are joined. If you look at this nice lowercase m through a magnifying glass, you can see a corner between the two bumps — with curves coming out of it. The curved-corner anchor point may also remind you of a double fishhook turned upside down. You need these points to create not just lowercase m’s, but also hearts (the Valentine variety, as shown in Figure 7-3).

Figure 7-3: This heart, though not anatomically correct, shows two curved corner anchor points.
Consider the possibilities — clovers, moons (old-fashioned crescents-with-little-noses), and other shapes you may see in a cereal bowl (except for blue diamonds — those you draw with straight-corner anchor points). But beware that curved-corner anchor points are a little weird. To create one, you have to modify an existing anchor point by following these steps:
-
Create a smooth anchor point while you’re creating a path.
This works best after you draw at least one line segment.
-
Press the Alt (Option on a Mac) key and then click and drag the smooth anchor point.
A direction point appears — totally independent of the anchor point — on the opposite side of the point. This new handle controls where the double-fishhook corner goes. You can drag the new handle nearer to the first direction point (the one for the original smooth anchor point) — or anywhere else — without affecting that first direction point.
| Tip? |
You can also change a smooth anchor point into a curved-corner anchor point by pressing the Alt (Option on a Mac) key as you drag the smooth anchor point. |
Combination-corner anchor points
If you want to use the Pen tool to draw rounded-corner rectangles — such as classic TV screens, archways, and cylinders — you need combination-corner anchor points. The combination that identifies this type of anchor point is a blending of two other types: smooth and straight-corner anchor points. You can identify a combination-corner anchor point by what you find sticking out of it: two line segments and only one direction point. This handle curves one of the line segments and leaves the other segment straight. Keep in mind that the handle is controlling the curved segment, not the straight segment, and these points are much easier to use.
As with curved-corner anchor points (mutant versions of their straight-corner cousins), you can’t just say, “I want one of those” and poof! have one appear on-screen. To create the exotic combination-corner anchor point, you must modify an existing smooth or straight-corner anchor point. Which type you modify depends on where you want the curve to go:
-
If you want the curve before the anchor point (the existing line segment is curved), you modify a smooth anchor point.
-
If you want the curve after the anchor point (the existing line segment is straight), you modify a straight-corner anchor point.
Figure 7-4 shows how to create a combination-corner anchor point in either situation.
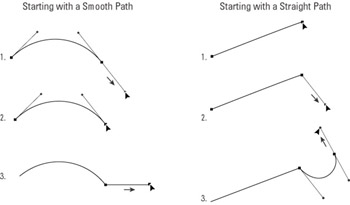
Figure 7-4: Two ways to create combination-corner anchor points: starting smooth(left) or straight(right).
Starting with a smooth path
To create a combination-corner anchor point from a smooth one (so that the curve precedes the anchor point), follow these steps:
-
Click and drag the Pen tool; then, at another location, click and drag again to create a curved line.
To get an image that resembles Figure 7-4, start in the upper-left quarter of a blank Illustrator document, click and drag up and to the right for the first drag in Step 1. Start your second drag at a place roughly parallel to your original starting point and about an inch to the right, dragging down and to the right.
Remember? To see what you’re doing, you have to draw at least one line segment before you change the anchor point. That’s the rule!
When you complete the two drags in Step 1, the most recent line segment ends in a smooth anchor point.
-
Click the smooth anchor point that appeared after you clicked and dragged the second time in Step 1.
The direction point (handle) that extended out from the anchor point disappears.
-
Move the mouse pointer to a place about an inch to the right of the most recent anchor point and click.
A straight path segment (straight because it’s free from the influence of the direction point) appears. After you click, the two direction points (handles) disappear from the curved line that you drew in Step 1. The anchor point from which you drew your new straight segment is a combination-corner anchor point.
Starting with a straight path
To create a combination-corner anchor point from a straight-corner anchor point (so the curve comes after the anchor point), follow these steps:
-
Using the Pen tool, click once and (without dragging) click again in a nearby location in the document.
To get an image that resembles the one in Figure 7-4, start in the upper-right quarter of a blank Illustrator document, click once, and then — after moving the mouse pointer to the right and slightly higher — click again.
A straight path segment appears. You need this line segment so that you can see the difference in the path as you change the straight-corner anchor point to a combination-corner anchor point.
-
Click the straight-corner anchor point you just created; hold down the mouse button and drag.
To get an image that resembles the one in Figure 7-4, drag down and slightly to the right.
A new, single direction point (handle) extends from the anchor point.
-
Click in another location and drag away from the anchor point.
To get an image that resembles the one in Figure 7-4, click a spot in line with the previous anchor point, and then drag up and slightly to the left.
A curved path segment appears. The anchor point between the straight and curved line segments is now a combination-corner anchor point.


