Curvy with the Arc Tool
Curvy with the Arc Tool
In Chapter 7, I tell you how to create a curve with the Pen tool — a sometimes painful two-step click-and-drag process. With the Arc tool, however, all you do is just click and drag. The longer you drag, the larger the arc. The angle you drag affects the angle of the arc. That’s it. If only everything in life were so simple. To edit your arc, treat it is as you would any other curve. Use the Direct Selection tool to select and move either of the anchor points or direction points on the curve. See Chapter 6 for the complete editing lowdown.
Getting the arc you want
Maybe you’re the finicky type and not completely satisfied with the arc created by using the default settings. Fortunately, the options in the Arc Segment Tool Options dialog box are numerous. Double-click the Arc tool to bring up the dialog box shown in Figure 8-7. The best thing about this dialog box is that it gives you a preview of the settings as you adjust them.
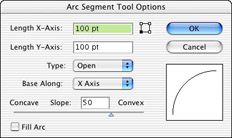
Figure 8-7: Design your arc here.
The preview thumbnail gives a nice visual representation of what happens to the arc as you change the lengths of the X (horizontal) and Y (vertical) axes. You have the choice of the type of arc — open or closed (think a slice of pizza). You can also choose where the base of your arc is anchored — either the X or Y axis. The slope slider allows you to adjust how concave (pushed in) or convex (pushed out) your curve appears. Figure 8-8 shows examples of both concave and convex closed arcs. Deselect the Fill Arc option to create arcs with no fill, regardless of whether a fill is selected or not. The small square to the left of the OK button is a proxy box, which allows you to specify the point of origin for the arc.
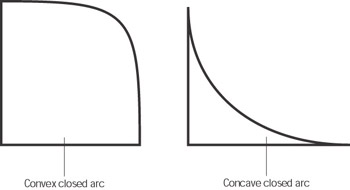
Figure 8-8: Two types of closed arcs.
| Tip? |
When you select the Arc tool and click your Artboard, the Arc Segment Tool Options dialog box appears (just like it did when you double-clicked the Arc tool). When you click OK, an arc is drawn with the settings established in the dialog box . . . no dragging required! |
Spiraling out of control
Spirals are notoriously hard to draw (without the Spiral tool). Using the Pen tool, you’d have to set up a complex grid and align points and direction points until the cows came home, had a good night’s rest, went to work for the day, and then came home yet again. It’s really, really hard. But the Spiral tool allows you to quickly create all sorts of snazzy-looking spirals from a loose-looking galaxy or whirlpool to the super-tight grooves on a 45 rpm record (ask your grandparents, kids). Figure 8-9 shows some spirally artwork created primarily with the Spiral tool.
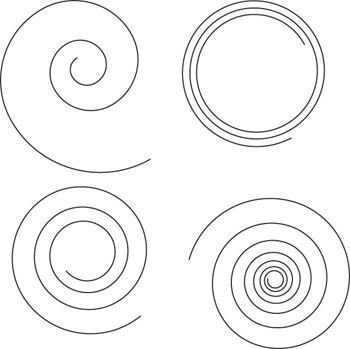
Figure 8-9: Spirals created ?with the Spiral tool.
To customize a spiral, you hold down one of the following keys as you drag:
-
Up/Down Arrow: Adds or deletes the winds of the spiral as you’re ?drawing it.
-
Ctrl (z on a Mac): Winds or unwinds the spiral (the outside moves, but the center stays where it is, making the spiral tighter or looser), which changes the number of winds.
-
Spacebar: Allows you to move the spiral around with the mouse as you draw it.
-
Tilde (~): Creates multiple spirals as you draw.
Click the Artboard with the Spiral tool selected (instead of clicking and dragging) to open the Spiral dialog box, as shown in Figure 8-10. In the Spiral dialog box, the Radius option is the distance from the center of the spiral to its outermost point. The Decay option determines how much larger or smaller each coil of the spiral is from the previous coil. Values close to 100% result in a tight spiral, and 100% results in a perfect circle. The Segments option determines how many coils make up the spiral. Each wind of the spiral is made of 4 segments; if you want 5 coils in the spiral, type 20 in the Segments field.

Figure 8-10: Use options in the Spiral dialog box to set the spiral's tightness.


