The Appearance Palette
The Appearance Palette
The Appearance palette, shown in Figure 11-4, is where you go to see why your artwork looks the way it does. (Although, the palette can’t explain why anybody would put neon-pink paisleys all over the place.) You can view the Appearance palette by choosing Window→Appearance. When the Appearance palette wafts into view, it bears a vast treasure of option information. In its basic state, the palette displays Fill, Stroke, and Transparency settings. In its more complex state, the palette displays additional fills and strokes, and effects applied to those fills and strokes (as well as to the object itself).
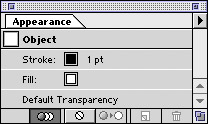
Figure 11-4: The Appearance palette.
Not to worry: This welter of information isn’t nearly as confusing as your income tax form. Here’s why: All along, in the course of creating your artwork, you’ve been putting all these information tidbits into the Appearance palette. You tell Illustrator to add info to this palette every time you set an option that changes the way your object looks (such as stroke, fill, and transparency).
| Technical Stuff? |
The Appearance palette faithfully records all this information all the time, even if you don’t look at it. (Good thing it doesn’t record everything appearance related, like that big-bangs shag hairdo you were so proud of in 1976.) |
Reading the Appearance palette
The Appearance palette, shown in Figure 11-5, displays accumulated information about a particular object. What does it all mean? Is it important? Why oh why did Natalie ever leave the Maniacs? I’ll answer the first questions, and leave the last one for a Behind the Music special.

Figure 11-5: The Appearance palette displays an array of information about the object, such as the stroke and fill data shown here.
To make sense of all the Appearance palette’s information, peruse the following list of its features:
-
Target: This feature identifies the type of graphic that the information in the Appearance palette refers to. Typically this feature reads Object or Path, meaning the information in the palette refers to (or will be applied to) an appearance that is or will be applied to a single selected object. When you select a group or a layer, the target reads Group or Layer. If text is selected, the target reads Type. The target section is always at the top. A tiny thumbnail image emulates the appearance of the graphic.
-
Global effects: These effects apply equally to, and affect all aspects of, the entire object. Whenever you apply Effects or Transparency settings (as I described earlier in this chapter) without using the Appearance palette, you apply the effects as global effects. Although they’re usually the first attribute you apply, they always appear near the bottom of the list in the Appearance palette.
Tip? Another way to differentiate global effects from other effects is the way they line up with other items listed in the palette. Global effects appear in alignment with the Stroke and the Fill listings. Effects applied to a specific stroke are indented beneath the listing for that specific stroke. In Figure 11-5, Radial Blur is the global effect.
-
Strokes: Objects can have more than one stroke only when you add them through the Appearance palette (see the section, “Adding fills and strokes,” later in this chapter). Therefore, the first one (listed at the top) is typically the one also shown in the Toolbox. The target may have additional strokes listed here as well. Strokes can have effects applied to them specifically. In Figure 11-5, you see a single stroke with a weight of 6 points. See Chapter 5 for more information on strokes.
-
Stroke and Fill effects: Effects can be applied directly to strokes and fills, instead of to the entire object, group, or layer. In this figure, the stroke has both a Crystallize and a Mezzotint effect applied to it.
-
Stroke and Fill transparency: Each stroke and fill can have various Transparency settings applied to it. Here, the first fill has an Opacity setting of 55%.
-
Fill: Each object (group or layer) can have multiple fills (as it can have multiple strokes). Each fill can also have any number of effects applied to it. This object has both a solid color fill and a pattern fill applied to it.
-
Transparency: This feature is the transparency appearance for the entire object, group, or layer. In Figure 11-5, the transparency is set to Object Opacity: 64%, meaning the entire object has been faded to 64%. If no special Transparency settings were applied, this would simply read Default Transparency. See Chapter 10 for more information on the Transparency palette.
The top-to-bottom order of the fills and strokes in the Appearance palette reflect a front-to-back order in the graphic. Strokes and fills on top in the palette appear in front of the strokes and fills that are lower in the palette. Effects run from top to bottom in terms of which effect is applied to the graphic first.
Most of the items in the Appearance palette can be moved up and down through the list into different positions, and this change is reflected in the actual graphic. For instance, you can move the Feather effect applied to a stroke so that it’s applied to a fill. You can also move the Feather effect so that it applies to the entire object. To move something in the Appearance palette, drag it up and down through the palette, just as you move things in the Layers palette.
If a fill or stroke has an effect applied to it, the little disclosure triangle automatically appears on the left and points down, listing the attributes of that fill or stroke. When you have a whole lot of different effects applied to a fill or stroke, the palette can get cumbersome. Clicking the disclosure triangle hides the list of effects. You can access the list at any time by clicking the disclosure triangle again.
Adding fills and strokes
Chapter 5 explores fills and strokes in greater detail (and if you want to nip back there for more information, I can wait). When you apply a different stroke or fill to an object without using the Appearance palette, the fill or stroke replaces any existing fill or stroke. You don’t have to settle for just one of each, though! By using the Appearance palette, as shown in Figure 11-6, you can add as many fills and strokes as you want. This feature offers some interesting possibilities. For example, you can give a path three different colored strokes of different sizes, to create a striped path. Or you can apply a pattern fill over a solid-color fill.
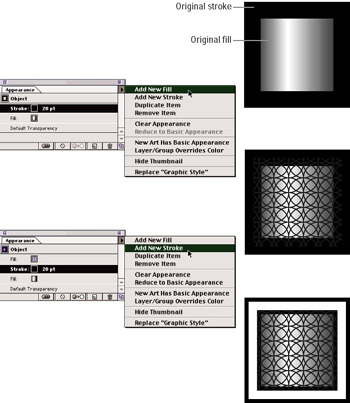
Figure 11-6: Adding fills and strokes to an object.
Just follow these steps to apply an additional fill and stroke to an object:
-
Create an object with a fill color and a thick stroke.
In this example, I made a rectangle by clicking and dragging with the Rectangle tool. (See Chapter 4 for more information on the rectangle tool.) I filled it with a gradient by clicking the Fill box in the Toolbox, and then by clicking a gradient swatch in the Swatches palette. I next added a 20-point black stroke to the square by clicking the Stroke box in the Toolbox, and then by clicking a black swatch in the Swatches palette, and finally by choosing 20 points from the Stroke palette. For more info on fills and strokes, see Chapter 5.
-
Choose the Add New Fill command from the Appearance palette pop-up menu.
Tip? Illustrator adds a fill, but you don’t see any difference because the new fill is identical to the fill already there. The new fill is highlighted in the Appearance palette, however, and as soon as you select a new fill color from the Color palette or the Swatches palette, you see the new fill over the old one.
-
With the new fill still highlighted in the Appearance palette, change the fill to a pattern fill from the Swatches palette.
For this example, change the fill to the pattern called “Jaguar” by clicking it in the Swatches palette.
If you don’t know which pattern is the Jaguar pattern, pause your cursor for a moment above each swatch. Its name pops up.
-
Choose the Add New Stroke command from the Appearance palette pop-up menu.
A stroke appears on top of the original stroke. As with the added fill color, the new stroke uses the same settings as the previous stroke, so you don’t see an immediate difference.
-
In the Color palette, change the color of the stroke to white and change its stroke width to 10 points.
After you add strokes and fills, you can move them around. Simply click them in the Appearance palette and drag up or down. As you drag, a black line appears in the palette, indicating where that fill or stroke will go after you release it.
| Tip? |
Multiple fills and strokes work great with the Transparency palette. Each fill and stroke can have its own Transparency settings. This approach is a great way to blend fills and strokes together to achieve unique appearances. For example, if you apply a solid color fill over a pattern fill and then change the blend mode of the color fill to hue, you replace the color(s) in the pattern with the color of the solid color but still maintain all the detail of the pattern. See Chapter 10 for more information on the Transparency palette and blend modes. |
Changing the appearance of groups and layers
You can change the appearance of groups or layers as well as objects. Groups are collections of separate objects that have been grouped together (using the Object→Group command) so that they act like a single object when you select them with the Selection tool (see Chapter 3 for more information on the Group command). Similar to grouping, layers are a method of organizing multiple elements of your graphic into separate areas. Chapter 13 discusses layers in depth.
To change the appearance, you need to target those groups or layers first. Targeting is a method of selecting a group or layer so that any changes made to the appearance affect all the objects in the group or layer. Changing the appearance of groups or layers creates a global appearance for all objects in the group or on the layer. Objects still maintain their individual appearance settings, but any group or layer changes are added to all the objects.
To change the appearance of a group by adding an effect, just follow these steps:
-
Select a group by clicking it with the regular Selection tool.
-
Add an effect to the group.
For this example, add a Gaussian Blur by choosing Effect→Blur→ Gaussian Blur. In the Gaussian Blur dialog box that opens when you choose the effect, set the Radius to 5 and click OK.
All the objects in the group become blurred. Just like that. Wow.
On the other hand, targeting a layer to apply an effect is a little more unusual, as shown in Figure 11-7.
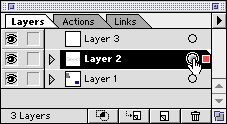
Figure 11-7: Targeting a layer to apply an effect.
Layers are a way to organize and arrange objects in your document. (Chapter 13 talks about layers in depth.) Every time you add an object to a layer, the appearance of that object changes to match the settings of the layer. When that object goes to another layer, with different Layer Appearance settings, the object’s appearance changes again.
To target and apply an effect to a layer, just follow these steps:
-
Choose Window→Layers.
The Layers palette opens (refer to Figure 11-7).
-
In the Layers palette, click the Target Layer Appearance button beside the layer that has the appearance you want to change.
The Target Layer Appearance button is the circle to the right of the name of the layer in the Layers palette. Clicking this circle targets the layer, so your changes affect that layer.
-
Add an effect to the layer.
For this example, choose Effect→Stylize→Feather. The Feather dialog box opens. Set the Feather Radius to 5 and click OK. All the objects in the layer are feathered. (Lay in a large supply of birdseed. Just kidding.)
Applying effects to strokes and fills
Normally, whenever you apply an effect, it’s applied to the entire object. However, to keep matters interesting (or confusing), you can also apply any effect to either a stroke or a fill. Whichever one you change, the other remains unaffected, as shown in Figure 11-8.
Figure 11-8: The Pucker & Bloat effect applied to the stroke, but not the fill.
To apply an effect to a stroke only or to a fill only, just follow these steps:
-
Select an object by clicking it with the Selection tool.
-
Choose Window→Appearance to open the Appearance palette.
-
In the Appearance palette, select the stroke or the fill to which you want to apply the effect.
For this example, select the stroke.
-
Choose an effect from the Effect menu.
For this example, choose Effect→Distort & Transform→Pucker & Bloat. The Pucker & Bloat dialog box opens. Drag the slider towards Pucker (to the left) or towards Bloat (to the right). The effect applies to the path and takes an appropriate place in the Appearance palette.
When you look at your artwork, you see that only the stroke has been puckered (or bloated, depending on what you chose). If you want to apply an effect just to a fill, follow the preceding steps, but select a fill instead of a stroke.
Going back to adjust settings
Any effect previously applied to an object, group, or layer can be modified. You can edit the effect by double-clicking it in the Appearance palette. After you do, the effect’s dialog box appears, enabling you to edit the current values for that effect. If the effect dialog box has a Preview check box, place a check in it and watch your changes in real time!
| Warning? |
Don’t try to edit an effect you just applied by selecting that effect again in the Effect menu. Doing so applies the same effect a second time over the same path. Instead, double-click the effect in the Appearance palette. |
Removing appearances
If you’re tired of keeping up appearances (for example, you feel your artwork is too complex and want it to be cleaner and simpler, or you’ve added so many effects that printing or drawing on-screen takes too long), Illustrator gives you three ways to remove them (from on-screen artwork, that is). You can take an appearance apart (one attribute at a time), trash the whole appearance except the basics, or zap everything at once. Here’s how you accomplish each of these tasks:
-
To get rid of a single effect, transparency setting, stroke, or fill: Select what you want to remove in the Appearance palette and then click the little trashcan icon at the bottom right of the palette.
-
To get rid of all effects, extra fills and strokes, and transparencies: Click the Reduce to Basic Appearance button (the button with two circles at the bottom center of the palette). This action strips away everything except one stroke and one fill color and resets the Default Transparency setting to a blend mode of normal and an Opacity setting of 100%. (See Chapter 10 for more details on blend modes and Opacity settings.)
-
To clear everything away: If you really want to clear the decks, leaving a path with no strokes or fills whatsoever, click the Clear Appearance button (the circle with a line through it at the bottom left of the palette).
| Technical Stuff? |
Note that the Appearance palette always shows a Fill color, Stroke color, and Default Transparency setting for an object, even after you throw them away. Throwing away a fill or stroke automatically sets it to None; throwing away a transparency sets it to the Default Transparency setting, which is a blend mode of Normal and an Opacity setting of 100%. |
| Tip? |
If you’re wondering what the last two buttons in the Appearance palette do, here’s the skinny. The icon with the three overlapping circles enables you to specify whether appearance effects are applied to new objects. Click the button so that it becomes highlighted to apply just a single fill or stroke to new objects. You can also choose the New Art Has Basic Appearance option from the Appearance palette pop-up menu. Click the button so that it isn’t highlighted to apply all the appearance effects to new objects. You can also deselect the New Art Has Basic Appearance option from the palette pop-up menu. |
The dog-eared page icon is the Duplicate button. Select the appearance effect or attribute (stroke or fill) you want and click this button to create a duplicate.
Killing live effects until they’re dead
Sometimes, you want to preserve the way an object looks, but get rid of all the things in the Appearance palette. One reason to do this is that all these multiple fills, strokes, and effects can take tremendous processing power when they are live. This situation can result in long print times, or long times redrawing whenever you make a change to your graphic. The drawback to live effects is that they are previews and need to be recalculated every time you make a change. You can kill these live effects so that they permanently change your graphic. You can no longer make individual adjustments to them or remove them, but all the calculations have been made and the graphic has been permanently changed. This results in a much simpler, if limited, graphic.
To permanently set all the live effects, choose Object→Expand Appearance. The object expands, which is a completely counterintuitive way of saying the object gets simpler. All the settings made in the Appearance palette are really just previews. They haven’t been applied to the graphic. Every time you make a change, that appearance needs to be completely recalculated. Expanding the object applies all those changes to it permanently, so the calculations don’t have to be made again. The graphic is simpler, if less editable. Figure 11-9 shows the difference between live and, um, dead objects.
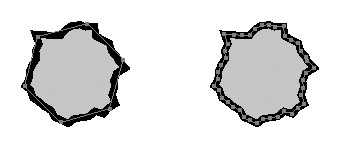
Figure 11-9: A live effect (left) and after Expand Appearance is applied.


