Legal Graffiti
Legal Graffiti
The Symbol Sprayer and its family of Symbolism tools, shown in Figure 4-18, is how Adobe makes your job of producing repeating graphics easier and quicker. Feel like a kid (okay, a bad kid) and spray on-screen repeating graphics all over the place to your heart’s content. No clogged spray nozzles, no paint drips, no fumes. Who could possibly resist that intriguing spray can sitting there in the Toolbox just begging to be picked up?
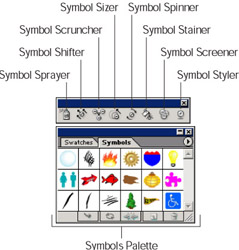
Figure 4-18: He who ?has the ?best toys wins: The Symbolism tools.
| Technical Stuff? |
Symbols are reusable and repeatable elements that are used in animation. Although they can be graphics, buttons, movie clips, sound files, and even fonts, in Illustrator they can be comprised of any Illustrator object — vector- or pixel-based images or text. Each individual symbol is referred to as an instance. The beauty of symbols is that although you may have multiple instances of a symbol in your file, each instance references a single symbol in the Symbols palette, thereby keeping the file size extremely small. |
Symbols provide a quick and easy way to create a large group of similar objects and an easy means to collectively edit these objects. Symbols can be used for most anything, but are especially handy in creating navigation buttons, borders, map icons, and masses of graphics, such as foliage, snowflakes, and stars.
Using the Symbol Sprayer
I like it when tools, such as the Symbol Sprayer, work the way that I think they should (unlike the tedious Pen tool). Follow these steps to become the master of your personal digital spray can:
-
Select the Symbol Sprayer.
Note that the sprayer icon is surrounded by a circle, which represents the diameter of your sprayer. (Read the upcoming section, “Setting the Symbolism options,” to discover how to change that size.)
-
Choose Window→Symbols.
The Symbols palette appears with a default library of symbols to choose from.
-
Select a symbol from the Symbols palette, click the Symbolism tool ?on the Artboard, and drag it around the page.
A trail of symbols (of the one you chose) appears, mirroring the movement of your cursor while you drag it across your Artboard. (Check it out in Figure 4-19.) Unless you feel the need to edit your symbols or create your own custom symbol, you’re done!
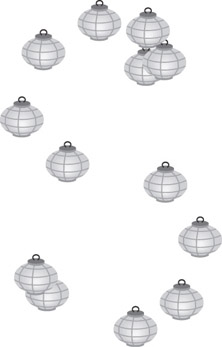
Figure 4-19: Pssst: Graffiti never had ?it so good (or legal).
Creating a custom symbol
If you’re the creative type, create your own symbol. First create the artwork, which can include any Illustrator object — vector- or pixel-based images or text. You can even use a combination of objects, as shown in Figure 4-20. Next, select your artwork and do one of these three things: Click the New Symbol button (the little piece of paper at the bottom of the Symbols palette); choose the New Symbol option from the Symbols palette pop-up menu (accessed from the little triangle at the upper right of the Symbols palette); or drag and drop the art onto the Symbols palette. Voil? — a symbol is born.

Figure 4-20: Combine object types to create custom symbols. Just ducky.
Editing your symbols
The other Symbolism tools enable you to tweak your symbols to graphic perfection. To edit your symbols, first select the symbols with the Selection tool. Note how you select the bounding box (a temporary border surrounding objects) of the symbols and not the individual instances. That’s because symbols are a unique breed of graphic that require a unique kind of editing. After you select the symbols, click and drag with the Symbolism tool of your choice:
-
Symbol Shifter: Click and drag your mouse to shift the position of the symbols in relation to each other. The symbols move around the cursor as you drag, creating a sort of ripple effect.
-
Symbol Scruncher: Click and hold down your mouse to move the symbols closer together. Hold down the Alt (Windows)/Option (Mac) key while clicking and holding down your mouse to move the symbols apart.
-
Symbol Sizer: Hold your mouse button down to size the symbols larger. Hold down the Alt (Windows)/Option (Mac) key while manipulating your mouse to reduce the size of the symbols.
Tip? You can also use the Rotate and Scale tools to rotate and size symbols.
-
Symbol Spinner: Click and drag your mouse in the desired direction to rotate the symbols.
-
Symbol Stainer: Hold your mouse down to tint the symbols by using ?the current Fill color.
-
Symbol Screener: Hold your mouse down to increase the transparency of the symbols.
-
Symbol Styler: Applies a style from the Styles palette onto the symbol. With the Symbol Styler, select and drag a style from the Styles palette onto a symbol instance.
Setting the Symbolism options
Double-click any of the Symbolism tools to bring up the Symbolism Tools Options dialog box, as shown in Figure 4-21. Here you adjust the behavior of each tool.
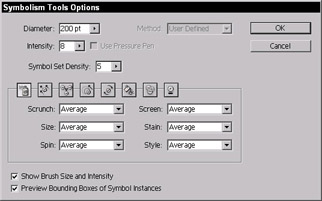
Figure 4-21: The Symbolism Tools Options dialog box: Grand Central for controlling the look of your symbols.
Select your tool icon from the row and then adjust its Diameter (1–999 points), the Intensity (1–10), and the Symbol Set Density (1–10). Most of the tools provide shortcut keys with which you adjust settings while you draw. I recommend keeping the Show Brush Size, Intensity, and Preview Bounding Boxes of Symbol Instances options selected (checked) so that you get a good idea of your tool coverage (and you get a box rather than a bazillion anchor points as your symbols spew forth).
In the Method option of the Symbolism Tools Options dialog box (refer to Figure 4-21), choose the User Defined setting to apply the settings within your Illustrator application to the Symbolism tools. For example, if you choose User Defined for your Stain setting for the Symbol Sprayer, the symbols appear with your current Fill color, regardless of the original color of the symbol.
Here are some other handy tips to keep in mind when working with symbols:
-
If you export your file as a Flash (SWF) file, your symbols are included in the symbol library of your Flash application. (See Chapter 16.)
-
To place a single instance of a symbol, choose the Place Instance of Symbol option from the Symbols palette pop-up menu, or click the ?Place Symbol Instance button at the bottom of the palette.
-
To convert a symbol into a regular Illustrator editable graphic, select the symbol instance and click the Break Link to Symbol button at the bottom of the Symbols palette, or select the command from the Symbols palette pop-up menu. You can then modify the graphic, select it, and click the original symbol in the Symbols palette. Then, choose the Redefine Symbol option from the Symbols palette pop-up menu. Not only is the symbol revised, but any symbol instance on your Artboard is revised as well. Imagine having to change 1,000 little leaves on a tree if they were regular graphics and not symbols!
-
Symbolism tools can take advantage of a pressure-sensitive tablet. Select the Use Pressure Pen option in the Symbolism Tool Options ?dialog box.
-
To name or rename your symbol, double-click the symbol in the Symbols palette or choose Symbol Options from the Symbols palette pop-up menu.
-
To delete a symbol, select it in the Symbols palette and click the Delete Symbol at the bottom of the Symbols palette, or choose the command from the Symbols palette pop-up menu.
-
To duplicate a symbol, select it in the Symbols palette and choose Duplicate Symbol from the Symbols palette pop-up menu. Duplicating ?is handy for making variations of a symbol.


