Managing the Mess
Managing the Mess
Although the commands for moving artwork may seem fairly flexible at first, that’s only true if you keep the number of objects limited. After you start creating artwork with dozens (or even hundreds) of objects in it, the first four commands start showing their limitations and causing frustration. For instance, think of the hassle of putting an object in a precise order when you have a hundred different levels in the stack (“Move it from level 94 to level 63? Sure, no problem.” Right.), not to mention the challenge of selecting one object from among hundreds!
That situation is where the Layers palette comes in. Not only does it enable you to organize your artwork into layers, but it also gives you a much more flexible method of arranging your artwork within the stacking order. You can also do fiendish things to layers, such as hiding them so you can’t see them, or locking them so you can see them but can’t change them or duplicate them (along with their artwork) in a different document. This flexibility brings a great deal of sanity to working with complex illustrations.
Imagine that you’re creating an image of a flock of birds in a maple tree. Your client wants to see the tree change according to the four seasons. She also wants to see the tree with and without the birds. You have one tree, fifty birds, and hundreds of leaves — and the whole image is set in spring. Oh, and the client is coming over to see the finished artwork in 15 minutes! Do you panic? No, you use layers! You separate the tree, birds, and leaves into separate layers. Then you can hide and reveal the bird layer to show the tree with and without the birds. Hide the layer with the leaves on it, and you have your maple tree in winter! To simulate seasons, duplicate the leaves layer twice. Then, again using the Layers palette, you can select all the leaves in one layer and change the fill colors to summer colors. Then go to the third leaf layer and change those colors to fall colors. By showing one layer while hiding the other two, you can create your fall, spring, and summer trees. There you have it! Eight pieces of artwork from one piece, in about as much time as it takes to describe it!
Using the Layers palette
The Layers palette, shown in Figure 13-3, provides you with the means to do as much (or as little) organization as you want. You can split your artwork into layers, sublayers, and sublayers of those sublayers. Then you can view, hide, select, rearrange, or delete any number of the layers and sublayers.

Figure 13-3: The Layers palette with multiple layers.
Thumbnails
The thumbnails on the Layers palette show what objects are on each layer. You can quickly select everything on that layer by clicking the Target circle. In addition, clicking the Target circle enables you to apply Transparency settings and effects to that layer, as I discuss in Chapter 10.
| Tip? |
Is the thumbnail too small to get an accurate view of the artwork? Select the Palette Options option from the Layers palette pop-up menu. The thumbnail size is determined by the row size. Choose from small, medium (the default size), or large; or choose the Other setting and type in any pixel size for your thumbnails. |
I call it layer cake . . .
If you haven’t opened the Layers palette before, you may be surprised to find that you’ve been working with layers all along. Whenever you create a new document, Illustrator automatically creates a layer to contain your artwork.
When you work with multiple layers, you may have to get accustomed to the Arrange commands, such as the Bring Forward and Send to Back commands. These commands work within layers but don’t move objects from one layer to another. After you select an object and choose Object→Arrange→Bring to Front, Illustrator brings the object to the front of the layer that it currently occupies — but not all the way to the front of the document. So if another object is hanging around in a layer in front of the selected object and you use the Bring to Front command, the selected object may still be behind another object in the document. If this happens, you can use the Object→Arrange→ Send to Current Layer command, or you can use Steps 3 and 4 in the following list to move artwork into another layer.
A good way to get a feel for the Layers palette is to break a piece of existing artwork into several layers, as shown in Figure 13-4.
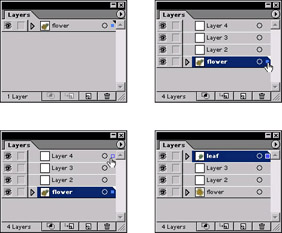
Figure 13-4: Placing existing artwork into multiple layers.
To separate your artwork into multiple layers, just follow these steps:
-
Decide how you want to organize your artwork.
You may want to split it into similar elements — such as type, pixel images, graphics, and a background.
-
Create the additional layers you need for your artwork by clicking the Create New Layer button — click once for each additional layer.
The Create New Layer button is the third button from the left at the bottom of the Layers palette; it looks like a sheet of paper with the bottom-left corner folded up to reveal a second sheet of paper underneath it. You can also choose the New Layer option from the Layers palette pop-up menu.
-
With the Selection tool, select the graphic element in your artwork that you want to move to one of the other layers.
After you select the art, a little square appears to the right of the layer that currently contains the selected artwork.
-
To move the art to another layer, click and drag the little square up or down in the Layers palette to the layer you want.
When you release the mouse button, the artwork has already changed layers. You may not see any apparent change in the artwork, but moving the artwork into a new layer changes the color of the selection highlights (the tiny, on-screen squares and lines that appear along the points and paths after you select something with any selection tool). The color changes to the selection highlight color for the new layer. It’s a dead giveaway.
-
Repeat the previous two steps until all your artwork is in the correct layers.
Changing the stacking order of layers
Layers, like individual objects, have a stacking order. This order is reflected in the Layers palette. The contents of layers at the bottom of the palette appear in back of the contents of layers at the top of the palette. To change the stacking order of a layer, click the name of the layer or its thumbnail and drag upwards or downwards in the Layers palette. As you drag, a black bar appears between layers to indicate where the layer will be moved to after you release the mouse. When this black bar is at the position you want the layer to occupy, release the mouse. The layer and all its contents move to that position.
Lock and Unlock, View and Hide
Well, no, I’m not suddenly writing rhythm-and-blues lyrics. You can lock layers by clicking the Lock/Unlock toggle button (the square just to the left of the thumbnail). Clicking it causes it to do the opposite of whatever it’s currently doing. If a layer is unlocked, for example, clicking the Lock/Unlock button locks the layer. If a layer is already locked, clicking the Lock/Unlock button unlocks the layer. So far, so good. But potential frustrations lurk.
When a layer is locked, you can see it, but you can’t select it or alter it in any way. If you try to select anything in a locked layer, you select only the object behind it. After you get accustomed to this state of affairs, you find that layers are a great way to get things out of the way that you aren’t working on and to preserve any artwork that you don’t want accidentally changed.
Just to the left of the Lock/Unlock button is the View/Hide button (which looks like an eye). Why hide all that work? One word: safety. This button not only hides the artwork in the layer, but it also locks the artwork so you can’t accidentally change it. The View/Hide button is also a great way to get things out of the way and to prevent accidents. It’s also a great way to create multiple versions of artwork by showing and hiding different elements. (You know — trees with several sets of leaves for different seasons, or football players with several uniforms, depending on their contracts. . . .)
| Remember? |
Hidden artwork is always locked artwork. If it weren’t locked, you could change that poor, hapless object without meaning to — because you can’t see hidden artwork. (Wow. Sometimes obvious stuff is so comforting.) |
Copying layers (quickly and completely)
You can copy a layer — along with all the artwork it contains — by clicking the layer and dragging it on top of the Create New Layer button, which is just waiting around at the lower edge of the Layers palette, hoping that somebody will give it something to do. This technique is a great way to create multiple versions of artwork. You can duplicate one element many times, and then change the appearance for each layer. Show and hide the layers to compare and contrast the different versions.
| Tip? |
To create a new sublayer (a layer within a layer), click the Create New Sublayer button at the bottom of the Layers palette, or select the New Sublayer option from the Layers palette pop-up menu. |
Viewing objects and groups
After you click the little triangle to the left of a layer’s name, you see an instant panorama of the groups and objects on that layer, as shown in Figure 13-5.
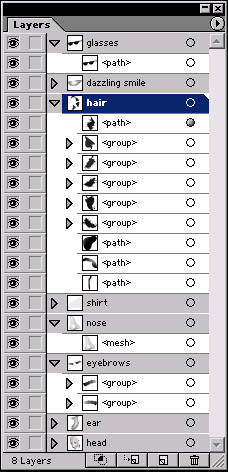
Figure 13-5: You can see the contents of a layer in the Layers palette by clicking the triangle to the left of the layer’s name.
Using your options on layers, groups, and objects
You can give each layer, group, and object in Illustrator a name. If you don’t name them, they wander around despondently, lugging their default names (such as <path> and Layer 1). Naming layers can be a great help for locating different objects. (Those teensy thumbnails can be awfully hard to distinguish.) Naming the layers provides you with instant recognition.
To change a layer’s name, double-click that layer in the Layers palette. To change the name of a group, double-click that group in the Layers palette. And finally, to change the name of an object, double-click that object in the Layers palette. (Is there an echo in here? Nope, just consistency — part of good software design.) The Layer Options dialog box appears, as shown in Figure 13-6.

Figure 13-6: The Layer Options dialog box.
The Layer Options dialog box offers several other options beyond just naming layers:
-
Name: Use this text box to type in a descriptive name for the layer.
-
Color: Set the selection highlight color here. Changing this option doesn’t change any color in the artwork — just the color used to show that something is highlighted.
-
Template: Selecting this check box enables you to give the layer a special designation and the following unique set of behaviors (which tells you that the layer is a template):
-
The layer is automatically locked so nothing on it can be selected or changed.
-
By default, pixel-based artwork shows as dimmed, which allows you to focus on your own artwork better while still being able to see the template artwork. Think of the layer as virtual tracing paper. You can, however, uncheck (deselect) this option if you so desire.
Tip? The names of the Template layers are italicized, so they’re easy to spot in the Layers palette.
-
Template layers do not print, and they aren’t included with your artwork when you use the Save for Web command.
-
You can create a different version of a particular piece of artwork and put the existing artwork in a Template layer where it’s out of the way. It won’t print, but you can still see it.
-
-
Lock and Show: These options can be checked and unchecked to enable you to perform the same function as selecting the Lock/Unlock and View/Hide buttons in the Layers palette.
-
Preview: Selecting this check box allows you to see your artwork in Preview mode. When unchecked, it displays the current layer’s artwork in Outline view; all other artwork in the document remains in Preview view.
-
Print: This option can be checked or unchecked to make the layer printable or not printable.
-
Dim Images to: This option enables you to dim pixel-based artwork to any set percentage. You may want to do so for tracing purposes so that you can focus on your Illustrator artwork while using the faded pixel artwork as a guide.
| Tip? |
You can move objects, groups, and layers around inside the Layers palette, doing all sorts of strange things to your artwork. You can move objects from one layer to another, move groups inside other groups, and even nest layers by dragging them inside each other. Try doing this and watch out for surprises. |


