Using the Gradient Fill
Using the Gradient Fill
Paths can be filled with colors that smoothly blend from one to another across a distance. These colors are gradients. Gradients can have any number of colors in them, with results that are nothing short of astonishing. Figure 5-13 shows several paths with gradient fills.

Figure 5-13: Path ?objects ?with gradient fills.
Filling a path with a gradient involves two steps: creating the gradient and then applying it to a path. However, you can do this in any order. Often, it’s easier to create a gradient, apply it to a path, and then continue to tweak it by changing, adding, or removing colors or by modifying the position or angle of the gradient. You can see how the gradient looks on an object instead of just in a small box.
To fill a path with a gradient, select the path and then click a gradient in the Swatches palette. The object fills with a gradient that probably doesn’t look a thing like what you want — but that’s okay. By using the Gradient tool and the Gradient palette, you can tweak this gradient to your heart’s content.
The Gradient tool
![]() ?The Gradient tool (shown in the margin) doesn’t actually create anything. Instead, it enables you to set the direction and the duration (the distance across which the gradient makes its transition from the beginning color to the ending color).
?The Gradient tool (shown in the margin) doesn’t actually create anything. Instead, it enables you to set the direction and the duration (the distance across which the gradient makes its transition from the beginning color to the ending color).
To use the Gradient tool, first use any selection tool to select an object that’s filled with a gradient. Then click and drag across the gradient with the Gradient tool and release the mouse button when you get to the other side. The direction that you drag sets the direction of the blend. The place where you click gets 100 percent of the start color; the place where you release gets 100 percent of the end color. The gradient happens as a smooth blend between those two points (as you can see in Figure 5-14).
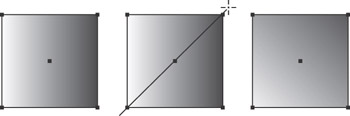
Figure 5-14: Left: The square shows a default gradient applied. Center: Clicking and dragging with the Gradient tool. Right: The result.
The Gradient palette
If you don’t like the colors of your gradient, you don’t have to settle for the gradients that come in the Swatches palette. You can use the Gradient palette (by choosing Window→Gradient) to change colors, add colors, remove colors, and change the way the colors behave. (See Figure 5-15.)
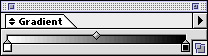
Figure 5-15: Control color with the Gradient palette.
| Tip? |
The Gradient palette looks simple compared with other palettes, but don’t be deceived. In spite of its humble appearance, this palette lets you create just about any gradient you could ever want. The Gradient palette works with the Color palette and the Swatches palette, so keep both those palettes open whenever you edit a gradient. |
The gradient sliders slide left and right. You use them to change how gradually (or not-so-gradually) your colors blend with each other. If you want the colors to blend without much nuance over a short distance, drag the sliders closer together. If you want the colors to blend more gradually across a longer distance, move the sliders farther apart.
Gradient-mania: Color-tweaking made simple
When you change a gradient in the Gradient palette, selected objects that are filled with that gradient update to reflect that change. You can see what’s going on with the gradient more easily if you make an object and fill it with the gradient before you start making changes in the palette.
To change gradient colors, here’s the highly artistic approach (no smock needed):
-
Click one of the gradient sliders beneath the gradient bar.
The color of the slider appears in the Color palette.
-
Create a different color in the Color palette.
As long as the gradient slider is selected, the color updates in the Gradient palette automatically. Is that slick or what?
Tip? As an alternative, you can click any solid color in the Swatches palette and drag it to the Gradient slider in the Gradient palette. You can also press the Alt (Option on the Mac) key and simply click a solid color swatch in the Swatches palette. The gradient updates with the new color.
Adding colors to the gradient is a lot easier than going to the paint store. Just follow these steps:
-
Click beneath the gradient bar where there isn’t any gradient slider.
A new slider appears where you click.
-
Change the color of the new slider in the Color palette or press the Alt (Option on the Mac) key and click a solid color in the Swatches palette.
-
Adjust the position of your gradient sliders if you desire.
| Remember? |
To remove a color, click the gradient slider and drag it off the Gradient palette. To save the gradient, drag the gradient swatch from the Gradient palette (or from the Fill box in the Toolbox) to the Swatches palette. You can also simply click the New Swatch button (a dog-eared page icon) in the Swatches palette. |
Between every pair of gradient sliders (on top of the gradient bar) is the midpoint slider. This sets the point at which the two colors blend at 50 percent of each color. You can also move this point by dragging it to the left or to the right. Figure 5-16 gives you a look at ways to change the gradient.
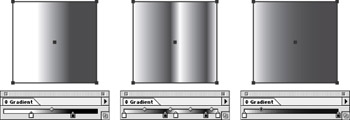
Figure 5-16: First, moving the sliders closer together. Second, adding new color sliders. Third, moving the gradient midpoint.
The secret gradient
If you click the gradient swatches in the Swatches palette, you may notice that some gradients look like spheres or sunbursts. You may have tried to recreate one of these gradients, but no amount of clicking and dragging with the Gradient tool — and no amount of moving gradient sliders — enables you to do that.
The trick is in a hidden option in the Gradient palette. Click the little triangle in the upper-right corner of the Gradient palette. The Gradient palette pop-up menu with only one item (Show Options) appears. Choose this option to make several more options appear in the palette, as shown in Figure 5-17. The one you want is the Type option, which reveals two choices: Linear and Radial. Choose Radial. The beginning color is the center color. When you click and drag, the spot where you click sets the center of the gradient.
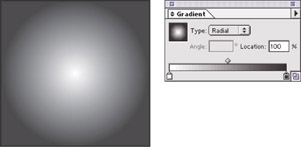
Figure 5-17: Choose Show Options from the Gradient palette pop-up menu to work ?with a radial gradient.


