Understanding Fill and Stroke
Understanding Fill and Stroke
A fill is a color enclosed by a path. A stroke is a line of color that precisely follows a path. To run the coloring book metaphor into the ground (carpet?), the stroke is the line, and the fill is the inside-the-line that you aren’t supposed to color outside of (but you did anyway because you weren’t about to let your parents stifle your creativity!). Color is a loose term here; it can mean a solid color, a pattern, or (in the case of fills) a gradient. In Figure 5-1, you can see a variety of paths with different strokes and fills applied to them.
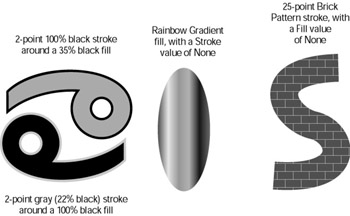
Figure 5-1: Paths with different fills and strokes applied to them.
Although a stroke can be any thickness, it always uses a path as its center. You can stylize your strokes with solid colors or patterns but not with gradients. (Patterns and gradients are special combinations of colors; read more about them in the upcoming section, “All the colors in the rainbow and then some.”) A path surrounds the area where you put the color. This area is the fill because, um, it’s filled (with color).
| Tip? |
Fills and strokes can obscure the boundaries of your paths, especially when you have very thick strokes on your paths, such as the S-shaped bricks in Figure 5-1. To temporarily hide all fills and strokes, choose View→Outline. This shows your artwork as just the paths, with all strokes and fills hidden. You can still edit the artwork as you would any other time. The only difference is that you can’t see fills and strokes. To show all the colors again, choose View→Preview. |
You have many ways to create and modify fill and stroke color in Illustrator, but the quickest and easiest way to apply them is by using the Fill and Stroke boxes in the Toolbox, which looks remarkably like what you see in Figure 5-2.

Figure 5-2: Fill and Stroke in the Toolbox.
You can change a fill or a stroke, but not both at the same time. You decide whether to change the fill or the stroke by selecting an object and then clicking the Fill (solid) box or the Stroke (bordered) box. The box you click comes to the front; after that, every color change you make is applied to whichever one you chose . . . until you choose the other one.
Some very useful features surround the Fill and Stroke boxes. Just to the upper right is a little curved line with arrows on both ends. Click this thingamajig (called the Swap Fill and Stroke button) to swap fill and stroke colors.
| Tip? |
Press Shift+X on your keyboard and you swap fill and stroke colors without having to click anywhere! |
To the lower left of the Fill and Stroke boxes are miniature white (Fill) and black bordered (Stroke) boxes. Click this Default Fill and Stroke button to set the Fill and Stroke boxes to their default colors: white for Fill and black for Stroke.
If you prefer fills and strokes in festive colors, here’s the story: Beneath the Fill and Stroke boxes live three square buttons that handle colors. Click the first square (the Color button) to change the fill or stroke color to the last color that you used. Click the second square (the Gradient button) to change the color of the stroke or fill so that it matches the last-selected gradient you used. Click the third square (the None button) to use no fill or stroke color at all.
| Tip? |
Double-clicking the Stroke or Fill boxes summons the Color Picker from which you can specify colors in a variety of ways. You can choose a color from a spectrum, using the true color field and the color slider, or define a color numerically. You can also select colors from the Color and Swatches palettes, as I describe later in this chapter. |
Filling and stroking paths with color
You can fill a path with one color and stroke it with another, as shown in Figure 5-3.

Figure 5-3: Filling and stroking a path with two different colors.
To fill a path with one color and stroke it with another, just follow these steps:
-
With any of the selection tools, select the path that you want to color.
-
In the Toolbox, click the Fill box (the solid one).
Doing so tells Illustrator to apply the next color you choose to the fill (but not the stroke) of selected paths.
-
Choose Window→Swatches.
The Swatches palette appears. The squares in this palette function in much the same way as do the three squares beneath the Fill and Stroke boxes in the Toolbox. Click any square in the palette to apply that swatch to the selected stroke or fill. (For more information, see “The Swatches Palette” later in this chapter.)
-
Click any solid-color swatch.
(Well, okay, any swatch in the palette works. The ones that aren’t solid colors are special colors, such as patterns and gradients — but sticking to solid colors is less confusing early on.)
-
Click the Stroke box (the thick-bordered one) in the Toolbox.
Illustrator is ready for you to pick a stroke color.
-
In the Swatches palette, choose a solid color, just as you did for the fill color in Step 4.
| Tip? |
You can also drag and drop color onto your path. Simply drag a color swatch from the Swatches palette and drop it onto your path. Depending on whether the fill or stroke is selected in the Toolbox, either the fill or stroke is colored anew. |
Making a bold stroke
When you follow the steps to color a stroke and don’t see any change, you probably have too narrow of a stroke. Stroke widths can range anywhere from 0 points (pts) to 1,000 points (18 inches, or about 46 centimeters). If the stroke is too narrow to be visible on-screen, you can change the stroke width by using the Stroke palette, as shown in Figure 5-4.
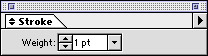
Figure 5-4: The Stroke palette.
To give the path a different stroke width:
-
Select the path with any selection tool.
-
Choose Window→Stroke.
The Stroke palette appears.
-
Enter a new value or choose one from the Weight drop-down menu.
Adding multiple strokes to a single path
This power-user tip will have your friends writhing in jealous agony. Choosing the Add New Stroke option in the Appearance palette pop-up menu places a second stroke on your path. You can make this stroke a different color, width, and even apply an effect directly to it. To avoid confusion, always check to see which stroke is highlighted in the Appearance palette; that’s the one that will be changed when you fool around with settings in the Stroke or Color palette.
Filling crossed and open paths
Sometimes a path crosses itself. For instance, a path in the shape of a figure eight crosses itself once. If you fill this path, the two round areas of the eight are full, as shown in Figure 5-5.
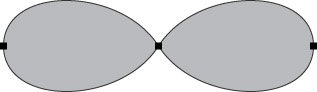
Figure 5-5: ?A filled path in a figure eight shape.
Open paths, which have separate starting and ending points, can be filled but the results are a little different from what you may expect. When you fill an open path, an imaginary path connects the first and last points of the original path. This imaginary path marks the limits of the fill area. If you apply a stroke to the figure, the stroke doesn’t apply to the imaginary path. Figure 5-6 shows open paths with fills in them. I use a dotted line to show where Illustrator creates the imaginary path between two end points.
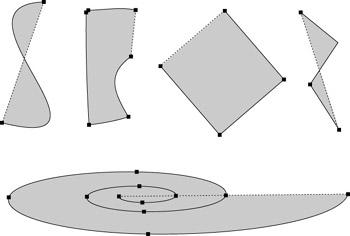
Figure 5-6: Open paths with fills and dotted lines connecting the starting and ending points.


