Creating Basic Shapes
Creating Basic Shapes
Illustrator has six tools for creating shapes. Although you could create all those shapes with the Pen tool, you’d torment yourself if you did so. The specialized tools in Illustrator make the shapes easy to create. The six tools are named for (and look like) the shapes they create, as follows:
-
Rectangle: Use this tool to make rectangles and squares. Hold down ?the Shift key when using this tool to get a perfect square.
-
Rounded Rectangle: As you may expect, you get rounded corners on your rectangles and squares when you use this tool. Of course, if you recall high school geometry, you know that a round rectangle is a contradiction in terms. By definition, a rectangle is a four-sided polygon with each corner forming a 90? angle. Oh, well. So much for Euclid.
-
Ellipse: This tool makes ellipses and circles. Hold down the Shift key when using this tool to get a perfect circle.
-
Polygon: This tool makes objects with any number of sides — from 3 to 1,000 — with each side the same length. You can use this tool for triangles, pentagons, hexagons, and so forth.
-
Star: This tool makes stars with any number of points between 3 and 1,000.
-
Flare: This tool creates effects, such as lens flares and reflections, which are photo realistic, yet entirely vector-based. See Chapter 3 for the complete lowdown on this exciting tool.
The shape-creation tools are located in a single row in the Toolbox, as shown in Figure 4-1.
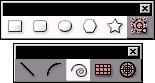
Figure 4-1: The six shape-creation tools.
Drawing rectangles and squares
To draw a rectangle, select the Rectangle tool in the Toolbox, and then click and drag where you want the rectangle to go. After you release the mouse button, a rectangle appears. To draw a square, you follow a slightly different procedure, as I describe in the following steps:
-
Choose the Rectangle tool from the Toolbox.
-
Click and drag with the tool. (Don’t release the mouse button yet.)
-
Press the Shift key.
The rectangle snaps into a square.
-
Release the mouse button (but don’t release the Shift key until after you release the mouse button).
A square appears. (If you release the Shift key before you release the mouse button, the square snaps back into a rectangle.)
You can draw a rounded-corner rectangle by choosing the Rounded Rectangle tool (hidden in the toolslot with the Rectangle tool) and draw with that instead of the regular Rectangle tool. You can access any of the hidden tools by clicking and holding on the visible tool; after a second the other tools in that toolslot appear.
If you want to create a rectangle with exact dimensions (for example, 28 points x 42 points), select the Rectangle tool and click and release your mouse, but don’t drag. A dialog box appears, as shown in Figure 4-2.
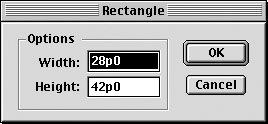
Figure 4-2: The Rectangle dialog box.
Type in height and width and then click OK. Illustrator draws a rectangle to those exact specifications.
| Tip? |
Illustrator places the rectangle’s upper-left corner at the spot where you click with the Rectangle tool. If you hold down the Alt key (Option on a Mac) at the same time, Illustrator places the rectangle’s center at the spot where you click with the Rectangle tool. |
Drawing ellipses and circles
To draw an ellipse, choose the Ellipse tool and click and drag in the document window. After you release the mouse button, an ellipse appears. To draw a perfect circle, hold down the Shift key while you draw with the Ellipse tool.
| Tip? |
If you hold down the Alt key (Option on a Mac) at the same time that you click (but don’t drag) with the Ellipse tool, Illustrator places the ellipse (or circle) from its center instead of from its upper-left edge. |
Like with the Rectangle tool, clicking (without dragging) causes the Ellipse dialog box to appear, as shown in Figure 4-3. Here you can type in an exact height and width for the ellipse. These values represent the distance across the ellipse at its widest and narrowest points.
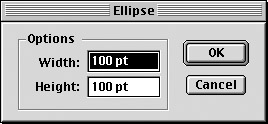
Figure 4-3: The Ellipse dialog box.
Creating polygons and stars
Illustrator has tools designed specifically for creating polygons and stars. Like rectangles and ovals, these shapes can be drawn with the Pen tool, but having a tool for creating them makes the process much easier, faster, and more accurate. Using these tools is fairly straightforward. As with the Rectangle and Ellipse tools, just click and drag and then release the mouse button when the shape is the size you want. Also, like with the Rectangle and Ellipse tools, just clicking (without dragging) with the Polygon or Star tool opens a dialog box, which you use to specify the shape’s exact size (and other attributes).
| Tip? |
Need to create stars at various sizes with a certain number of points? Or different sized polygons with the same number of sides? The dialog boxes for the Polygon and Star tools remember the number of sides and points you enter and use those settings for each subsequent shape you draw, even if you click and drag. |
Pulling polygons
To create a polygon, click and drag with the Polygon tool. When the polygon is the size you want, release the mouse button. The new polygon appears. Because polygons are more complex than ellipses or rectangles, you can get all sorts of special capabilities by pressing certain keys as you draw. To customize the polygon as you create it, hold down any of the following keys as you drag:
-
Shift: Constrains one side of the polygon so that it’s parallel to the bottom of the page.
-
Up/Down Arrow: Adds or deletes sides of the polygon while you draw it.
-
Spacebar: Moves the polygon around as you draw it.
-
Tilde (~): Creates multiple polygons while you draw. At times you can have so many polygons that they look like one solid figure, but each one is a separate entity that you can separate and move wherever you want. This feature can create quite astounding effects, as shown in Figure 4-4. To use this feature, you must release the mouse button before you release the key or all duplicates disappear. This works when you draw any of the other shapes, too! By the way, to get the swirly effect, move your mouse clockwise or counterclockwise as you draw.
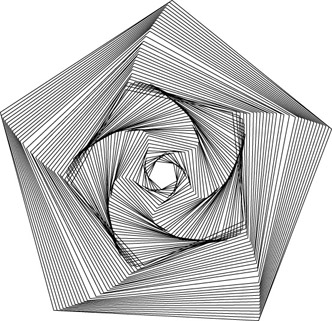
Figure 4-4: Press the tilde (~) key while you draw with the Polygon tool to produce a unique effect.
Clicking (without dragging) with the Polygon tool opens the Polygon dialog box, as shown in Figure 4-5. Polygons use a Radius value instead of height and width. All sides of the polygon are the same distance from the center; this distance is the Radius value. To create a polygon of a specific width, type in half the width you want in the Radius field. You can type in any number of sides, from 3 to 1,000.
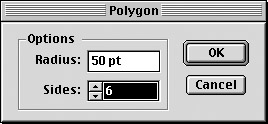
Figure 4-5: The Polygon dialog box.
Seeing stars
To create a star, click and drag with the Star tool. After you release the mouse button, a star is born. Stars are even more complex than polygons. Fortunately, you also have more keys for customizing options. To customize a star, use the following keys as you drag:
-
Shift: Constrains one side of the star so that the bottom two points of the star are parallel to the bottom of the page.
-
Up/Down Arrow: Adds/deletes points of the star while you draw it.
-
Ctrl (z on a Mac): Constrains the middle points (the inner radius) of ?the star; the outer ones still move.
-
Spacebar: Moves the star around as you draw it.
-
Tilde (~): Creates multiple stars as you draw.
Clicking (without dragging) with the Star tool opens the Star dialog box, as shown in Figure 4-6. Stars have two radii that you can set in the Star dialog box. The first radius determines how far the inner points of the star are from the center. The second radius determines how far the outer points are from the center. In the Star dialog box, you can also set the number of points the star has. After you make your settings, click OK to create the star you specified. After you create a star using the Star dialog box, each star you create by clicking and dragging uses the same specifications, more or less. Regardless of each star’s size, it has the same number of points (unless you change them using the up and down arrows), and the first and second radii maintain the same proportions, if not the same size. If you enter two inches for the first radius and one inch for the second, the second radius is 50 percent smaller for every star you create after you establish the settings in the dialog box, regardless of the star’s size.

Figure 4-6: Use the Star dialog box to set the quantity ?and length of its points.
Electronic graph paper
![]() ?The Rectangular Grid tool, which shares a toolslot with the Line tool, allows you to create grids of any size and configuration. Double-click the Rectangular Grid tool or simply click the tool on your Artboard (the area on which you draw) to access the Rectangular Grid Tool Options dialog box. Enter values ?for the size of the grid and the number of columns (called Horizontal Dividers) and rows (called Vertical Dividers). You can also enter a skew value that progressively increases or decreases the size of the rows and columns. The Fill Grid option when left unchecked creates a grid without a fill, and the Use Outside Rectangle as Frame option surrounds the grid lines with a rectangle.
?The Rectangular Grid tool, which shares a toolslot with the Line tool, allows you to create grids of any size and configuration. Double-click the Rectangular Grid tool or simply click the tool on your Artboard (the area on which you draw) to access the Rectangular Grid Tool Options dialog box. Enter values ?for the size of the grid and the number of columns (called Horizontal Dividers) and rows (called Vertical Dividers). You can also enter a skew value that progressively increases or decreases the size of the rows and columns. The Fill Grid option when left unchecked creates a grid without a fill, and the Use Outside Rectangle as Frame option surrounds the grid lines with a rectangle.
The Polar Grid tool operates in a similar manner as the Rectangular Grid tool. In the Polar Grid Tool Options dialog box, you find options for Size and the number of Concentric Dividers (smaller circles that appear within the largest outer circle) and Radial Dividers (the lines that radiate from the center of ?the smallest circle to the edge of the largest circle). Using both radial and concentric dividers gives the effect of a spider’s web, as shown in Figure 4-7 (right). You also have the same Skew and Fill Grid options that you do with the Rectangular Grid tool. The Create Compound Paths from Ellipses option creates a polar grid where every other concentric circle is transparent. The effect creates a bull’s-eye target, as shown in Figure 4-7 (left).
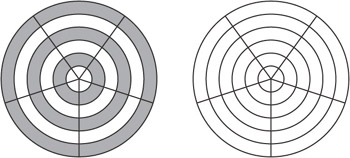
Figure 4-7: ?A polar grid with and without the compound paths option selected.
In addition to the grids created by the Rectangular Grid and Polar Grid??tools, Illustrator can transform your background into electronic graph paper. Choose View→ Show Grid. To change the settings for the grid, choose Edit→ Preferences→Guides and Grid. In the Guides and Grid Preferences dialog box, you find options for changing the color, style, and increments of the grid. If you choose View→Snap to Grid, your objects snap to the grid corners whenever you move them or whenever you create new objects. When I say snap, I don’t mean the objects automatically jump to the grid corners. What happens is a lot subtler: When you drag an object by using any selection tool, it sort of sticks a little when an edge of the object is over a grid corner. If you don’t want the object to reside at that point, you can keep dragging. The stickiness is just enough to help you align the object. Figure 4-8 shows a document with a grid behind it.
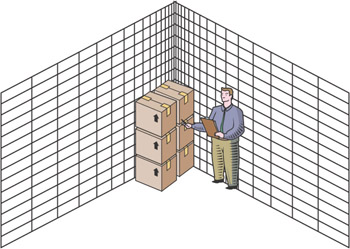
Figure 4-8: A document (in this case, a cartoon) with a grid behind it.


