Figuring Out Styles
Figuring Out Styles
Styles are collections of colors, transparency settings, effects, and additional fills and strokes that can be applied to any path, group, or layer. Think of all that information in the Appearance palette. Saving it and applying it to different objects (without having to re-create all those settings) can significantly reduce the time and effort you spend. That’s the advantage of using styles.
Another advantage is that any update in the style changes all the objects to which you apply that style. For instance, if you apply a style with a red fill and black stroke to a path, and later you update the style to an orange fill, the object you previously applied that style to changes to an orange fill and black stroke.
Applying styles to objects
Illustrator comes with a whole slew of premade styles that are stored in the Styles palette (see Figure 11-10), ready for you to use with just a click.

Figure 11-10: Applying a style to a path.
To apply a style to an object, follow these steps:
-
Select an object.
-
Open the Styles palette by choosing Window→Styles.
The Styles palette appears.
-
Click a thumbnail style in the Styles palette.
Doing so automatically applies all the settings to the selected object.
Creating and editing styles
You can create a style from any selected object in the document, as shown in Figure 11-11. You can also create a style based on the current Appearance palette settings. (The Appearance palette contains the settings for the last object selected, even if that object isn’t currently selected.)
-
Select an object (or not, as the case may be).
If you don’t select a path, the style you create adopts the current settings in the Appearance palette.
-
Open the Styles palette by choosing Window→Styles.
The Styles palette appears.
-
Click the New Style button (the middle button at the bottom right of the Styles palette) or simply drag your object onto an empty space in the Styles palette.
A thumbnail representation of the new style appears in the Styles palette.
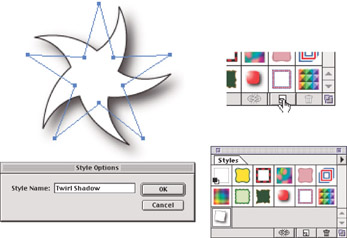
Figure 11-11: Creating a new style.
You have more than one method available to edit an existing style. Regardless of the method you use, Illustrator automatically updates all the objects that have that style applied to them to match the new style. The basic way to edit an existing style is to redefine it.
| Tip? |
After you apply a style to an object, you can click the Break Link to Style button on the Styles palette to prevent Illustrator from updating the object to a new style if you redefine the existing one. |
To redefine an existing style, as shown in Figure 11-12, just follow these steps:
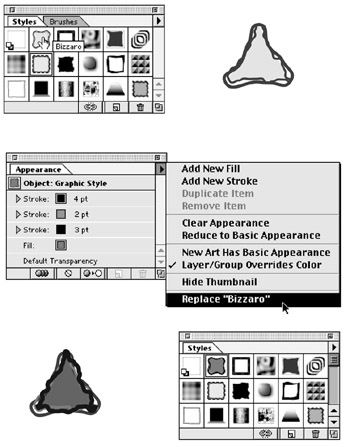
Figure 11-12: Redefining an existing style.
-
Create a basic shape and apply a style to it.
In this instance, I created a triangle by using the Basic Shapes tool. Then I chose Window→Styles and applied the style Bermuda to the triangle by clicking that style in the Styles palette.
-
Edit the selected object as you normally would to create the new appearance that you want.
Change the fill and stroke, and/or add effects. In this case, I chose a darker fill color and added two strokes of different colors to the triangle by using the Add New Stroke command in the Appearance palette pop-up menu (which I describe in the “Adding fills and strokes” section of this chapter).
-
After you’re satisfied with the changes, open the Appearance palette by choosing Window→Appearance. With the altered object still selected, choose Redefine Style Style Name from the Appearance palette pop-up menu, accessed by clicking the triangle in the upper-right corner of the Appearance palette.
You’re replacing a style, but you have to do it through the Appearance palette. Go figure! Because the name of the style I edited in this example was Bermuda, the menu reads Redefine Style “Bermuda.” The menu changes to whatever name the style has been given.
Illustrator updates the style in the Styles palette with the changes — and updates any object in the document that has that same style applied to it.
Another way to edit an existing style is to replace it with another set of Appearance settings. Set the fill, stroke, and effects for an object to make it look the way you want. Then hold down the Alt key (Option on a Mac) and drag the object over the thumbnail of the style that you want to replace in the Styles palette. It may look as if you’re dragging that entire object into the Styles palette, but you’re just dragging its fill, stroke, and effects settings (in other words, its appearance). To let you know that the object is in the proper position to replace the existing style, a black border appears around the style. Release the mouse to update the style to the Appearance settings of the selected object. Illustrator also updates all objects that share the style.
Spotting the difference between graphic and text styles
The Illustrator graphic styles are different from its text styles (text styles are discussed in Chapter 14). Graphic styles specify graphic attributes, such as fill color, stroke color, transparency, additional strokes and fills, and any applied effects. Text styles (Illustrator has two types: Character and Paragraph) specify text attributes, such as font, size, leading, alignment, and other Character palette and Paragraph palette settings.
The Illustrator graphic styles don’t allow you to save text attributes, such as font and alignment, with them. However, you can apply graphic styles to text and text objects; the graphic styles just don’t apply any text-specific attributes.
Applying graphic styles to text
Illustrator looks at text as a picture of letters and numbers — not as letters and numbers — and then applies a graphic style to that picture, as shown in Figure 11-13.
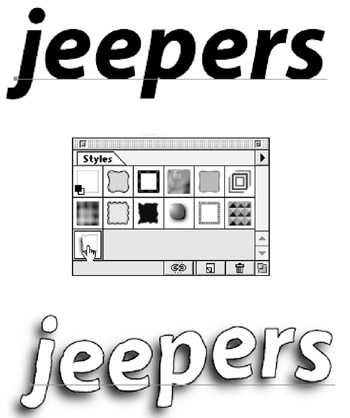
Figure 11-13: Applying a graphic style to text.
To apply a graphic style to text, just follow these steps:
-
Select text by using the Selection tool.
-
Display the Styles palette by choosing Window→Styles.
-
Click a thumbnail in the Styles palette to apply that style to the text.
Illustrator applies the graphic style you select to the text object.
You can quickly apply a style to text or other objects by selecting the style you want and then clicking with the Paint Bucket (which is located in the same slot as the Eyedropper tool) on anything you want to change to that style. (It’s so much easier than dragging a real paint bucket. And you don’t have to worry about the carpet. Is Illustrator great, or what?)


