Task 8: Transferring Files and Settings from Another PC
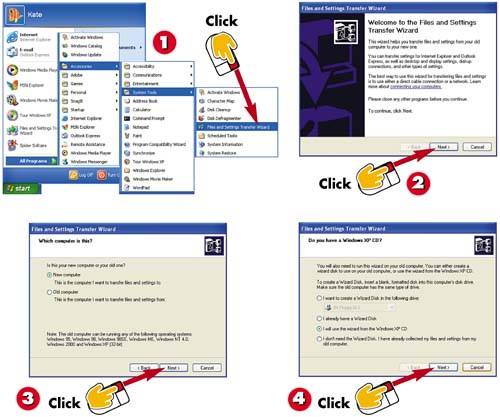

Click the Start button, choose All Programs, select Accessories, click System Tools, and choose Files and Settings Transfer Wizard.

The wizard starts. Click the Next button.

When asked whether you are currently using your new computer or your old one, select the New computer radio button, and click Next.

The wizard asks whether you have a Windows XP CD. Click the I will use the wizard from the Windows XP CD button, and click Next.
INTRODUCTION
If you're using Windows XP on a brand new computer, you can use XP's Files and Settings Transfer wizard to migrate files, documents, and settings from your old computer to your new machine via a floppy disk (or other removable media), LAN, or known network path.
TIP
No CD?
If you don't have a Windows XP CD handy, click the I want to create a Wizard Disk in the following drive button in step 4, select an option from the drop-down list, and follow the instructions to create a wizard disk of your own. It enables you to pull the files and settings you need from your old computer just as if you had an XP disk, and transfer your files and settings to your new machine.
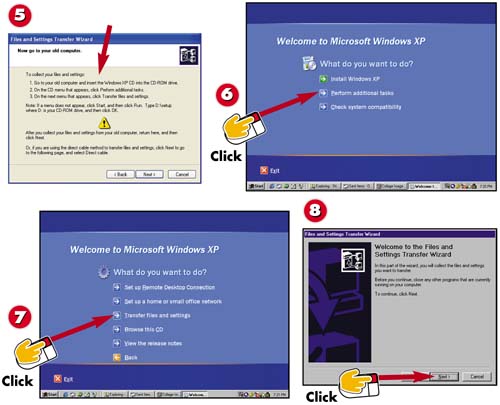

The wizard instructs you to insert your Windows XP CD in the CD drive of your old computer; do so now.

Using your old computer, wait for the Windows XP CD to start, and then click the Perform additional tasks link.

Windows asks what you want to do next. Click the Transfer files and settings link.

The Files and Settings Transfer Wizard starts. Click the Next button.
TIP
Office Settings
In addition to transferring your system settings, the File and Settings Transfer wizard can transfer a limited number of application settings for Microsoft Office. You should note, however, that the wizard does not migrate the applications themselves. These you must install on your new computer using your own two hands (if they are not already installed).
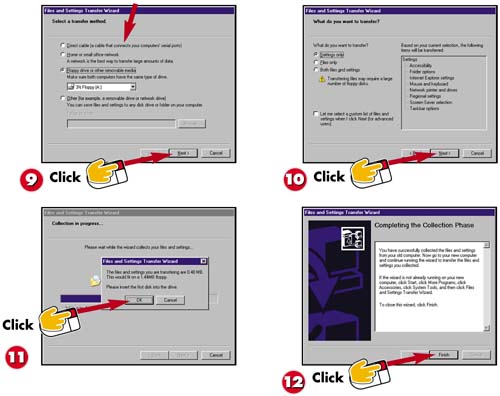

After a moment, the wizard asks you to select a transfer method. Do so (I've chosen Floppy drive or other removable media), and click the Next button.

Decide what you want to transfer?settings, files, or both. Select the appropriate radio button (in this case, Settings only), and click the Next button to continue.

Wait while the wizard collects your files and settings. When prompted, insert an empty floppy into your old computer's disk drive drive, and click the OK button.

Windows notifies you when the wizard finishes transferring your files and settings onto the floppy disk(s), and instructs you to return to your new computer. Click the Finish button.
TIP
Transfer Media
If you want to transfer files and settings, you'll probably need several (read: dozens or hundreds) of floppy disks to finish the job. If you have the option of using some other media, for example, a Zip disk, a CD, or a network connection, take advantage of it.
TIP
Using Alternative Transfer Media
This task illustrates the use of floppy disks to transfer settings; the steps vary slightly if you choose another option in step 9. Follow the onscreen prompts.
TIP
Performing a Custom Transfer
If you want to transfer only some of your files and settings, click the check box at the bottom of the screen shown in step 10. You'll be given the opportunity to remove from the list any folders, file types, and settings you do not wish to transfer.
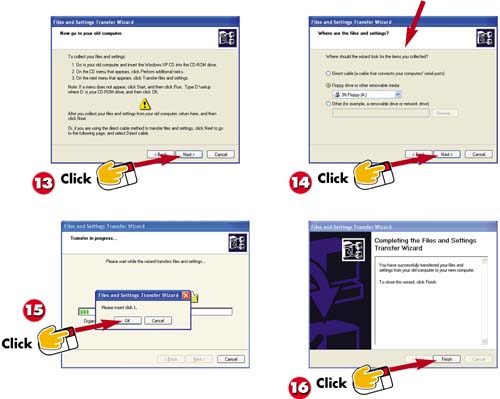

Return to your new computer, and click the Next button.

Specify where the wizard should look for the items you collected?a floppy drive, a network, or some type of removable device?and then click the Next button.

If the files and settings you collected are on a floppy, Zip disk, or CD, you'll be prompted to insert the appropriate disk. Do so, and click the OK button.

XP transfers the files and settings from your old computer to your new one (this could take some time). When the transfer is complete, click Finish.
TIPLogging Off When the transfer process is complete, you'll be prompted to log off so that the changes can take effect. |


