Task 12: Setting Up a Digital Camera
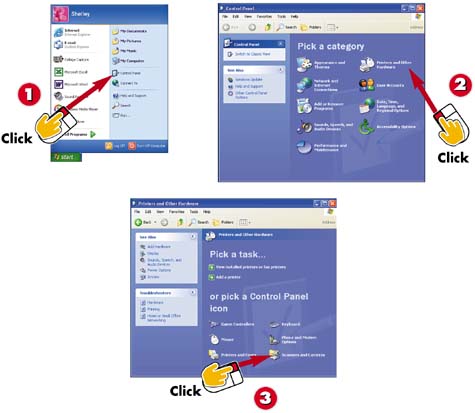

Click Start and then click Control Panel.

Click Printers and Other Hardware.

Click the Scanners and Cameras Control Panel icon.
INTRODUCTION
Another hardware component you may add to your system is a digital camera. You can snap pictures using this camera and then copy them from the camera's memory or media card to your computer. From your computer, you can then print, e-mail, and store the pictures. To start, you first set up your particular camera.
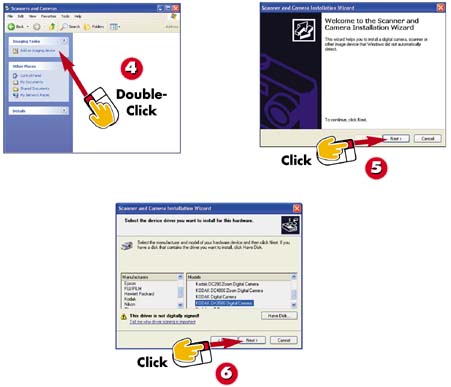

Double-click the Add an imaging device link to start the Scanner and Camera Installation Wizard.

Click Next to move from the welcome screen to the first step.

Select your camera manufacturer in the list on the left. Then select your particular camera from the list on the right. Click Next.
TIP
Automatic Installation
Before you use the wizard, try automatic installation. Connect the camera to your computer. Windows should recognize the new hardware and prompt you to install the appropriate driver. Click OK to install the recommended driver.
TIP
Take Pictures
The features of your camera as well as how to use that camera vary from camera to camera. Check your camera documentation to learn how to take pictures and transfer them to your PC.
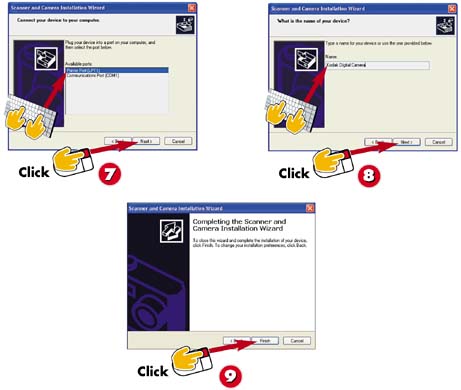

Select the port to which the camera is connected and click Next.

Type a name for the device and click Next.

Then click Finish to install the new camera and its appropriate device driver.
TIPMy Pictures Folder Consider storing your pictures in the My Pictures folder which includes a handy Pictures Tasks list with picture-related tasks. |


