Using Bullets and Numbered Lists
Bullets and numbered lists provide an excellent way to segregate, list, and organize information for a reader. You can control the appearance, or format, of a bulleted or numbered list. The bullet or numbering format you use last becomes the default format; that is, the next time you create a bulleted or numbered list, Word uses the same format you used the last time you created a bulleted or numbered list. As you'll learn in this section, you can easily change the default bullet or numbering format by choosing one of seven default bullet formats or one of seven default numbering formats. You can modify any of these to create your own formats.
 The bullet and numbering features covered here are designed for simple lists. If you need to build complex automated multilevel numbering schemes based on your outline headings, see "Using Word's Automatic Outline Numbering," p. 636.
NOTE
Here's a quick refresher on when to use bulleted lists and when to use numbered lists:
Use a bulleted list when you have several related items, but the order in which the reader sees them doesn't matter much.
Use a numbered list when you have several related items, but the order does matter?for instance, in describing a procedure containing steps that must be followed consecutively.
Starting and Stopping a Bulleted List
Using the Formatting toolbar, you can quickly create a bulleted list. Place the insertion point in the paragraph where you want to add bullets, and click the Bullets button on the Formatting toolbar. Word inserts a bullet and automatically indents text so that, as word wrap takes over, your text aligns itself correctly.
NOTE
If you've already typed in your list without bullets, you can easily add them by highlighting the text and clicking the Bullets button. Word adds bullets to each individual paragraph.
Press Enter to start a new paragraph preceded by a bullet. By default, Word continues to add bullets after every paragraph mark you add.
To end a list?stopping Word from adding bullets (or numbering) after paragraph marks that follow?take one of these actions:
When the insertion point appears in the first paragraph you don't want preceded by a bullet, click the Bullets button to toggle it off.
Press Enter twice at the end of the last paragraph you want to contain a bullet.
Press Backspace when the insertion point appears at the beginning of an empty bulleted paragraph.
TIP
By default, Word's AutoFormat feature creates Automatic Bulleted Lists. (This setting is controlled in the AutoFormat As You Type tab of the Tools, AutoCorrect Options dialog box.) With this feature turned on, you can type an asterisk at the beginning of the paragraph to which you want to add a bullet. Follow the asterisk with a space and type. When you press Enter, Word converts the asterisk to a bullet character and adds a bullet character to the next paragraph.
CAUTION
In some cases, you won't want Word to automatically create bulleted or numbered lists?you'll need to retain control over your numbering. For these situations, choose Tools, AutoCorrect Options, AutoFormat As You Type, and clear the Automatic Bulleted Lists and Automatic Numbered Lists check boxes.
Changing the Appearance of Word's Bullets
If you don't like the bullet you get when using the Formatting toolbar, you can open the Bullets and Numbering dialog box and select a different one.
With the insertion point in the paragraph you want to change, choose Format, Bullets and Numbering, or right-click and choose Bullets and Numbering from the shortcut menu. The Bullets and Numbering dialog box appears (see Figure 4.18).
Figure 4.18. Select one of these standard bullet characters or choose your own.
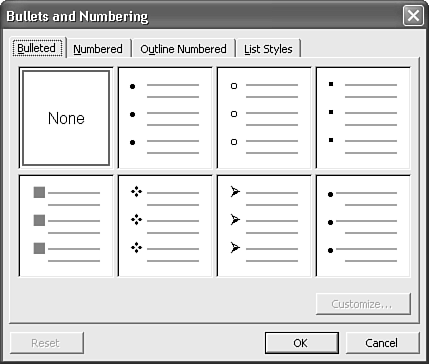
With the Bulleted tab displayed, you can choose one of seven standard bullets by clicking on the one you want and clicking OK.
As you'll see, you can also customize your bullet with another character or use a picture in place of a bullet?as is commonly done on Web pages. Whatever bullet character or picture you choose becomes the default and appears if you add bullets to a paragraph using the Bullets button on the Formatting toolbar.
NOTE
You can't actually select a bullet or number in an automatic bulleted or numbered list. To change the format of a bullet or number, you must work through the Bullets and Numbering dialog box. To delete the character, place the insertion point in the paragraph and click the appropriate Standard toolbar button: Bullets or Numbering.
If you create a custom bullet and later decide you want a different one, choose Format, Bullets and Numbering again. In the Bulleted tab, click the thumbnail sketch corresponding to the Custom bullet you created. Then click Customize and make the changes you want, using the Customize Bulleted List dialog box. (As you work in that dialog box, you may have to click Font to choose new font formatting, or click Bullet to choose a new symbol.)
Customizing Your Bullet's Appearance
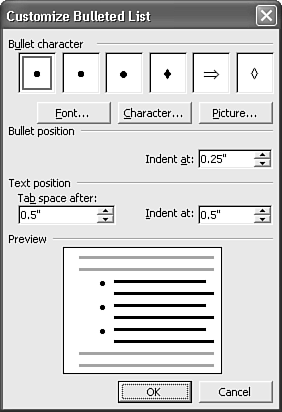
If none of Word's seven standard bullet characters is what you want, choose one of them and click Customize. The Customize Bulleted List dialog box opens (see Figure 4.19). Here, you can control virtually every aspect of a bullet's appearance, including its font formatting, the character you use, and the bullet's indentation.
Figure 4.19. You can control any aspect of a bullet character's appearance in the Customize Bulleted List dialog box.
TIP
If you hit on a bullet format that you particularly like, you may want to make it available all the time. Open the template you use most often and modify the List Bullet style, using your favorite bullet format. All new documents you create based on this template will contain the updated List Bullet style, which you can apply to paragraphs you want preceded by bullets.
When you're finished customizing your bullet, click OK, and the new custom bullet appears as an option in the Bulleted tab from now on.
To reset your custom bullets to the ones that came with Word, see "Resetting Numbering or Bullet Formats to Word's 'Factory Defaults,'" p. 148.
Changing a Bullet's Font Formatting
To change the font formatting used to produce a bullet, do the following:
Choose Format, Bullets and Numbering.
From the Bulleted tab, choose one of Word's seven standard bullets. Use a standard bullet you don't expect to need in your current document because the custom bullet you're creating will replace it.
Click Customize to display the Customize Bulleted List dialog box (refer to Figure 4.19). The bullet character you selected in the Bullets and Numbering dialog box appears selected in the Bullet Character box.
To control the bullet's font formatting, click the Font button. Word's standard Font dialog box appears. Here, you can choose a different font, font size, character spacing, or text effect.
When you're satisfied, click OK.
As you select fonts (or make any other change), the Preview box shows you how the change will affect the appearance of your bullet.
CAUTION
If you change fonts, check the Preview box to make sure that you haven't changed the character Word is using. For example, a bullet character in the Symbol font corresponds to an icon in the Wingdings font.
Changing a Bullet Character
To change the character used for a bullet, follow these steps:
Choose Format, Bullets and Numbering.
From the Bulleted tab, choose one of Word's seven standard bullets (or one of your custom bullets, if you've already created one).
Click Customize to display the Customize Bulleted List dialog box (refer to Figure 4.19).
Click Font and choose the font formatting you want your bullets to follow; click OK when you're finished doing so.
If you prefer one of the other five bullets displayed in the Bullet Character area, click on it. Otherwise, click Character to display Word's Symbol dialog box (see Figure 4.20).
Figure 4.20. Select a character for the bullet from the Symbol dialog box.
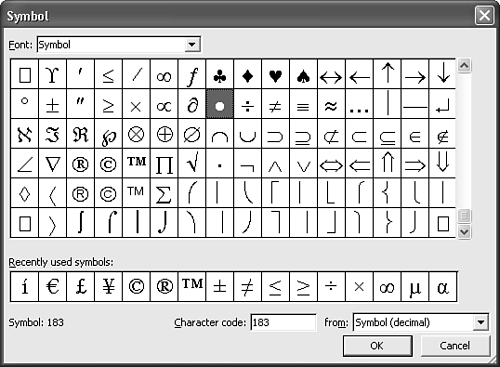
Choose the bullet you want and click OK to close the Symbol dialog box.
Click OK again.
TIP
Note that some fonts are especially valuable sources of bullets. In addition to the Symbol font that Word normally uses, others include Wingdings; the newer Wingdings 2 and Wingdings 3; Webdings, Microsoft's free font for Web applications; and the Adobe PostScript font Zapf Dingbats.
Specifying a Picture Bullet
You can use a picture or series of pictures as your bullets. This is most commonly done on Web pages, but you can do it in print documents as well. To select an image for use as a bullet, follow these steps:
Choose Format, Bullets and Numbering.
From the Bulleted tab, choose one of Word's seven standard bullets (or one of your custom bullets, if you've already created one).
Click Customize to display the Customize Bulleted List dialog box (refer to Figure 4.19).
Click Picture. The Picture Bullet dialog box appears (see Figure 4.21).
Figure 4.21. Selecting a picture for use as a bullet.
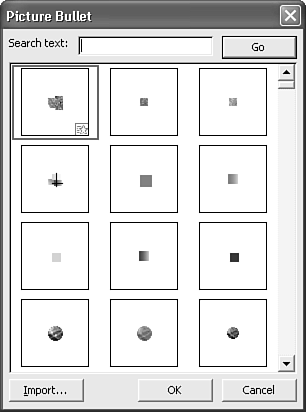
Select a bullet. Or, if you want to use a bullet not contained in the dialog box, click Import to open the Add Clips to Gallery dialog box.
From the Add Clips to Gallery dialog box, browse to and select the bullet image you want to use; then click Add.
From the Picture Bullet dialog box, make sure that the bullet you want is selected and click OK.
To learn how to specify a different picture bullet for multiple levels of your list, see "Adding a New List Style," p. 646.
Controlling Bullet Indentation and Text Position
By default, Word indents the bullet character 0.25" from the left margin and indents the text after the bullet 0.50" from the left margin.
You can change either of these settings using the Customize Bulleted List dialog box. Open the Bullets and Numbering dialog box (choose Format, Bullets and Numbering). With the Bulleted tab displayed, choose a bullet. Then click Customize. The Customize Bulleted List dialog box appears (refer to Figure 4.19).
To change the position of the bullet, enter a new value in the Bullet Position Indent At spin box. To change the position of text following the bullet, enter a new value in the Text Position Indent At spin box. When you finish, click OK.
Word also allows you to control the length of the tab Word inserts immediately following a bullet. By default, this is set to 0.5" . The result is a hanging indent where all text lines up accurately. However, if you need to change the tab setting, you can enter a new setting in the Tab Space After scroll box.
Starting and Stopping a Numbered List
Numbered lists work much like bulleted lists. To quickly create a numbered list, do the following:
Click in the paragraph you want to number (or select the paragraphs you want to number).
Click the Numbering button on the Formatting toolbar.
Word numbers each paragraph you selected. Then, as you work, each time you press Enter to start a new paragraph, Word adds the next consecutive number to that paragraph. If you move paragraphs within a numbered list, Word automatically renumbers them, keeping the numbering consecutive.
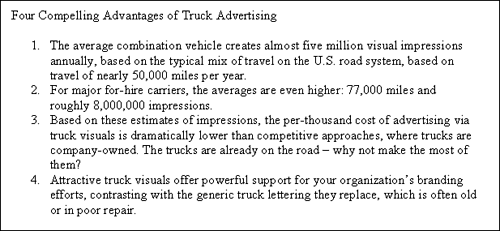
Figure 4.22 shows a sample numbered list.
Figure 4.22. An example of Word's default numbered list.
TIP
You can convert a bulleted list to a numbered list by selecting the bulleted list and clicking the Numbering button. Use the same technique to convert a numbered list to a bulleted list.
To stop Word from numbering new paragraphs, do one of the following:
Press Enter twice at the end of a numbered list.
Press Enter once at the end of a numbered list and then press Backspace.
Place the insertion point in the first paragraph you don't want to contain a number and click the Numbering button on the Standard toolbar.
TIP
Occasionally, you may want to skip numbering one paragraph but continue numbering in paragraphs afterward. Word adds numbers to every selected paragraph or every line ending with a paragraph mark. To avoid numbering a line, use a line break (Shift+Enter) rather than a paragraph break (Enter) to start the line you do not want to number.
However, if you do this, you lose all other benefits of the paragraph's formatting. For example, if the paragraph has 6 points of Space Before, this new line won't get it. In other words, in an attempt to discard one paragraph format, you discard all of them.
If you want to maintain other formatting and skip numbering of one or more paragraphs, place the insertion point in the first paragraph of the new list. Then right-click, choose Bullets and Numbering, and click the Continue Previous List button. Then click OK.
By default, you can also start numbering a list manually, using a number followed by a period, hyphen, or closed parentheses mark and a space. As soon as you press Enter, Word reformats the list as an automatically numbered list. Word also recognizes numbered lists that start with the letter A or a; an uppercase or lowercase Roman numeral; or a letter or number placed between parentheses, such as (1).
NOTE
If Word does not start a numbered list automatically, choose Tools, AutoCorrect Options; click the AutoFormat As You Type tab; and check the Automatic Numbered Lists check box.
NOTE
You can't edit the numbers in an automatic list directly. As you'll see in a moment, however, you can customize them through the Customize Numbered List dialog box.
Changing How Numbered Lists Work
If you don't like the appearance of the number you get when using the Formatting toolbar, choose Format, Bullets and Numbering to display the Bullets and Numbering dialog box. Click the Numbered tab (see Figure 4.23). Then select one of the seven standard number patterns available in Word.
Figure 4.23. Select one of these seven standard numbering patterns.
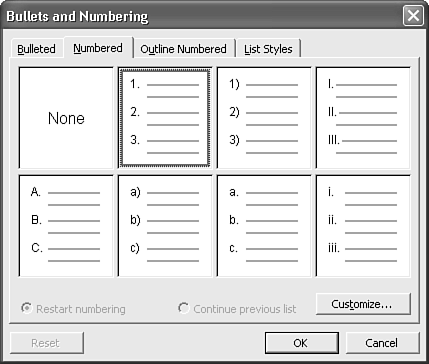
As with bullets, you can choose one of seven standard numbering styles. And if that's not enough, you can take even more control of your numbering options.
NOTE
Whatever number pattern you settle on becomes your default setting for the current document, and Word uses that setting whenever you click the Numbering button on the Formatting toolbar.
If none of the numbering patterns in the Bullets and Numbering dialog box is sufficient for your needs, choose one that you don't expect to use in your document and click Customize.
NOTE
When you customize a numbering pattern, the customized version replaces the original version as a choice in the Numbered tab of the Bullets and Numbering dialog box. The original is no longer available unless you click Reset to return to Word's factory defaults.
For more on resetting number formats, see "Resetting Numbering or Bullet Formats to Word's 'Factory Defaults,'" p. 148.
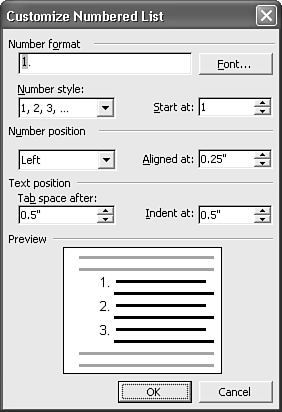
The Customize Numbered List dialog box opens (see Figure 4.24). Here, you can customize your numbered list by changing the font used to produce the number, the style of the list, the starting number, and how the numbers and text indent and align. As you make changes, you can view their effects in the Preview box.
Figure 4.24. Customizing a numbered list.
Changing a Numbered List's Font
To change the font used to produce a number, display the Customize Numbered List dialog box (refer to Figure 4.24). The number character you selected in the Numbered tab of the Bullets and Numbering dialog box appears selected in the Number Format box. Click the Font button, and the Font dialog box appears; here, you can change fonts, font sizes, character spacing, and effects.
When you're satisfied with your selection, click OK to close the Font dialog box, click OK again to close the Customize Numbered List dialog box, and click OK again to close the Bullets and Numbering dialog box.
Changing Number Style
Using the Number Style boxes in the Customize Numbered List dialog box, you can choose different numbering sequences and a different starting number for your list. Word enables you to choose from the following sequences:
1, 2, 3…
I, II, III…
i, ii, iii…
A, B, C…
a, b, c…
1st, 2nd, 3rd…
One, Two, Three…
First, Second, Third…
01, 02, 03…
You can also choose no numbering at all by selecting (none) in the Number Style drop-down list box. This feature enables you to type several characters in the Number Format box and use them as if they were single bullets?so you could create a numbered list such as the following:
BONUS! Free software!
BONUS! 30-day free access!
BONUS! CD-ROM packed with sample ideas!
NOTE
If you create a numbered list that contains only text (as described previously), be sure to use a font that is consistent or complementary with the surrounding text in your document. For instance, if the text in your document is formatted in Times New Roman, use either Times New Roman or a complementary sans serif face such as Arial for your list text.
Changing the Starting Number in a Numbered List
In some cases, you might want to change the number your list starts with. For instance, your list might need to correspond with a set of serial numbers that begins with 101. To set a new number format, display the Customize Numbered List dialog box and enter the new value in the Start At spin box.
TIP
If you simply want to restart numbering at 1 partway through a numbered list, you don't need to work with the Customize Numbered List dialog box. Instead, simply right-click on the numbered list element you want to renumber as 1; then choose Restart Numbering from the shortcut menu.
Later, if you want to restore consecutive numbering, right-click on the numbered list element you restarted at 1 and choose Continue Numbering from the shortcut menu.
Changing Number Position and Alignment
By default, Word indents the number in a numbered list by 0.25" from the left margin. It indents the text following the number by 0.5" from the left margin.
To change how Word aligns the number, enter a new value in the Aligned At spin box. (You can also choose to center or right-align the number in the Number Position drop-down box.)
To change how Word indents the text that follows the number, enter a new value in the Indent At spin box.
Resetting Numbering or Bullet Formats to Word's "Factory Defaults"
Suppose you've been changing bullet and numbering formats so that when you open the Bullets and Numbering dialog box, you don't see the format you want anymore?and you know it was there when you first started using Word. You can reset your numbering formats to reinstate Word's defaults.
In the Bullets and Numbering dialog box, click the Bulleted or Numbered tab, as appropriate. Then, click a format. If the Reset button is available, you have customized the selected format. Click the Reset button; then click Yes to confirm that you want to restore the original formatting.


