Preparing the Content of Your Main Document
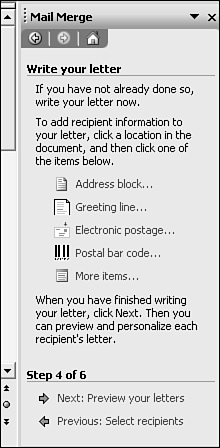
To prepare the content of your letter or email message, from the Select Recipients window of the Mail Merge Wizard task pane, click Next: Write Your Letter. The Write Your Letter page appears (see Figure 17.13). From here, you can add text to your letter, as well as the mail-merge fields and other elements that customize your letter to your precise needs.
Figure 17.13. The Write Your Letter page of the Mail Merge Wizard task pane.
If you are creating a directory, instead of Next: Write Your Letter, the following option will be Next: Arrange Your Directory. If you are creating labels or envelopes, the option available will be Next: Arrange Your Envelope or Next: Arrange Your Label. The options described in the following sections are identical, with one addition: If you are creating labels, you can define the contents and appearance of one label, and click the Update All Labels button to apply the same settings to all the others.
You can now write the content of your letter in the editing window?or copy existing content from another document. Beyond this, Word provides tools for organizing your letter's address block, greeting line, and other elements that will vary from one printed letter to the next. These are covered in the following sections.
Setting Your Address Block
Word uses the term "address block" to refer to the portion of a main document containing its recipient's name and address, and potentially company and title information. In previous versions of Word, you needed to individually add mail-merge fields for each of these elements: First Name, Last Name, Company, Address Line 1, and so forth. This was time-consuming and error prone.
Word 2003 simplifies matters by allowing you to choose the address block format you want and automatically specifying the fields that deliver this format. Of course, Word's results may not always be perfect, and you may need your address block customized in a way Word hasn't considered. If so, you can easily make manual adjustments.
To specify your address block, first click in your letter or envelope to place your insertion point where you want the address to appear.
CAUTION
If you are creating an envelope, Word places a text box in the middle of the envelope. This is an ideal location for your outgoing mailing address. However, if you don't deliberately click inside this text box, Word instead inserts your outgoing address at the upper-left corner of the envelope, where your return address should go instead.
Then, click Address Block in the Mail Merge Wizard task pane. The Insert Address Block dialog box appears (see Figure 17.14).
Figure 17.14. Use the Insert Address Block dialog box to control which information will appear in your address block.
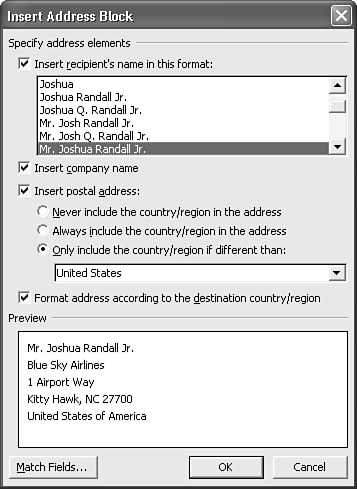
From the Insert Recipient's Name in This Format scroll box, choose the format you want from the list of samples provided. (If you don't want to include the user's name at all, clear the Insert Recipient's Name in This Format check box.)
If you want to include the recipient's company name in your address block, leave the Insert Company Name check box checked.
If you want to include the recipient's postal address in your address block, leave the Insert Postal Address check box checked; then specify whether you want to include a country or region in the address.
If your messages are primarily sent within the U.S., leave the Insert Company Name check box checked. You may want a country to be listed in your address block only if the message is going abroad. If so, click Only Include the Country/Region If Different Than, and select United States in the drop-down list below.
Matching the Fields in Your Address Block
In many cases, Word can automatically match the field names in your data source with the field names it uses in its address block. For example, if you've used an Outlook contact list as your data source, Word can generally map fields from there without difficulty.
However, in most cases you'll want to check Word's field matching before you run your mail merge?and if changes are necessary, you need a way to make them. To check Word's field mapping, click Match Fields in the Insert Address Block dialog box. The Match Fields dialog box appears (see Figure 17.15).
Figure 17.15. In the Match Fields dialog box, you can specify which database fields from your data source correspond to each element of your address block.
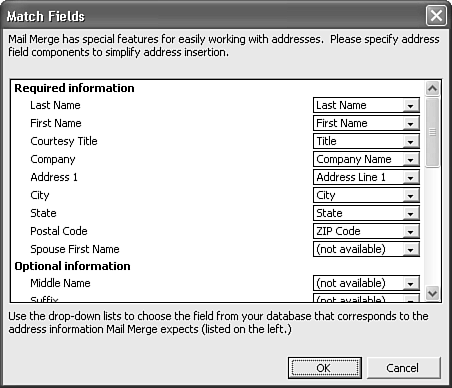
The fields Word expects to place in an address block appear in the scroll box, under Required Information. The fields Word has discovered in your database are correlated at the right. For example, Word expects a field named Courtesy Title (which might contain data such as "Dr." or "Ms."). The database used as the data source in Figure 17.15 contains a corresponding field named Title.
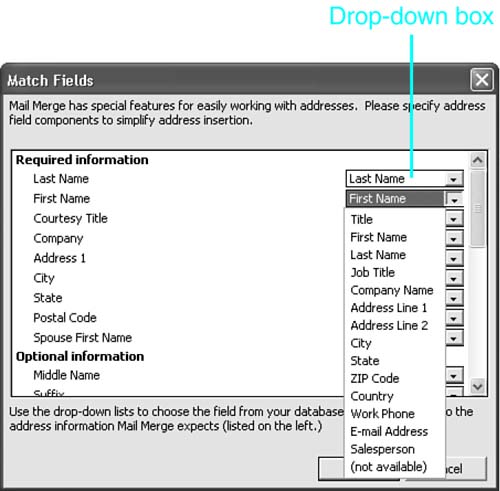
To change the database field associated with an element in your address block, click the box to the right of the field name and choose the field you want to use from the drop-down box, which lists all the fields Word found in your database (see Figure 17.16).
Figure 17.16. To map a different field to one of Word's address-block elements, choose it from the corresponding drop-down box.
When you've finished mapping fields, click OK to return to the Insert Address Block dialog box. When you've finished reviewing your address block, click OK.
NOTE
If Word can't find a field that it needs for your address block or greeting line, it displays the Match Fields dialog box without being asked?expecting you to resolve the problem by locating the data within your database.
Specifying a Greeting Line
Most letters contain a greeting line, such as "Dear Mr. Jones" or "Dear Bob." Word 2003 allows you to specify this greeting line and even include a generic greeting when your database doesn't have appropriate information. To control your greeting line, click Greeting Line in the Write Your Letter window of the Mail Merge Wizard task pane. The Greeting Line dialog box opens (see Figure 17.17).
Figure 17.17. In the Greeting Line dialog box, you can specify how your message's greeting will read.

You can first choose a salutation. Two options are built-in: Dear and To. If you want a different salutation, you can type it yourself. If you want no salutation at all, choose None from the salutation drop-down box.
Next, choose a name format. By default, Word expects your mailing to be formal: "Dear Mr. Randall." If your mailings are more informal, you might choose a first name instead. You can choose various options, if your database contains the information to support them. For example, if you're mailing to couples, you can use a format like "Dear Joshua and Cynthia."
Then choose (or type) the punctuation you want to follow the recipient's name. By default, Word uses a comma; many letter writers prefer a colon.
Occasionally, your database won't contain the information needed to follow the format you specify. Rather than leaving your greeting blank or partially blank, Word allows you to choose or type a default Greeting Line for Invalid Recipient Names, such as Dear Sir or Madam. Many direct mail letter-writers will want to enter a generic greeting line that is more contemporary, such as Dear Colleague; or more specific, such as Dear Fellow Stamp Collector.
NOTE
Like the Insert Address Block dialog box covered earlier (refer to Figure 17.14), the Greeting Line dialog box contains a Match Fields button, which displays a dialog box that allows you to double-check whether Word has identified fields that contain the correct information to include in a greeting.
When you've finished editing your Greeting Line, click OK to return to the Write Your Letter window of the Mail Merge Wizard task pane.
Customizing the Body of Your Main Document
You might occasionally want to add fields to the body of your letter or email message?not just to the address block or salutation. For example, you might want to include a paragraph that says something like this:
Like many of your neighbors in Longwood, you may suspect you're paying too much for auto insurance. Why not do what many of them have already done, and check out Bob's Discount Auto Insurance?
By inserting the City field from your database into your message, you can instruct Word to customize each message with its recipient's hometown.
To make customizations like these, click in your document to position your cursor where you want the mail-merge field to be placed. Then click More Items in the Write Your Letter window of the Mail Merge Wizard. The Insert Merge Field dialog box opens (see Figure 17.18).
Figure 17.18. The Insert Merge Field dialog box.
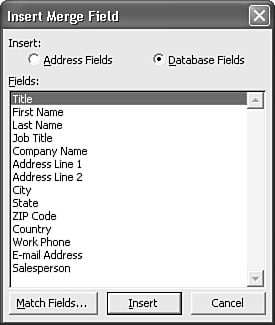
You can choose from two sets of merge fields, by clicking the corresponding Insert button at the top of the dialog box:
Database Fields, which must correspond to specific database field names in your database
Address Fields, which still must be mapped to fields in your database, but need not have names identical to those in your database
Choose a field in the Fields scroll box, click Insert, and click Close. The field appears in your document, surrounded by double brackets.
CAUTION
Be sure to place appropriate spacing before and after the field you insert to avoid unsightly gaps?or words that run together?in your final message.
You may find this easier to do if you first display hidden characters such as spaces and paragraph marks by clicking the Show/Hide Paragraph Marks button on the Standard toolbar.
Adding a Postal Bar Code to Your Envelopes
If you are creating envelopes, Word allows you to print postal bar codes that allow the U.S. Postal Service to process mail more efficiently and may qualify you for a mailing discount.
NOTE
Word supports only U.S. postal codes.
To add postal bar codes, click Postal Bar Code on the Arrange Your Envelope window of the Mail Merge Wizard. The Insert Postal Bar Code dialog box appears (see Figure 17.19).
Figure 17.19. The Insert Postal Bar Code dialog box.
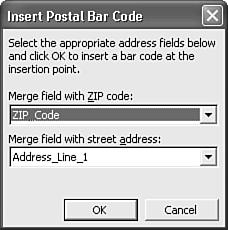
In the Merge Field with ZIP Code drop-down box, Word shows you the database field it intends to use to generate your five-digit ZIP Code. In the Merge Field with Street Address drop-down box, Word shows you the street address database field it intends to use to create the remaining four digits of your ZIP Code.
If either of these fields does not correlate with the database fields that actually contain ZIP Code or street information, make appropriate changes; then click OK. Word inserts a bar code on the envelope, in a location that meets postal regulations.
To move on with your mail merge, click Next: Preview Your Letters (or Preview Your Envelopes, or Preview Your Labels).
Previewing Letters or Other Documents
In the Preview window of the Mail Merge Wizard (see Figure 17.20), you can review how each of your finished letters looks before you actually print it.
Figure 17.20. Previewing a letter in the editing window.
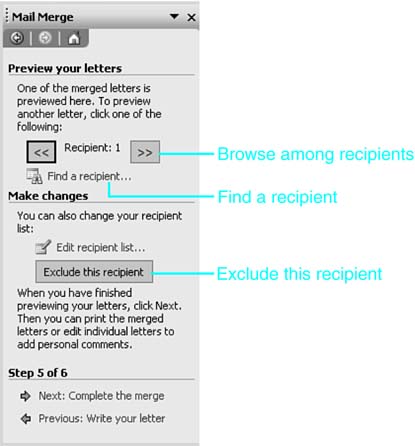
The first letter in your mail merge appears in the editing window. You can scroll through your database by clicking the double-arrow keys in the Preview Your Letters window, or click Find a Recipient to check the letter to a specific individual.
You may occasionally see a letter to an individual who shouldn't receive one?perhaps it's someone to whom you've already made a special private offer that is inconsistent with the direct mail offer everyone else is receiving. To remove a recipient from your mail merge, click Exclude This Recipient. To check and adjust your entire recipient list, click Edit Recipient List. The Mail Merge Recipients dialog box appears (refer to Figure 17.9); make your changes there and click OK.
Checking Your Mail Merge for Errors
Before you're ready to finalize your merge, you can also preview individual form letters (or other merged documents) by clicking View Merged Data while your main document is displayed. Keep in mind that in a large mailing, it may be impractical to check every document individually. It's simply too easy to miss potentially disastrous problems, such as discrepancies between merge fields in the main document and field names in the data source, or incorrect sort order.
That's where Word's Check Errors feature comes in. To run error checking, click Check Errors on the Mail Merge toolbar. The Checking and Reporting Errors dialog box appears (see Figure 17.21).
Figure 17.21. Choosing how you want Word to check and report on potential errors in your mail merge.
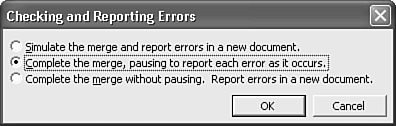
You have three choices. The first and third choices list your errors in a new document, named Mail Merge Errors1. The middle choice runs the merge, displaying a dialog box onscreen if an error occurs.
One common error Word may find is an invalid merge field. This often occurs when you enter merge fields and later change your data source. If the new data source includes different field names from those you used originally, Word can't find the information it needs to include in your merged documents.
When the Invalid Merge Field dialog box appears, you can click Remove Field to remove the field from your main document. Word continues checking for errors immediately without asking you to confirm the change.
To move on with your mail merge, click Next: Complete the Merge.
Editing Individual Letters, Envelopes, or Labels Before Printing
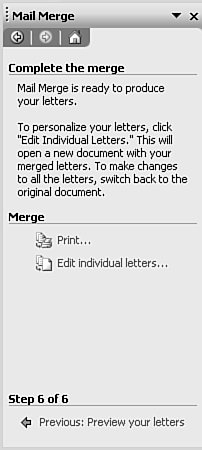
In the Complete the Merge window of the Mail Merge Wizard task pane (see Figure 17.22), you're given two choices about how you want to complete your mail merge.
Figure 17.22. From the Complete the Merge window, you can either print your merged documents or create an editable file containing them.
Of course, you can go straight to print?but if you're not sure that your letters, labels, or envelopes are perfect yet, or if you want to make further customizations to them, you can instead merge your letters to a single Word document. After you've done so, you can edit that document just like any other Word document.
To merge to a Word document, click Edit Individual Letters (or Edit Individual Labels or Edit Individual Envelopes). The Merge to New Document dialog box opens (see Figure 17.23). Here, you get another opportunity to specify which database records to merge. For example, imagine that your entire mailing will consist of 10,000 letters; you might simply want to spot-check 50 of them.
Figure 17.23. The Merge to New Document dialog box.

To merge only the current record, choose Current Record. To merge a specific set of records, click From and enter the range of records you want to merge, in the From and To text boxes. Then click OK. Word creates a new file, with each letter in a separate section. You can edit the letters and print them as you would the contents of any other Word document.


