Using Footnotes and Endnotes
Footnotes and endnotes are notes that provide more information about specific text in your document. In Word, footnotes appear at the bottom of your current page. Notes compiled at the end of a document?or at the end of a section?are called endnotes. Both footnotes and endnotes are equally easy to insert?and easy to work with after you add them. You can use them both in the same document.
Word can automate the most annoying aspects of managing footnotes and endnotes: sequencing and placing them properly. When you use Word's footnote and endnote features, you get extensive control over your footnotes and endnotes. Of course, you can control the text that appears in your footnotes and endnotes?and how that text is formatted. But you can also control
Where your footnotes appear on your page and exactly where your endnotes are placed at the end of your document
How your footnotes and endnotes are sequenced
What kind of footnote or endnote marks (called note reference marks) you use
How footnotes are separated from other text on your pages
By using Word's controls, you can customize your footnotes or endnotes for any type of document, including specialized documents such as legal documents, which may have strict footnote or endnote requirements.
Inserting Footnotes and Endnotes
To insert a standard footnote, place your insertion point where you want the footnote mark to appear, and press Alt+Ctrl+F. Word inserts a note reference mark containing a number. If this is the first footnote in your document, the number is 1; if you have already inserted footnotes, Word uses the next number after your last footnote, using the sequence 1, 2, 3, and so on.
To insert a standard endnote, place your insertion point where you want the endnote mark to appear, and press Alt+Ctrl+D. Word inserts a note reference mark containing a lowercase letter. If this is the first endnote in your document, the letter is "i"; if you have already inserted endnotes, Word uses the next letter after your last endnote, following the sequence i, ii, iii, and so on.
 To change the appearance of your footnotes or endnotes, see "Customizing Your Footnotes and Endnotes," p. 748.
TIP
If you use footnotes and endnotes often, you can add them to the shortcut menu that appears when you right-click on text in your document. To do so, follow these steps:
Choose Tools, Customize, and click the Toolbars tab.
Check the Shortcut Menus check box in the Toolbars scroll box. The Shortcut Menus toolbar appears.
Click the Commands tab and choose Insert from the Categories scroll box.
In the Commands scroll box, click on the command you want to add?in this case, either Footnote or Insert Endnote Now.
Drag the command to the Text button on the shortcut toolbar; drag down to choose the shortcut menu you want to use (Text); then drag across the cascaded menu and release the mouse pointer where you want the command to appear.
Click Close in the Customize dialog box.
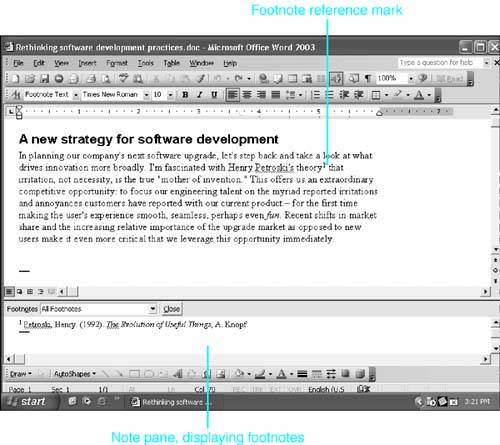
In Normal view, when you insert a footnote or an endnote, Word also typically displays the note pane. Figure 22.1 shows how this note pane looks immediately after you insert your first footnote. If you were to insert an endnote instead, it would look much the same except that it would use "i" for notation and the note pane would be set for endnotes.
Figure 22.1. When you press Alt+Ctrl+F to enter a footnote, Word places a footnote reference mark at your insertion point and opens the Footnote pane for editing.
NOTE
If the note pane does not appear, choose View, Footnotes to display it, or double-click on any footnote or endnote reference mark.
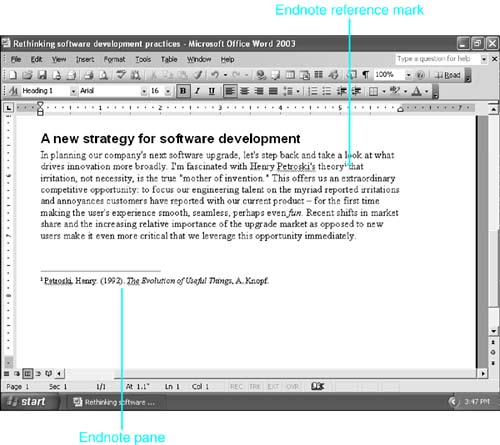
In Print Layout view, there is no separate note pane (see Figure 22.2). You simply edit footnotes wherever they are located on the page?typically under a footnote separator line that stretches about one-third of the way across the page.
Figure 22.2. In Print Layout view, the footnote appears in its location on the page; you can edit it there in the same way that you edit other text in your document.
If you're creating endnotes, it is usually best to work in Normal view. If you create an endnote in Print Layout view, Word moves you to the list of endnotes at the end of the document or section. You can edit the endnote there, but often you can't see the document text to which it relates.
Editing Footnotes and Endnotes
Within the note pane, you can edit or format text in most of the ways you're familiar with. You can even add images or tables. A few of Word's features are off-limits, but not many. For example, you can't use Word 2003's drawing tools, insert comments, or insert captions. You can't create multiple columns, either, but multicolumn tables are a possible workaround.
TIP
Even though you can't use drawing tools, it is possible to place a drawing inside a footnote or an endnote. Create the drawing in Word's editing window, copy it to the Clipboard, and then paste it into the note pane.
If you are working in your document and you want to edit the text associated with a footnote or an endnote, double-click its note reference mark. The note pane opens, displaying the corresponding note. In Normal view, you can also view the note pane by choosing View, Footnotes. If the note pane is open for viewing footnotes, but you would prefer to view endnotes, you can choose All Endnotes from the drop-down box within the note pane.
If you don't need to edit the text of a note but want to see it, hover your mouse pointer over the accompanying note reference mark in your document. The mouse pointer changes shape to resemble a piece of note paper; then a ScreenTip appears displaying the contents of the note (see Figure 22.3).
Figure 22.3. Hover your mouse pointer over a note reference mark, and Word displays the note's contents in a ScreenTip.

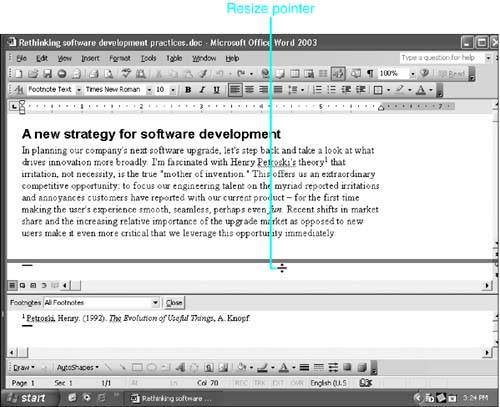
If you're working in a document with many footnotes or endnotes, you might want to view more than those that appear in the size of the default note pane. To adjust the size of the note pane, place the mouse pointer over the border until it changes to double vertical arrows (see Figure 22.4). Drag the border up or down to resize the pane.
Figure 22.4. Resizing a note pane by dragging its top border.
Customizing Your Footnotes and Endnotes
Word gives you total control over the appearance, sequence, and location of footnotes and endnotes. This control is available through the Footnotes and Endnotes dialog box. To display it, click Insert, Reference, Footnote (see Figure 22.5). If Footnote does not appear in the Insert menu, first click the double-down arrow to make Word display its full menu.
Figure 22.5. You can control the formatting and numbering of footnotes and endnotes in the Footnote and Endnote dialog box.
NOTE
Many publishers, especially in specialized fields, require customized formatting for footnotes. In some cases, their footnote styles are adapted from The Chicago Manual of Style. Before creating references in footnotes or endnotes, make sure that you are formatting them appropriately.
In the next few pages, you'll learn how to change each of Word's default settings, beginning with the change you're likely to make most often: customizing the character Word uses as its note reference mark.
Inserting a Custom Mark
In documents in which you have only a few footnotes or endnotes, you may want to use a custom mark?a special character that appears in place of the number or letter Word normally uses as a note reference mark. To create a custom mark, place your insertion point where you want the footnote or endnote, and open the Footnote and Endnote dialog box. From there,
Choose Footnotes or Endnotes to specify what kind of note you're creating.
Click in the Custom Mark text box and enter the character(s) you want to use in your note reference mark. (You can insert up to 10 characters in a note reference mark.)
Click Insert.
NOTE
If you want to change an existing note reference mark into a custom mark, select the mark in your document before you follow these steps.
TIP
You can use custom marks in documents that also use conventional note reference marks. When Word numbers the conventional note reference marks, it skips any custom marks in your document.
You can't edit a note reference mark directly; you must create a custom mark (or change Word's automatic footnote/endnote numbering sequence, as you'll learn how to do shortly).
You might want to use a symbol as your custom mark, such as  or
or  . If so, rather than entering text in the Custom mark field, click the Symbol button next to it. The Symbol dialog box appears (see Figure 22.6). Choose the symbol you want to use and click OK. The symbol you chose now appears in the Custom Mark box. Click Insert to finish creating the footnote or endnote.
Figure 22.6. Choose a symbol from the Symbol dialog box. To choose from a different character set, select another symbol font (such as Wingdings) from the Font drop-down box.
Controlling Footnote Location
Word assumes that you want your footnotes to appear at the bottom of each page, but in many cases that may not be what you need.
NOTE
If you want to change footnote or endnote settings for only a portion of your document, first select the text containing the reference marks you want to control.
You can change these default settings in the Footnote and Endnote dialog box (refer to Figure 22.5). The controls for changing where footnotes or endnotes appear are located in the drop-down boxes to the right of the corresponding note type (you can work with only one type at a time).
NOTE
Any changes you make in the Footnote and Endnote dialog box affect both the notes you will insert and those you've already inserted.
If you're working with footnotes, your choices are Bottom of Page (the default setting) or Beneath Text. If you choose Beneath Text, your footnotes are placed directly under the last line of text on each page. This means that the location of footnotes can vary, depending on how far down the page your document text extends.
If you're working with endnotes, your choices are End of Document (the default setting) and End of Section. If you choose End of Section, all the endnotes in each section are compiled after the last line of that section.
For more information on how section breaks affect your documents, see "Working with Sections," p. 159.
Controlling Footnote Numbering
As you've seen, Word automatically numbers footnotes using the sequence 1, 2, 3.… Word also assumes that you want your footnotes to number consecutively throughout your document, beginning with the number 1.
If you need to create multiple footnotes that share the same footnote number and refer to the same text, see "Cross-Referencing a Footnote or an Endnote," p. 762.
If you allow Word to automatically sequence your footnotes or endnotes (rather than manually creating custom marks yourself), Word gives you control over the numbering and lettering sequences it uses. You can specify the sequence through the Number Format drop-down box in the Footnote and Endnote dialog box. Your choices are the same whether you're working with footnotes or endnotes. They include
1, 2, 3…
a, b, c…
A, B, C…
i, ii, iii…
I, II, III…
*,
The *, , , §… option inserts a series of the most commonly used footnote symbols. After you go past four footnotes or endnotes, Word "doubles up" the characters. The reference mark associated with footnote #5 is **; footnote #6 is ; and so on. Then, after you go past eight footnotes or endnotes, Word "triples up" the characters, and so on.
NOTE
You can't set Word to automatically use a single custom character repeatedly in all your footnotes or endnotes, but you can manually insert the same custom mark every time you add a footnote or an endnote.
Controlling the Starting Number of Footnotes or Endnotes
Word assumes that you want your footnotes to begin numbering with 1 and your endnotes to begin numbering (or, perhaps, lettering) with i. You might, however, be creating a chapter of a book that already contains footnotes or endnotes. You know that several notes appear before yours. To start with a different number (or letter), select it in the Start At spin box of the Footnote and Endnote dialog box.
NOTE
The letters or numbers in the Start At spin box change, based on the Number Format you've chosen. If you enter a different number, letter, or symbol in the Start At spin box and later change the Number Format, your starting number automatically changes to the corresponding number or letter in the new sequence.
Restarting Numbering for Each Section or Page
By default, Word numbers footnotes or endnotes sequentially through the entire document. However, you might want your notes to begin numbering again with 1 (or whatever starting number you've chosen) at the beginning of each new document section. If so, choose Restart Each Section from the Numbering drop-down list box in the Footnote and Endnote dialog box.
If you're working with footnotes, you have an additional option: to restart footnote numbering with each new page. To choose this option, choose Restart Each Page from the Numbering drop-down list box.
Converting from Footnotes to Endnotes (and Vice Versa)
Occasionally, you might start out creating footnotes and later decide that you want endnotes instead. Or perhaps you start out with endnotes and discover that your client, publisher, or organization prefers footnotes. You can convert between footnotes and endnotes whenever you want; you can even swap endnotes and footnotes at the same time.
To convert all your footnotes or endnotes at once, choose Insert, Reference, Footnote, and click the Convert button. The Convert Notes dialog box opens (see Figure 22.7). Select one of the available options and click OK.
Figure 22.7. You can convert all footnotes to endnotes, all endnotes to footnotes, or swap footnotes and endnotes at the same time.
When you convert footnotes to endnotes, or vice versa, Word correctly renumbers them, taking into account any notes that already exist. For instance, if you convert two footnotes to endnotes and you already have one endnote, Word will correctly sequence all three endnotes, from i to iii.
To convert only one footnote to an endnote (or vice versa), display the note in the Footnote or Endnote pane, right-click on it to display the footnote shortcut menu and choose Convert to Endnote (or Convert to Footnote).
Working with Footnotes and Endnotes: A Closer Look
You've already learned that you can edit any footnote or endnote in the note pane. The note reference mark in your document and the text of your footnote or endnote are connected. Whenever the note reference mark moves in your document, the footnote/endnote text moves with it. This means that you can
Duplicate a footnote by selecting, copying, and pasting the note reference mark.
Move a footnote by cutting and pasting (or dragging and dropping) the note reference mark.
Delete a footnote by deleting the note reference mark.
Whenever you move, copy, or delete a note reference mark, Word automatically updates the numbering of all the footnotes or endnotes in your document. Of course, you don't have to cut, copy, paste, or delete only the note reference mark; chances are you'll also be editing related surrounding text at the same time. The note reference mark moves with the surrounding text.
CAUTION
If you delete text that includes a reference mark, you delete the accompanying footnote or endnote as well.
Navigating Among Footnotes and Endnotes
You've already learned that you can double-click any note reference mark to display the note pane. Whenever you click inside a footnote or an endnote in the pane, Word also displays the corresponding location in the main document.
You can move among notes in the main document without opening the note pane. To move to a specific footnote, click Edit, Go To (or press Ctrl+G or F5) to display the Go To tab of the Find and Replace dialog box. Choose Footnote in the Go to What scroll box; then, in the Enter Footnote Number text box, enter the footnote number you want to view, and click Go To.
A simpler method of just moving from one footnote or endnote to the next is to use the Browse Object buttons (see Figure 22.8).
Figure 22.8. Working with Select Browse Object.
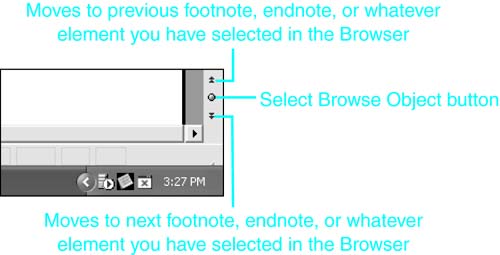
With these buttons you can use the double-down arrow to go to the next footnote or endnote in your document. Alternatively, the double-up arrow takes you to the previous one. First, however, you need to set either footnotes or endnotes as your browse object. Follow these steps to move from one footnote or endnote to the next:
Click the Select Browse Object button.
Click Browse by Footnote or Browse by Endnote (see Figure 22.9).
Figure 22.9. Using Select Browse Object to move between footnotes or endnotes.

Reformatting Footnotes and Endnotes
Word builds footnotes using two built-in styles: Footnote Text for the contents of the footnote, and Footnote Reference for the reference mark (as it appears in both the document and the Footnote pane). For endnotes, Word uses Endnote Text and Endnote Reference. This means you can create a document in which all footnotes use one set of formatting instructions, and all endnotes use a different set of formatting entirely.
Follow these steps to change the appearance of either footnotes or endnotes in your current document, by changing their associated styles:
Select footnote or endnote text, or a note reference mark that you want to change.
Choose Format, Styles and Formatting. The Styles and Formatting task pane appears, displaying the name of the style that is being used by the text you selected.
In the Styles and Formatting task pane, click on the style name, and choose Modify. The Modify Style dialog box appears.
Select the style changes you want to make. For example, if you want, choose a different font in the Formatting area.
Check the Automatically Update check box if you want to change all appearances of the style in your existing document.
Check the Add to Template check box if you want the updated style to be added to the template associated with this document so that the updated style will be applied in future documents that use the same template.
Click OK.
To learn more about creating styles easily, see "Creating Paragraph Styles Easily with Style by Example," p. 339.
Controlling Footnote and Endnote Separators and Notices
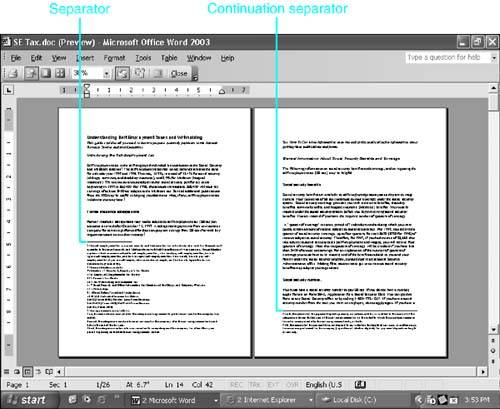
By default, Word separates footnotes from the text of your document by inserting a line roughly one-third the width of a standard page margin. This is called the footnote or endnote separator.
If a footnote is so long that it must jump to the next page, Word separates it from the text on that page as well, using a footnote or endnote continuation separator. By default, this is a line that extends across the entire width of the page. You can see examples of both in Figure 22.10.
Figure 22.10. Word uses separators to divide footnotes and endnotes from other text in the document.
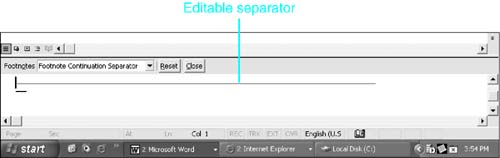
You can change the appearance of either the separator or the continuation separator. You can also edit them to include text. To do so, first display the Footnote or Endnote pane by double-clicking on any footnote or endnote reference mark in Normal view. From the Footnotes or Endnotes drop-down box in the notes pane, select the element you want to edit. The current setting appears, typically either a short or a long line. Figure 22.11 shows a footnote continuation separator as it appears after you select it from the Footnotes drop-down box. Edit the element to include the text, underlining, and/or formatting you want, and click Close.
Figure 22.11. You can edit the separator by choosing it from the Footnotes drop-down box in the notes pane.
TIP
If you want, you can also add text that tells users a note is jumping to the next page. With the Footnote pane open, choose Footnote Continuation Notice. (Or with the Endnote pane open, choose Endnote Continuation Notice.) Then enter and format the text you want. Click Close.
By default, the Footnote or Endnote Continuation Notice is blank.
TIP
If you work extensively with footnotes, consider a third-party bibliographic database product, such as ProCite 5.0 (www.procite.com) or Endnote 6.0 (www.endnote.com). Both products include sophisticated "cite while you write" Word macros that streamline complex footnoting.
If Word won't print endnotes on a separate page, see "What to Do If Word Won't Print Endnotes on a Separate Page," in the "Troubleshooting" section of this chapter. |
If Word superimposes footers on top of footnote text, see "What to Do If Word Prints Page Footers on Top of Footnote Text," in the "Troubleshooting" section of this chapter.
If Word won't delete reference marks, see "What to Do If Word Won't Delete Footnote or Endnote Reference Marks," in the "Troubleshooting" section of this chapter.


