Understanding Outline View
Soon, you'll learn techniques for polishing your outline to make sure that your document is actually structured the way you want. First, however, notice three things about Outline view:
Each paragraph has a symbol to its left. These symbols tell you what you need to know about the paragraph's relationship to surrounding text:
A plus sign (+) tells you the paragraph has subordinate text. This text may consist of lower-level headings, paragraphs formatted in styles that Word does not recognize as a heading or outline level, or both.
A minus sign (?) tells you the paragraph has no subordinate text. In other words, the paragraph has a heading style or an outline level but no subheads or body text are under it.
A small square tells you the paragraph is body text.
Paragraph formatting, such as indents and line spacing, disappears. In fact, Word grays out the Format, Paragraph menu command so that you can't use it to add new paragraph formatting. In its place, Word displays its own outline indenting to make it obvious which paragraphs are most important (for example, which appear at the highest level of your outline) and which are subordinate.
The Outlining toolbar appears. This toolbar contains all the tools you need in order to edit and manage your outline.
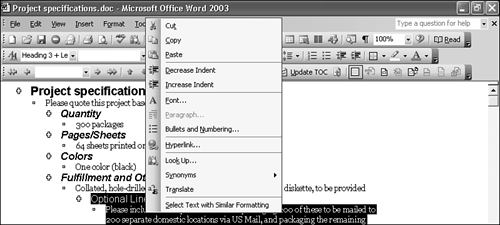
You can use keyboard shortcuts or the Increase Indent and Decrease Indent buttons on the Formatting toolbar to set standard indents without changing the outline level of your heading. You can also right-click to access a shortcut menu that includes some formatting controls (see Figure 18.3).
Figure 18.3. Right-click anywhere in Outline view to see its shortcut menu.
TIP
You can switch back and forth between views at any time. You might use Outline view when you're organizing your document, Normal view when you're editing content, and Print Layout view when you're primarily concerned about graphics and the appearance of your pages.
If you're working in Normal view and you decide to change a heading level, you might want to switch into Outline view so that you can quickly change all the subordinate headings at the same time.
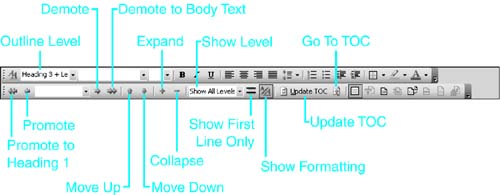
Using the Outlining Toolbar
Take a closer look at the Outlining toolbar (see Figure 18.4), which includes Word's tools for organizing and managing your outline. These buttons fall into the following four categories:
Tools for increasing or decreasing the relative importance of paragraphs (Promote to Level 1, Promote, Outline Level, Demote, and Demote to Body Text).
Tools for moving paragraphs up or down in the document (Move Up, Move Down).
Tools for controlling which paragraphs display and how they look (Expand, Collapse, Show Level, Show First Line Only, and Show Formatting).
Tools for working with Tables of Contents in Outline view (Update TOC and Go to TOC). These buttons are covered in Chapter 20, "Tables of Contents, Figures, Authorities, and Captions."
Figure 18.4. The Outlining toolbar appears only when you are working in Outline view; you can't display it anywhere else.
 For more information about working with master document tools, see "Creating Master Documents and Subdocuments," p. 655.
Most of these buttons also have a keyboard shortcut equivalent, as listed in Table 18.1.
Button Shortcut | Toolbar Task | Keyboard |
|---|---|---|
| Promote paragraph | Alt+Shift+left arrow |
| Demote paragraph | Alt+Shift+right arrow |
| Demote to body text | Ctrl+Shift+N |
| Move selected paragraph(s) up | Alt+Shift+up arrow |
| Move selected paragraph(s) down | Alt+Shift+down arrow |
| Expand text under heading | Alt+Shift++ (plus sign) |
| Collapse text under heading | Alt+Shift+? (minus sign) |
Expand/collapse all text or headings | Alt+Shift+A | |
Toggle character formatting | / (on numeric keypad) | |
| Toggle to displayonly first line of body text | Alt+Shift+L |
Show only Level 1 headings/text | Alt+Shift+1 | |
Show all levels through [a number] | Alt+Shift+[number from 1 to 7] |
TIP
The Promote to Level 1, Promote, Demote, Demote to Body Text, Move Up, and Move Down keyboard shortcuts work in every view, not just Outline view. These shortcuts provide a quick way to change heading styles or move paragraphs.
It's helpful to understand what the Outlining toolbar buttons and symbols don't do so that you don't make the common mistakes that trip up many first-time outliners:
The right-arrow button does not insert a tab, even though it looks as if it might. It does indent text much as a tab does, but this happens only because that text is being demoted to the next lower level.
The numbered buttons do not specify heading or outline levels. They simply control how many levels you can see at the same time.
The plus and minus buttons do not increase or decrease the importance of selected text. Rather, they hide or display all the subordinate text and headings under the paragraph you've chosen.
Similarly, the plus and minus symbols next to each paragraph say nothing about the heading level associated with the paragraph. All they tell you is whether the paragraph has text subordinate to it. It's common to have two headings next to each other, both formatted in the same style, but one adorned with a plus sign and the other with a minus sign.
Adding New Subheadings
Now that you've taken a tour of Word's outlining tools, it's time to start using them. If you open a blank document and switch to Outline view, Word typically displays a minus sign. This indicates that, for the moment at least, no text is subordinate to the line in which you are working.
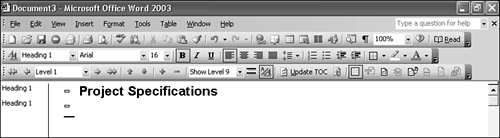
If you start typing the first line of an outline, Word formats your text as a first-level heading, using the Heading 1 style. If you finish your paragraph and press Enter to start a new one, Word creates a new paragraph, also with the Heading 1 style. You can see this in Figure 18.5, which shows an outline with style names displayed in the Style Area.
Figure 18.5. If you press Enter after creating a first-level heading in Outline view, Word starts another first-level heading.
NOTE
To set a Style Area, choose Tools, Options; click View, enter a value in the Style Area Width spin box, and click OK.
NOTE
In this respect, Word behaves differently in Outline view than in other views. Elsewhere in Word, if you press Enter to create a new paragraph after a heading, Word assumes that you want to create Normal text?text formatted with the Normal style. (That's what Word's built-in Heading style settings tell it to do.) However, people rarely create large blocks of Normal or body text in Outline view, so Word assumes that you are creating an outline and want another heading like the one you've just finished.
Promoting and Demoting Headings
Often, you don't want another heading at the same level as the one you've just completed. Instead, you want a subordinate heading or body text. To demote any heading by one level, position your insertion point anywhere in the paragraph and click Demote, or use the keyboard shortcut Alt+Shift+right arrow.
When you demote a heading, Word indents it and also changes the heading style. For example, if you demote a first-level heading, Word changes the style associated with it to Heading 2. If the heading contains text, the character formatting also changes to reflect the new style.
Of course, you can promote subordinate headings as well. Click the Promote button or press Alt+Shift+left arrow. Again, Word changes the style and formatting as well as the indentation.
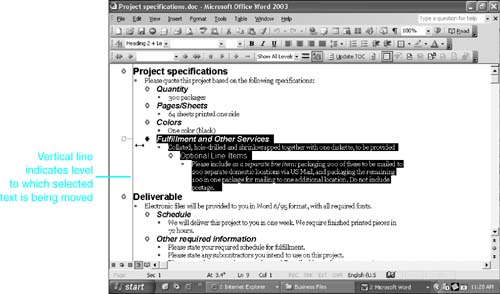
You can also drag a heading to a new level. Click the outline symbol next to the heading; your mouse pointer changes to a crosshair, and Word selects the heading and its subordinate contents. Then drag the mouse to the right. The mouse pointer changes to a horizontal double arrow, and you'll see a gray vertical line that moves as you jump from one heading level to the next (see Figure 18.6). When you've arrived at the heading level you want, release the mouse pointer.
Figure 18.6. You can drag a paragraph left or right to a new heading level.
TIP
If you want to move a heading by several levels, it's often quicker to change the style instead. For example, to move a heading from second to sixth level, choose Heading 6 in the Style drop-down list box.
Demoting Headings to Body Text
To demote any heading to body text, click Demote to Body Text or press Ctrl+Shift+N. Word reformats that text in the Normal style and displays the small square Body Text symbol next to it. When you finish a paragraph of body text, you can start a new one by pressing Enter; another Body Text symbol appears to the left of the new paragraph.
TIP
In most cases, it's inconvenient to edit your whole document in Outline view, but you might have some ideas you'd like to jot down while you're organizing a new document in Outline view. Click Demote to Body Text in a new paragraph and start typing.
It's important to keep in mind that Word uses the term "body text" to refer to two different things: a style and an outline level. As you'll see, this can cause confusion for the unwary.
Some people format all body text using Word's Body Text style rather than the Normal style. In fact, Word often makes this change automatically when you run AutoFormat. However, Normal and Body Text are two different styles. In particular, Body Text adds 6 points of space after each paragraph, and Normal does not.
Surprisingly, when you use Demote to Body Text, you reformat text with the Normal style, not the Body Text style (though this does apply the Body Text outline level). As a result, if your document utilizes the Body Text style but you also click Demote to Body Text in Outline view, you may inadvertently introduce small formatting inconsistencies.
If you want to standardize on the Body Text style rather than the Normal style, spend a few minutes recording a quick macro that replaces the Normal style with the Body Text style throughout your document.
NOTE
Just as you can demote a heading to body text, you can also promote body text to a heading by selecting it and clicking Promote. Doing so transforms body text into a first-level heading formatted with the Heading 1 style; if necessary, you can then click Demote once or more to transform the text into a lower-level heading.
You can promote several consecutive paragraphs of body text at once, as long as your selection doesn't contain any headings. Select all the paragraphs and click Promote.
Promoting or Demoting Several Headings at the Same Time
If you select one heading and promote or demote it, nothing changes elsewhere in your document. That might be just fine with you. Often, however, when you promote or demote a heading, you want all your subordinate headings to be carried along with it.
Word makes this easy to do. Rather than selecting the paragraph, click the outline symbol next to it. This selects both the current paragraph and all the paragraphs subordinate to it. In Figure 18.7 you can see a first-level heading that has been selected along with the second-level heading and subordinate body text under it.
Figure 18.7. Clicking the outline symbol next to a paragraph selects the paragraph and all the subordinate headings and body text under it.
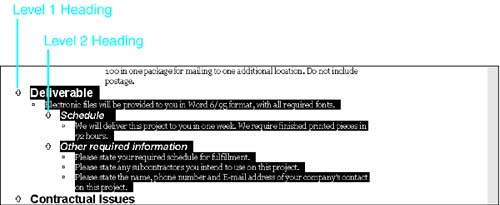
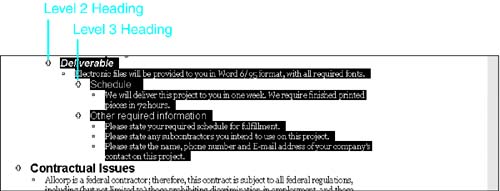
Figure 18.8 shows what happens after you click Demote. The second-level head is now a third-level head; the third-level head is now a fourth-level head, and so on. Text formatted in a style other than a Heading style does not change, however, regardless of which headings it is subordinate to. To transform body text into a heading, you must select and promote it.
Figure 18.8. After you click Demote, all the selected heading levels are demoted, but text formatted with other styles does not change.
Moving Paragraphs Within an Outline
As you organize your outline, you might find a heading or a block of text that you want to move toward the front or rear of the document. Word's Cut and Paste tools work within Outline view. However, if you are simply moving a heading or text by one paragraph (or a few paragraphs), there's a quicker alternative.
Place your insertion point in the paragraph you want to move, and click the Move Up or Move Down button on the Outlining toolbar. The entire paragraph moves. If you want to move more than one paragraph, select them all before clicking Move Up or Move Down.
If you're moving text farther than a paragraph or two, there's still a quicker solution than using Cut and Paste: Drag and drop it. Click the Outline symbol next to a paragraph. Your mouse pointer changes to a crosshair. Drag the mouse up or down. The pointer changes to a vertical double-arrow, and a gray horizontal line appears, moving as you jump from one paragraph to the next (see Figure 18.9). When you arrive at the location you want, release the mouse pointer.
Figure 18.9. Dragging text up or down in Outline view.
TIP
The technique you've just learned works if you're moving just one paragraph (and its subordinate contents). However, what if you want to move several consecutive paragraphs that all share the same heading level?
First, select all the paragraphs. Next, press the Alt key and click the Outline symbol next to the first paragraph of the text you've selected. Finally, drag the paragraphs to their new location.
If you have a long, complex document that needs to be thoroughly reorganized, here's a shortcut for organizing it without manually moving every heading:
Click Show Heading 1 to display only first-level headings (this is covered in the next section).
Manually enter heading numbers to reflect the order in which you want the first-level headings to appear. (Don't use any of Word's automatic numbering features.)
Press Ctrl+A (or choose Edit, Select All) to select all the first-level headings.
Choose Table, Sort.
Click OK. Word sorts the headings in number order?thereby reorganizing the entire document at the same time.
If you want, after your document is organized, you can use Word's Outline Numbering feature to replace your manual heading numbers with heading numbers that can automatically update themselves as you edit. (Word will automatically delete your heading numbers when adding its own.)
TIP
If, rather than moving outline headings around within a document, you want to move them to a new document entirely, the process can get tricky. Word doesn't provide an easy way of copying outline headings only into a new document. One workaround does the job as long as you're careful. First, save a copy of your file. Then, find all text formatted using the Normal style and replace it with nothing at all. Repeat the process with each style in your document that uses the Body Text outline level. (The fewer styles that appear in your document, the less time this will take.)
To replace text formatted in a specific style with no text at all, follow these steps:
Press Ctrl+H or choose Edit, Replace to display the Find and Replace dialog box.
Enter ^? in the Find What text box.
Click More to make sure that all the Find and Replace options are available.
Click Format, Style.
In the Find Style dialog box, choose whichever style you want to eliminate (such as Normal or Body Text) and click OK.
Make sure that the Replace With text box is empty, and click Replace All.
The result is a document containing only text formatted as headings and text formatted with styles that use outline levels other than those you deleted.
Navigating an Outline Document with Document Map and Browse Object
Word's Document Map (see Figure 18.10) makes it easier to navigate through complex outlined documents. Document Map compiles all your headings (and text to which you've assigned outline levels) in a separate window.
Figure 18.10. Document Map compiles all your headings and outline levels in a separate window to the left of your document.

To see the Document Map, click the Document Map button on the Standard toolbar, or choose View, Document Map. After Document Map opens, you can click any entry and move to the corresponding location in your document.
NOTE
Document Map works in all Word document views, but if you switch to Outline view while it's open, Document Map closes. Word assumes that you're already looking at an outline, so you don't need it. When you switch out of Outline view to any view in which you opened the Document Map, the map is again displayed. Unfortunately, if you want the Document Map to remain open when switching to Outline view, you have to reopen it by clicking the Document Map button again.
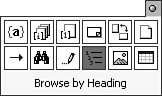
You can also use Word's Browse Object feature to move quickly from one heading to the next.
To set up Word to browse headings, first click the Select Browse Object button under the vertical scrollbar. With the Browse options displayed, choose Browse by Heading. The Previous Heading/Next Heading double-arrow buttons turn blue. Then click Previous Heading to find the preceding heading, or click Next Heading to find the next one, as shown in Figure 18.11.
Figure 18.11. Browsing headings through Select Browse Object.