Quick and Easy Brochures with the Brochure Template
Word includes a handy template for creating trifold brochures, the kind printed on the front and back of plain sheets of paper (8 1/2"x11", or A4) and then folded twice.
TIP
You aren't limited to using the built-in template, of course; if your printer can handle 8 1/2"x14" paper, consider printing a four-column brochure, assembled by folding three times.
The built-in Brochure template includes most of the standard brochure features: columns, graphics, headlines, and advanced paragraph formatting. Besides providing a tool that can make your brochures shine even if you have no layout talent, the Brochure template also offers a tutorial on useful techniques.
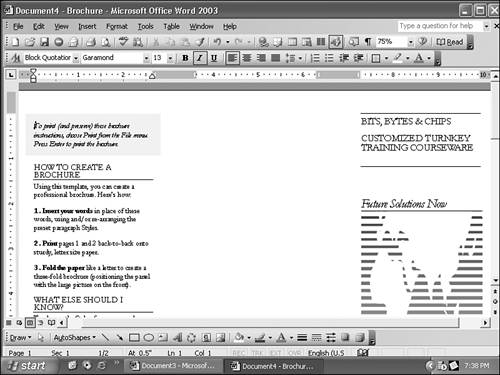
To create a brochure, choose File, New; click On My Computer in the New Document task pane; and click the Publications tab. Double-click on the Brochure icon. You'll get a complete brochure, with pictures in appropriate places, various text samples, and hints for making changes (see Figure 16.1).
Figure 16.1. Creating a new brochure from the built-in template.

NOTE
Depending on how you installed Word or Office, the first time you use the Brochure template, you may need to install it from your CD-ROM or the network location you originally installed the program from.
TIP
The tips in the brochure template are used as sample text that gets replaced with your own as you create your brochure. Because many of these tips and instructions are very useful, print the brochure template before you start changing it.
Start by modifying the brochure in ways that will apply to all the brochures you might want to make: Change the business name, address, tag line, logo, and so on.
Because you started with Microsoft's brochure template, you gain the formatting benefits built into that template. Most important, each newsletter element?including main headings, body text, cover title, subtitle, numbered lists, and return address?is formatted to complement the others. Moreover, each style is based on the document's Normal style, so you can quickly modify the overall look of the newsletter by changing the font used in the Normal style from Garamond to another font.

To customize the brochure, follow the tips in the template to replace the placeholder text; change the formatting of styles, individual paragraphs, or blocks of text; and replace the pictures in the template with your own.
NOTE
Don't try to squeeze in too much. Readers turn off too dense layouts; strategically placed whitespace makes any document more inviting and gives the eye a place to rest. Word's nicely designed three-panel "Slim-Jim" brochure template contains space for only about 650 words.
To replace a picture, first select the picture by clicking it. Then, use one of the commands on Word's Insert, Picture cascaded menu to choose a new picture to replace it.
For example, if you want to use a picture stored on your hard drive, choose Insert, Picture, From File; browse to the picture; click to select it; and click Insert. Word replaces your picture with the new one. You may need to resize the picture to better fit the needs of your brochure.

After you've replaced Word's generic content (text and images) with your own "boilerplate" materials?and modified design and content elements to reflect your own needs, save a copy of the brochure as a template. That way, in the future, you won't have to start all over again with Word's "generic" template: You can start with your revamped template.


