Adding Content to Web Pages in Word
A Web page and a Word document are similar in that their predominant content is usually words, sentences, and paragraphs. But Web pages include content not typically found in Word documents. In this section, we'll look at how to create or apply many of the most common types of Web content and formatting in Word.
Creating Hyperlinks
A hyperlink is the combination of some descriptive text or an image and the location (also called the address) of a Web page or an object. Any text or image on a Web page can hold a hyperlink. Hyperlinks most commonly point to the following:
Web pages
Media objects such as sounds, video, or pictures
Email addresses
The easiest way to create a hyperlink is simply to type it and let Word make it into a live hyperlink automatically. Whenever you type a string of characters that appears to be a Web or email address, Word automatically converts it for you. If it doesn't for some reason, or if you want to specify some options (such as ScreenTips), see the following sections.
Creating a Text Hyperlink
Any text phrase, word, or part of a word can be included in a hyperlink. To build a hyperlink, you need some text in a document and the exact location where you want the hyperlink to lead when it is clicked:
From a document in Word, highlight a text phrase. For instance, highlight "Microsoft" in the phrase "For more information, visit the Microsoft home page."
Click the Insert Hyperlink button on the Standard toolbar or choose Insert, Hyperlink to open the Insert Hyperlink dialog box, shown in Figure 24.9.
Figure 24.9. Filling in the Insert Hyperlink dialog box.
You can also reach the Insert Hyperlink dialog box by using the keyboard shortcut, Ctrl+K, or by right-clicking on the selected text and choosing Hyperlink from the shortcut menu.
In the top box, labeled Text to Display, the text you highlighted is displayed. Change it if desired.
In the Address text box, enter the Web URL for the site to which you want the text to link.
(Optional) To add a ScreenTip to the hyperlink, click the ScreenTip button, type the text, and click OK. A ScreenTip is text that appears in a box when the user points at the hyperlink in a Web browser. If you do not specify a ScreenTip, the URL will be used as a ScreenTip.
Click OK. When you return to your document, the text you highlighted is now a blue color and underlined, indicating that it is now an active hyperlink.
NOTE
URL stands for uniform resource locator. It's the complete address to the Web page or other location being referenced. Web page URLs usually begin with http:// and a great many of them (but not all) are then followed by www. Usually a company will place its Web pages on a server with the www designation, but some companies with large Web presences may have separate servers for support, sales, and so on. For example, to get support from Microsoft, the URL is http://support.microsoft.com.
Adding a Hyperlink to an Image
A graphic can function as a hyperlink, such that when the user clicks on the image, a Web page loads. The process for building a clickable or hot image is similar to that for building a text hyperlink:
Select any clip art, picture, drawing object, or WordArt within a Web page.
Click Insert Hyperlink on the Standard toolbar to display the Insert Hyperlink dialog box. (Or use any of the other previously methods of opening the Hyperlink dialog box.) The Text to Display line will be dimmed because there is no text.
Type the address for the link in the Address box at the bottom.
(Optional) If you want a ScreenTip, click ScreenTip, type the text, and click OK.
Click OK to complete the hyperlink.
The picture will not look any different. If you view the Web page using File, Web Page Preview, the default cursor changes to a hand with a pointing finger when it hovers over the image to indicate that it is now clickable, and the ScreenTip appears.
Creating an Email Hyperlink
Besides referencing other pages, hyperlinks can start the user's email editor and begin a blank email message with the recipient name filled in automatically. This is useful for providing a hyperlink through which someone can email you to comment on your Web page.
Follow these steps to create an email hyperlink:
Select the text or choose an image for the hyperlink.
Click on the Insert Hyperlink button to display the Insert Hyperlink dialog box.
In the lower-left corner of the Insert Hyperlink dialog box, click on Email Address.
Enter the email address, as shown in Figure 24.10.
Figure 24.10. Hyperlinking to an email address.
Notice how the phrase mailto: is automatically added to the beginning of your email address.
Click OK to complete the link.
When the link is clicked, a blank, pre-addressed email is opened. The email hyperlink is a convenient means for letting visitors to your Web page send you feedback or questions.
Inserting Horizontal Lines in a Web Page
Word documents don't normally use horizontal lines (also called horizontal rules) to separate topical sections. This is, however, a commonly used convention in Web pages because there is no established page length for Web pages. A horizontal rule can help separate sections of a long page without having to break it up into separate pages.
To add horizontal lines to a Web page, follow these steps:
Click on the line in your page where you want to insert the horizontal line.
Choose Format, Borders and Shading from the menu.
Click the Horizontal Line button at the bottom of the resulting dialog box.
A list of lines from which to choose is displayed (see Figure 24.11).
Figure 24.11. Select a horizontal line to use.
Choose a line and click OK to insert it into your Web page.
NOTE
Horizontal lines can be either the HTML element (<HR> tag) itself or, more commonly, a decorative graphic line. The ones you insert from Word are almost all graphical in nature, rather than using the simple HR tag. If you want to make sure you are getting a nongraphics line (for example, if you're trying to avoid using external graphics), manually edit the HTML code (using View, HTML Source) and add the <HR> tag.
After you've inserted a horizontal line (an HTML tag or a graphic) that you like, you can edit the line by following these steps:
Select the horizontal line by clicking it; then right-click it and choose Format Horizontal Line from the menu. The Format Horizontal Line dialog box, shown in Figure 24.12, displays.
Figure 24.12. Changing the properties of a horizontal line.
The current width, height, and alignment of the line are displayed in the Horizontal Line tab. Color will also be displayed (and can be changed) if the horizontal line is the HTML tag and not a graphic image.
The other tab in this box, Picture (not present for the HTML tag-generated line), lets you change some of the picture qualities, including brightness and contrast. You can also crop the line from here. Make any changes desired.
Click OK to accept your changes to the horizontal line.
TIP
After you have the line looking just as you want, use the Clipboard to copy and paste the line when you want to use it again. For consistency, use the same horizontal line throughout your Web site or section of a Web site.
Inserting Scrolling Text
Scrolling text is also called marquee text. Scrolling text marches stock-ticker style in a line across your Web page.
NOTE
Before using scrolling text, remember that it is not supported in Netscape browsers and displays only partially or not at all. If you expect your Web page to be viewed with Netscape browsers, either don't use this feature or don't put any critical information in it.
Scrolling text is inserted via the Scrolling Text button (the rightmost button) on the Web Tools toolbar. (Right-click on a toolbar and select Web Tools if this toolbar isn't open.) Clicking the button opens the Scrolling Text dialog box, shown in Figure 24.13.
Figure 24.13. Adding scrolling text to a Web page.
To make the scrolling text move how you want and display your text, do the following:
Set your text behavior to Scroll (the default), Slide (which scrolls the text only once and stops on the opposite side of the screen), or Alternate (which bounces the text back and forth?like a Ping-Pong ball?between the left and right margins of your page).
For the Scroll and Alternate settings, you can choose how many loops to scroll or bounce with the Loop settings. Your only choices with this control are 1 through 5 times and Infinite.
Choose a background color for your control from the list. (Sorry, no custom colors are on this list.)
Choose the direction of your scroll: Left or Right.
The slider control in the middle of the box controls the speed of the scroll (or bounce). Drag it to change the setting.
Type the text you want to scroll in the Type the Scrolling Text Here box. The Preview area provides a preview of your scrolling text as you change the various options.
Click OK to place the marquee in your Web page.
After the marquee is inserted into your Web page, you can make more changes to it:
Drag the marquee's border to change the length or height of the marquee (the text stays centered).
Format the scrolling text using any of the standard font-formatting tools in Word.
To temporarily stop the scrolling or bouncing (if it's driving you crazy as you work on the page, for example), right-click it and choose Stop. Right-click it and choose Play when you want to start it again.
To reopen the Scrolling Text dialog box (Figure 24.13), right-click the marquee and choose Properties.
To make the entire marquee a clickable hyperlink, select the marquee by clicking the Design Mode button (leftmost button) from the Web Tools toolbar. Then select the marquee and choose Insert, Hyperlink from the menu. Insert the correct Web address and click OK.
NOTE
Marquees are great attention-grabbing devices for pointing people to new or important information. They can be irritating or distracting, however, if placed on a page where people also have to read a lot of text.
Adding Images, Background Images, and Background Color
Besides text, images are the second most common element found on typical Web pages. When used correctly, images can reinforce text messages, add a dash of color, or add content not possible with text. Images can also be used as page backgrounds to make text more readable and reduce the glare common with a white background on monitors. The background color of the page can also be changed to reduce glare or add more interest to the page.
Adding Graphics to a Web Page
Adding a picture to a Web page in Word is no different from adding an image to a Word document:
Place your cursor where you want to place the graphic.
Choose Insert, Picture and select the location of an existing graphic or tools to create a graphic (WordArt, for example) from the menu.
Choose or create your image and click OK to insert it into the page.
After the graphic is placed, you can resize it by clicking on it, grabbing the bounding boxes, and dragging the image larger or smaller.
TIP
Bigger is not always better for images. Larger images can dramatically increase the load time for your Web page if your audience only has access to low bandwidth, such as a modem. Make the image only as large as needed to make your point.
 For more information on working with images in Word, see Chapter 13, "Getting Images into Your Documents," p. 437.
Using a Background Texture
A small image repeated or tiled across the background of a Web page can give the illusion of texture, such as paper, cloth, stone, or wood.
You can select your own pictures for tiling, but Word comes with a nice assortment of pictures that are readily available and designed to look good when tiled. To add one of Word's background textures to your Web page in Word, do the following:
Choose Format, Background, Fill Effects from the menu. This brings up the Fill Effects dialog box.
Click the Texture tab to bring up the default list of textures, as shown in Figure 24.14.
Figure 24.14. Accessing the background texture graphics in Word.
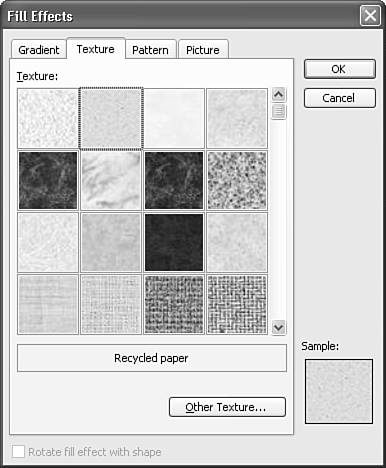
Scroll through the list until you find the texture you want, and click it to select it.
Click OK. The texture will now fill the background of your Web page.
If you want to use a picture of your own as the background texture, click the Other Texture button in step 3 instead of picking one of the existing ones.
Whenever you use a background texture, make sure that it contrasts with your font color. Dark text is best read against light backgrounds and vice versa. Also, background textures that contain too much definition or sharp patterns can make the page text difficult to read.
TIP
The texture image files are specially designed to seamlessly tile?that is, tile without showing any boundaries between each image?across your Web page. It is often best to use images specially designed to be background textures; otherwise, the boundary between each tile becomes visible and spoils the illusion. You can find many free collections of background images suitable for textures all over the Internet. Search for terms like Web backgrounds or textures.
Adding Background Color to a Web Page
If you don't want to use a background texture, how about a solid color instead? Here's how to choose one:
With your Web page open, choose Format, Background from the menu.
You can choose one of the colors displayed or click More Colors to bring up more options.
After you've found a suitable color, click OK to apply it to your Web page background.
As with textures, you want your background color to have good contrast with your font color.
TIP
Generally, it is a good idea to limit yourself to using about three colors. Your background color should be one that shows your text with good contrast. You should then reserve the second color for your main text color. You can use the third color to add accents and highlight those things that you want to grab the audience's attention. Using too many colors is distracting to the eye and detracts from the overall message. This would be a good time to use the company colors if they fit the profile. If the colors are difficult to work with, you can use just one or two of the colors and use a white background.
For more information on working with background colors and fills in Word, see Chapter 13, "Getting Images into Your Documents," p. 437.


