Calculating with Tables
Basic tables look tantalizingly like spreadsheets. In fact, a Word table can actually be made to perform a wide variety of calculations. In this section, you'll learn how to use tables as if they were spreadsheets.
NOTE
If you find that Word's table calculation capabilities are not sufficient for your needs, or if your source data is already stored in an Excel worksheet, see Chapter 29, "Leveraging Microsoft Office 2003's Power from Word," to learn how to embed Excel worksheet data and calculations in your Word documents.
Adding a List of Numbers Using AutoSum
Perhaps the most common calculation you'll want to perform in a table is to add a list of numbers. Word's AutoSum feature makes this easy.
Place your insertion point in an empty cell under (or to the right of) the list. Then, from the Tables and Borders toolbar, click the AutoSum button. Word enters a field in the cell containing a { SUM } function that calculates all the cells above it, or to its left. |
Because the calculation is entered as a field, it can be updated automatically after you change the numbers in the table. To update the calculation, select the field (or, if you want to update all its fields, press Ctrl+A to select the entire document) and press F9.
CAUTION
In most cases, formulas will not update themselves automatically when the values they depend on change. Therefore, don't assume that a value is correct unless you know you have updated the field to reflect the latest information.
If AutoSum doesn't add all the numbers it should, see "What to Do If AutoSum Doesn't Add All the Numbers in a Row or Column," in the "Troubleshooting" section of this chapter. |
Creating More Complex Formulas Through the Formula Dialog Box
Sometimes your calculation requires more than a simple sum, or you may want to control the way Word inserts a value into your table. For these purposes, choose Table, Formula.
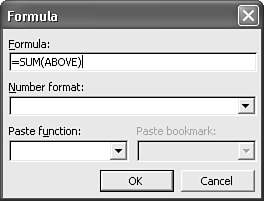
The Formula dialog box appears, as shown in Figure 12.35. If you've opened the Formula dialog box while your insertion point is at the bottom or to the right of a list of numbers, the formula text box will already contain a formula such as =SUM(ABOVE) or =SUM(LEFT). If all you want to do is add the list of numbers, you can click OK and Word inserts the calculation field just as if you clicked the AutoSum button.
Figure 12.35. Creating a formula in the Formula dialog box.
However, that's just the beginning of what you can do here. You can create fairly complex calculations, based on either values in the table or data that can be found elsewhere. You can also control the formatting of the values that result from your calculations.
From within the Formula dialog box, you can write your own formula. Formulas that you create within this dialog box are placed in your document as fields and can be updated the way other fields are updated: by selecting them and pressing F9.
To make your formulas calculate the contents of other cells, you can use cell references, much like those in Excel. The upper-left cell in a table is called A1. Rows are numbered; columns are lettered. Accordingly, to subtract cell A1 from cell A2, use the following formula:
=A2-A1
To multiply cell A1 by cell A2, use the following formula:
=A1*A2
To divide cell A1 by cell A2, use the following formula:
=A1/A2
Word also offers various functions that can be used in table formulas. These are available in the Paste Function box. See Table 12.3 for a brief description of what each function does.
Function | Purpose |
|---|---|
ABS | Displays the absolute value of a number or formula, regardless of its actual positive or negative value. |
AND(x,y) | Used in logical expressions, AND returns the value 1 if both x and y are true, or the value 0 (zero) if either expression is false. |
AVERAGE() | Calculates the average of a list of numbers that appear, separated by commas, in the parentheses. |
COUNT() | Displays the number of items in a list. The list appears in the parentheses, with list items separated by commas. |
DEFINED | Displays 1 if the expression x is valid, or 0 if x cannot be computed. |
FALSE | Displays 0 (zero). |
IF(x,y,z) | Evaluates x and displays y if x is true, or z if x is false. Note that x is a conditional expression, and y and z (usually 1 and 0) can be either any numeric value or the words True and False. |
INT | Displays the numbers to the left of the decimal place in the value or formula. |
MIN() | Displays the smallest number in a list. The list appears in parentheses with its items separated by commas. |
MAX() | Displays the largest number in a list. The list appears in the parentheses, with its items separated by commas. |
MOD(x,y) | Displays the remainder that results from dividing x by y a whole number of times. |
NOT (x) | Returns the value 0 (zero), meaning false, if the x is true, or the value 1, meaning true, if x is false. X is a logical expression. |
OR(x,y) | Returns the value 1, meaning true, if either or both x and y are true, or the value 0 (zero), meaning false, if both x and y are false. |
PRODUCT() | Displays the result of multiplying a list of values. The list of values appears in the parentheses, with the values separated by commas. |
ROUND(x,y) | Displays the value of x rounded to y number of decimal places; x can be either a number or the result of a formula. |
SIGN (x) | Displays the value 1 if x is a positive number, or the value ?1 if x is a negative number. |
SUM() | Returns the sum of a list of numbers or formulas that appear, separated by commas, in the parentheses. |
TRUE | Displays 1. |
Your formulas aren't limited to calculating numbers stored in the table in which you're working. You can include numbers from other tables in your document, or from anywhere else in your document. To use a number in a formula when it isn't in the table you're working in, first mark the number as a bookmark:
Select the number.
Choose Insert, Bookmark.
Type a one-word name in the Bookmark Name text box.
Click Add.
Click where you want to create the formula.
Choose Table, Formula.
Edit your formula.
When you get to the place in your formula where you want Word to reference the bookmark, choose the bookmark from the Paste Bookmark drop-down box. Word inserts the bookmark name in your formula.
Finish editing your formula if necessary.
Click OK.
TIP
If the "number" you select to bookmark is itself a formula, updating the entire document's fields will update both formulas. You can update all the fields in a document by pressing Ctrl+A and then F9.
 For more information about bookmarks, see Chapter 22, "Using Footnotes, Bookmarks, and Cross-References," p. 743.
Formatting Formula Results
Often, you'll create a formula that inserts an accurate value, but you'll want to format it differently from the default format Word may use. For instance, you may want to round the number at three decimal points, or present it as a percentage.
To control the format Word uses to insert a value it calculates, you can select a generic number format from the Number Format drop-down box. Table 12.4 lists the number formats and shows samples of the numbers they return.
Number Format | Sample |
|---|---|
#,##0 | 12,580 or ?12,580 |
#,##0.00 | 12,580.00 or ?12,580.00 |
$#,##0.00;($#,##0.00) | $12,580.00 or ($12,580.00) |
0 | 12580 or ?12580 |
0% | 12580% or ?12580% |
0.00 | 12580.00 or ?12580.00 |
0.00% | 12580.00% or ?12580.00% |
For more information about using Numeric Picture techniques, see "Customizing Numeric Formats to Your Specific Needs," p. 792.


