Building Indexes from Multiple Documents
You may be called on to create an index that includes entries from multiple documents?for example, chapters in a book, or components of a report created by different individuals. As with tables of contents (covered in Chapter 20), you have two alternatives:
You can incorporate each document in a master document, expand all the subdocuments to make them visible in the master document, and then insert your index at the end of the master document. Word searches each subdocument for index entries and incorporates them in an overall index. This approach takes a bit more time to organize up front, but gives you more control over how your documents work together. You can learn more about master documents in Chapter 19, "Master Documents: Control and Share Even the Largest Documents."
NOTE
If you create an index for a master document, it usually makes the most sense to place the index in the master document itself, typically at the end of the document.
If you choose to place the index in a subdocument, you may encounter trouble later in the editing process. In the event you open the subdocument outside the master document (for example, opening it from Windows Explorer instead of by clicking on its hyperlink within the master document), the index may not update properly. If you update an index in a subdocument opened in this fashion, only entries within the subdocument will be updated?Word will not be able to find entries in other subdocuments or the master document itself.
You can use { RD } (Referenced Document) fields to incorporate other documents into your indexes without using master documents. An { RD } field simply instructs Word to search another file and reflect its contents in any index or table of contents you create in your current document. Using { RD } fields can make for smaller, more manageable files, but it doesn't do anything to help you standardize styles, headers, footers, or page numbers throughout a large document.
NOTE
If you include more than one { RD } field, be sure to insert them in the order in which you want Word to include them in your index or table of contents.
Building an Index in a Master Document
To build an index in a master document, follow these steps:
Open or create your master document and display it in Outline view.
Click Expand Subdocuments on the Master Document toolbar to display all the contents of your master document and subdocuments. (If you don't, Word builds your index without the index entries contained in those subdocuments.)
Insert your index entries as appropriate, if you haven't already done so.
Click your insertion point where you want the index to appear.
Choose Insert, References, Index and Tables.
NOTE
If you didn't expand the subdocuments as directed in step 2, Word prompts you, asking whether you want to expand the subdocuments. Click Yes to include the index entries for the subdocuments. If you click No, Word creates an index but does not include entries from the subdocuments.
Click the Index tab and establish the index settings you need there.
Click OK. Word inserts your index at the insertion point. If you already have an index, Word offers to replace it.
CAUTION
If you need to move or change the name of a subdocument file, make sure the master document knows about the change. If it doesn't, updating the index could cause entries to disappear or (if the master document is looking at an old version of a subdocument) result in one with inaccurate or outdated entries. You can, however, safely change the name or location of a subdocument without harming your index as long as you move it from within the master document:
Open the master document and display it in Outline view.
Ctrl+click the hyperlink associated with the document you want to move. The document opens in its own window.
Choose File, Save As. The Save As dialog box opens, allowing you to save the document under a new name, in a new location, or both. The next time you open the master document, Word will look in the file's new location. Remember, though, that this does not delete the original file. If this file is no longer needed, it's usually best to delete it.
Using { RD } Fields to Include Index Entries from Other Documents
When you incorporate index entries using an { RD } field, the page numbers Word places in the index are those in the referenced document. Make sure that the numbers are sequenced as you want them and that they do not overlap page numbers in other documents included in your index. One solution is to use chapter numbers in your index, as discussed in the "Adding Chapter Numbering to Your Index" section, earlier in this chapter.
After you've made sure that the page numbering in your referenced document is appropriate, follow these steps to incorporate the { RD } field:
Choose Insert, Field.
Choose RD from the list of Field Names.
Enter the Filename (and, if necessary, the path) of the file you want to include.
If the path to the file is relative to the current document, check the Path Is Relative to the Current Document check box.
Click OK.
CAUTION
{ RD } fields make no provision for moved or renamed documents. If you change the name or location of a linked file, you must remember to edit the fields manually to reflect the change.
Reviewing and Updating the Contents of Your Index
What if you make content changes in your document after you create your index? You can update your index by clicking anywhere in it and pressing F9, or by right-clicking on the index and choosing Update Field from the shortcut menu.
TIP
Often it's easier to select the entire document (Ctrl+A) and press F9. That way, you update all your other fields at the same time?making sure that the page numbering in your index is accurate and up-to-date.
You should update your index, of course, any time you make significant changes in your document. However, you should also walk through your index systematically after you create it for the first time, to fix corresponding entries that aren't quite right. As you do so, update the { XE } index entry fields to fix the problems you find. For example, look for
Redundant entries that use slightly different variations on a word, or duplicate entries for a word in capitalized and lowercase form
Better ways of organizing high-level concepts
Misspellings
CAUTION
Make sure that you fix errors in your index by fixing the individual { XE } index entry fields, not by editing the compiled index itself. If you edit the compiled index, the next time you update it, your edits will be removed. Moreover, by editing your index manually, you may inadvertently introduce page numbering errors.
CAUTION
Word's spell checker does not check spellings in a compiled index. This isn't a problem if you use only index entries that are identical to text in the document, which can be proofread. However, if you heavily edit your index entries, you may want to proofread them separately.
There are two workarounds, neither of them ideal. First, you can wait until your index is absolutely final, select the index, and press Ctrl+Shift+F9 to unlink the index field. This changes the index field into text, which can be proofread. However, you can no longer update the index?a potential disaster if page numbers start changing again. You'll have to delete the entire index, insert a new one, and start over again with editing and spell checking it. (Before you unlink your index, make a backup copy of your document.)
Second, you can click the Show/Hide Paragraph Marks button on the Standard toolbar to display all the index entry { XE } fields within your document and then run a spell check on the entire document. That spell check includes these index entry fields when it checks your document.
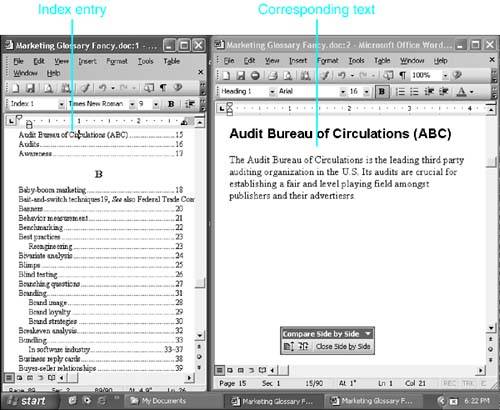
The best way to review an index is to open a second window on your file and set up Word so that you can view the index in one window while you view the document in another. To do so, follow these steps:
Open the document containing the index. (It should be the only document you have open.)
If your { XE } index entry fields are not visible, click the Show/Hide Paragraph Marks button on the Standard toolbar to make them visible.
Switch to Normal view if you aren't already there.
Choose Tools, Options, View, and check the Wrap to Window check box if it isn't already checked. This ensures that you can see all your text no matter how narrow your windows are. Click OK.
Create a new window by choosing Window, New Window.
Choose Window, Compare Side by Side to display one window on the left, and the other on the right.
Resize the windows so that you have a narrower window for the index column and a wider window for the document, as shown in Figure 21.9.
Figure 21.9. Setup to review an index alongside the document being indexed.
Now you can move through the index one item at a time. Whenever you find an item that needs changing, click in the window that displays the document, navigate to the { XE } field code that caused the problem, and edit it. When you're finished, click in the index (or select the entire document) and press F9 to update the index. Pressing F9 updates both windows (which are, as mentioned earlier, viewing the same document).


