Using Borders and Shading
Borders and shading add visual interest to your document. Word allows you to place a border around a page, or add a shaded background to a page. Word 2003's Borders and Shading features are covered in detail in the "Adding Table Borders and Shading" section of Chapter 12. Bordering a page is covered here.
NOTE
Word's Borders and Shading features can be used with any text you select, including words, paragraphs, table cells, and tables.
Creating Page Borders
Page borders have various uses. For example, they are effective for report title pages. Figure 5.24 shows an example.
Figure 5.24. Using a page border on a report title page.

To add a border around a page, work in the Page Border tab of the Borders and Shading dialog box. To display this dialog box, choose Format, Borders and Shading, and display the Page Border tab (see Figure 5.25).
Figure 5.25. The Page Border tab of the Borders and Shading dialog box.
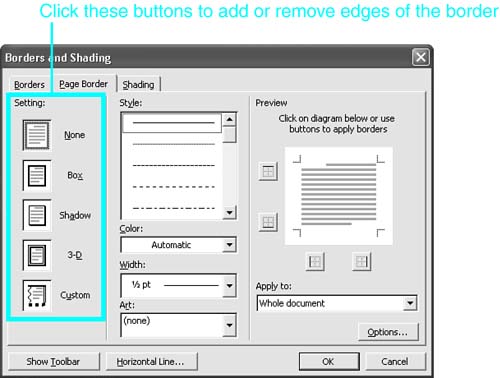
Choosing Which Type of Border to Create
In the Setting area, you can choose from among five types of borders:
None. No border, the default setting. Click this setting to remove a border that already exists.
Box. Places a line along each of the four sides of your page.
Shadow. Borders all four sides but places a thicker border on the bottom and right sides, to create a shadow effect.
3-D. Makes it appear that your page actually rises from its background.
Custom. Enables you to customize your own border, one side at a time.
When you choose one of these settings (except for Custom), Word reflects them in the Preview window; you can then edit each edge of the border individually, as discussed in the next section.
Setting the Style, Color, and Width of Your Page Border
After you select a type of page border, you can control the line style, color, and width of the line you use:
To choose a dotted, double, or triple line, select the line you want from the Style scroll box.
To specify a color for your page border, click on the Color drop-down box and choose the color from the palette that appears. You can also click More Line Colors to choose from a wider selection of colors.
To specify a thickness for your border lines, click on the Width drop-down box and select any of the options there, from 1/2 point to 6 point.
NOTE
As you make changes, you can view their effects in the Preview box (unless you have selected the Custom setting).
You can edit each edge individually. First, click the edge you want to reformat. Then, set the Style, Color, and/or Width settings you want; then click again on the edge you want to reformat, and the current settings are applied. If you don't click on the edge first, every change you make to the style, color, and/or width will affect all four borders.
Using a Graphical Border
Word provides a library of repetitive images you can use as borderlines. To use one, click the Art drop-down box and choose the image from there. Figure 5.26 shows a sample.
Figure 5.26. Using an image as a page border.
CAUTION
Although these images can be helpful in some documents, such as retail fliers, in many other situations they are viewed as tacky. Be careful how you use them.
Specifying Which Pages Are Bordered
As mentioned earlier, one use for page borders is to set apart the cover of your document. Word gives you complete control over which pages you border. Click the Apply To button and choose one of these options:
Whole Document. Borders the entire document.
This Section. Borders all pages in your insertion point's current section; if your document has one section, borders every page.
This Section?First Page Only. Borders only the first page of the current section. Note that you can use this feature to border the first page of every section if you want.
This Section?All Except First Page. Borders every page except the first page in the current section. Again, you can establish this setting individually for each section.
Controlling the Location of Page Borders
By default, Word places borders 24 points (1/3 inch) away from each edge of your page. You can change these settings. To do so, follow these steps:
Choose Format, Borders and Shading.
Click the Page Border tab.
Click the Options button. The Border and Shading Options dialog box appears (see Figure 5.27).
Figure 5.27. Controlling where page borders appear on the page.
Set your custom margins in the Top, Bottom, Left, and Right spin boxes.
When you're finished, click OK.
TIP
By default, Word measures page borders from the edge of the page. If you want to make sure that the borders always stay a specific distance from text, choose Text in the Measure From box. You can then choose whether you want the border to surround the page header or footer, or whether you want to tightly align the border to paragraph borders and table edges.


