Changing Styles
In the past few pages, you've learned how to create new styles. However, you can also make changes in existing styles. If you want to make systematic changes in a style, you can use the Modify Style dialog box. If you want to make simple changes to a style, it's easier to use the Styles and Formatting task pane.
Changing Styles Using the Styles and Formatting Task Pane
To change a style quickly, reformat the text in your document to reflect the formatting you want the style to use. Then, in the Styles and Formatting task pane, choose the original style name associated with the style (not the modified style name that Word automatically creates when you superimpose manual formatting on the style).
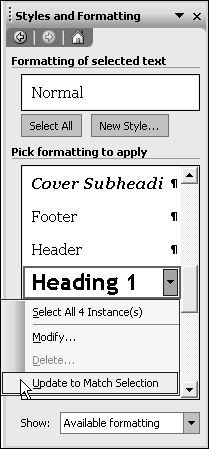
Right-click on the style name and choose Update to Match Selection from the shortcut menu (see Figure 10.7).
Figure 10.7. Updating a style to match the text you've selected.

Changing Styles Using the Modify Style Dialog Box
As mentioned earlier, when you want to make more systematic changes to a style, it usually makes sense to work in the Modify Style dialog box.
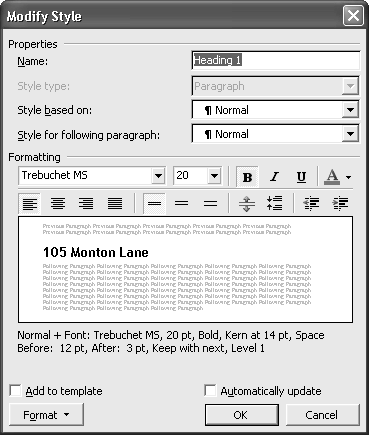
To display the Modify Style dialog box, first display the Styles and Formatting task pane (choose Format, Styles and Formatting). Next, right-click on a style in the Pick Formatting to Apply scroll box and choose Modify Style from the shortcut menu. The Modify Style dialog box opens (see Figure 10.8).
Figure 10.8. The Modify Style dialog box looks and works just like the New Style dialog box you've already seen.

As you can see, the Modify Style dialog box looks much like the New Style dialog box. However, the existing style you've already chosen is listed in the Name box. The style's current settings are also listed in the Description area of the dialog box, and their appearance in your document is previewed in the Preview area.
As soon as you change a style, Word applies the change throughout your document anywhere you used the style?or anywhere you used a style based on it. If you add the changed style to a template, the change takes effect in all new documents based on that template.
However, the changes are not made automatically in existing documents. First, you have to save the changes by saving the template. Then, when you open an existing document based on that template, you have to tell Word that you want to update the styles.
To update styles based on the template, first open a document based on the template you've changed. Next, choose Tools, Templates and Add-Ins, and check the Automatically Update Document Styles check box. Click OK, and Word reformats the document to reflect any style changes you saved in the template.
If Word changes styles on its own, in ways you don't like, see "What to Do If Styles Suddenly Change When You Don't Expect Them To," in "Troubleshooting" at the end of this chapter. |
If styles you create appear different from the way you expect, see "What to Do If Styles Look Different Than You Expect," in "Troubleshooting" at the end of this chapter.
Creating Keyboard Shortcuts for Your Styles
Earlier, you learned that Word comes with built-in keyboard shortcuts for the three highest-level heading styles, for the Normal style, and for the List style. You may discover other styles, built-in or custom, that you find yourself using quite often. To assign a keyboard shortcut to any style, follow these steps:
Display the Styles and Formatting task pane, by clicking the Styles and Formatting button on the Formatting toolbar or choosing Format, Styles and Formatting.
Right-click on the style you want to create a keyboard shortcut for and choose Modify Style from the shortcut menu.
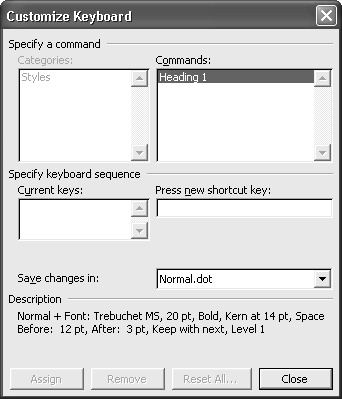
In the Modify Style dialog box, click Format, Shortcut Key. The Customize Keyboard dialog box opens (see Figure 10.9).
Figure 10.9. You can create a convenient keyboard shortcut for any style you expect to use often.

Press the keyboard shortcut combination you want to use. The combination appears in the Press New Shortcut Key box. If that combination is already in use, the current use is listed beneath the box where the keyboard combination is displayed.
If the combination you've chosen is acceptable to you, click Assign. If not, click inside the Press New Shortcut Key box, backspace to eliminate the shortcut that appears there, and type another keyboard combination. When you're satisfied with the combination you've typed, click Assign. (If you're not satisfied with any combination, click Close to exit the dialog box without adding a keyboard combination.)
Removing a Keyboard Shortcut Associated with a Style
You might occasionally want to remove a keyboard shortcut associated with a style, possibly to use the shortcut for another purpose. To remove a keyboard shortcut associated with a style, follow these steps:
Display the Styles and Formatting task pane, by clicking the Styles and Formatting button on the Formatting toolbar or choosing Format, Styles and Formatting.
Right-click on the style you want to create a keyboard shortcut for, and choose Modify Style from the shortcut menu.
In the Modify Style dialog box, click Format, Shortcut Key. The Customize Keyboard dialog box opens (refer to Figure 10.9).
In the Current Keys scroll box, choose the keyboard shortcut you want to remove.
Click Remove.
Click Close.

Deleting a Style
Sometimes you may no longer need a style. Perhaps you have created a style with a similar name and different formatting that you want to use instead.
To delete a style, right-click on it in the Styles and Formatting task pane and choose Delete from the shortcut menu. Click Yes to confirm that you want to delete all instances of the style. All text that had been formatted in the style you deleted is reformatted in the Normal style.


