Editing Objects in a Word Drawing
To work with a line, a rectangle, a circle, an AutoShape, or another object, you must first select it. Lines and shapes are selected when you first place them in your document. After that, you can select a line or shape at any time by clicking on it. When the object is selected, small circles called sizing handles appear at the ends or corners of the shape.
After you select a shape, you can
Move the shape by dragging it
Shrink or enlarge the shape by clicking on a sizing handle and dragging it
Delete the shape by pressing the Backspace or Delete key
Selecting Multiple Drawing Objects at Once
Most of your original drawings?and virtually any piece of editable Office clip art?contain more than one shape. You'll often want to select many shapes in a drawing at the same time.
You can select more than one object at a time. To do so, select the first object, press Shift, and select each additional object you want. Release the Shift key; the objects remain selected, and you can format them together.
Or, click the Select Objects button on the Drawing toolbar and drag the pointer across all the drawing objects you want to select. The Select Objects pointer selects only objects entirely within the area you select?if a corner peeks off to the side, that object won't be selected. Figure 14.22 shows a simple drawing with all its different objects selected.
Figure 14.22. A drawing with all its objects selected.
NOTE
If you are selecting objects in clip art that you've inserted, first right-click the clip art and choose Edit Picture from the shortcut menu so that you can edit it.
Grouping and Ungrouping
At some point, you might have several shapes and lines you want to move, format, or delete together. For example, if you're building an organization chart, you might need to move half the boxes an inch to the left to make room for a new division.
You've already learned that you can select many objects at once by dragging the Select Object pointer around them, or by selecting the objects one at a time while you keep the Shift key pressed down. However, if you do this, it's easy for the individual images to get separated.
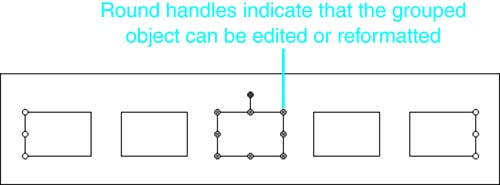
If you group the objects you're using, they stay together no matter what. To do so, select the objects you want to group, release the Shift key, right-click on one of the selected objects, and choose Grouping, Group from the shortcut menu. Notice that selection handles now surround the group of objects, not each individual object, as shown in Figure 14.23. You can now work with all the objects as if they were one object.
Figure 14.23. When grouped objects in a drawing are selected, one set of handles surrounds them all.
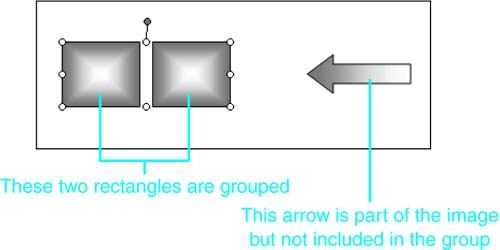
If you later need to reformat or edit text in one of the grouped objects, you can do so without separating ("ungrouping") it from the rest of the group. To do so, click anywhere in the group to select it. Then, click on the object you want to edit. Round object handles appear (see Figure 14.24). Next, right-click to display the shortcut menu, and choose the task you want to perform.
Figure 14.24. Editing a single object within a set of grouped objects.
Certain tasks, such as resizing an object, cannot be performed while the object is still part of a group. For these tasks, you must first ungroup the objects, then perform the task, and then (if you want) regroup the objects. To ungroup a grouped collection of objects, right-click on them, and choose Grouping, Ungroup from the shortcut menu.
If objects have ever been grouped, Word remembers how they were grouped even after you ungroup them. To regroup a set of objects as they were before being ungrouped, right-click on one object and choose Grouping, Regroup from the shortcut menu.
Layering Your Drawing
Each drawing object you create is placed in an individual layer. By default, your text layer is on the bottom. Every time you add another object, it is drawn in the layer on top of the previous object. The stacking order becomes noticeable when objects overlap each other?the object last drawn is on top and obscures a portion of any objects that were drawn earlier.
You can move objects to a different position in a stack, much as you might reshuffle a deck of cards. This is referred to as changing the stacking or Z-order. (In describing coordinates on paper, X refers to the horizontal; Y, the vertical; and Z, the depth.) For example, you can move objects up or down within a stack one layer at a time, or you can move them to the top or bottom of a stack in one move. Naturally, this means that you don't have to draw the bottom object first?you can always move it later. Because text is on its own layer, Word has two special commands for moving an object behind or in front of text.
To change the Z-order of any object, click the Draw button on the Drawing toolbar and choose Order. The Order submenu appears, giving you several choices. For example, you can move an object to the front or back, forward or back one layer, or in front or behind text.
Rotating Illustrations
Word can rotate shapes and illustrations. To rotate an image 90° on its z-axis, first select it. A green rotation handle appears on the object you selected. Click and drag the handles to rotate the object around its z-axis until it arrives at the position you want.
Flipping Illustrations
Word also allows you to flip objects horizontally or vertically. A good analogy might be turning over transparent cards in a deck of cards?or, possibly, flipping transparent pancakes.
To flip an image, first select it. Then, click the Draw button on the Drawing toolbar, and choose Rotate or Flip. Finally, choose either Flip Horizontal or Flip Vertical.
Flip Horizontal swaps the left and right sides of an image. For example, a baseball player playing first base would suddenly appear to be playing third base. Flip Vertical flips the top and bottom parts of an image. For example, a landscape flipped vertically would show the sky at the bottom.
Using the Grid to Line Up Objects
Word automatically divides pages into an invisible grid, with each square in the grid set to 0.13" by 0.13" . By default, objects you draw are lined up against the nearest gridlines, making it much easier to align multiple objects consistently. This automatic feature is called Snap to Grid.
You can adjust the increments used by Word's grid, up to a fineness of 0.01" . You can turn off the grid, make the gridlines visible, or even specify where on the page you want the grid to begin.
To access the Grid controls, click the Draw button on the Drawing toolbar. Choose Grid to open the Drawing Grid dialog box (see Figure 14.25). You can input new values for both the Horizontal Spacing and Vertical Spacing by either typing in the values directly or using the spinner arrows.
Figure 14.25. Controlling how the grid behaves and appears.
The Horizontal Spacing controls the amount of horizontal space between vertical gridlines, and the Vertical Spacing controls the amount of vertical space between horizontal gridlines.
The two Snap options can be used either independently or together. If you check Snap Objects to Grid, objects will always settle their upper-left sizing handles at the intersection of two gridlines. If you check Snap Objects to Other Objects, objects will always settle their upper-left sizing handles with each other. If both are checked, Snap Objects to Other Objects overrides Snap Objects to Grid.
You can also display gridlines onscreen to help you design pages more precisely. To do so, choose View, Gridlines. If you want more control over how your gridlines appear onscreen, click Draw, Grid; then check the Display Gridlines on Screen box. Then set values in the Horizontal Every and Vertical Every scroll boxes. The lower the values you set, the finer the gridlines.
TIP
You can turn off the Snap to Grid option temporarily by pressing Alt while moving your drawing object.
Nudging an Object
If you've ever tried to use your mouse to precisely position an object, you'll appreciate Word's nudging feature. You can move your object in increments as small as one pixel at a time using the Nudge option found under the Draw button of the Drawing toolbar. You can nudge an object in any direction?Left, Right, Up, or Down.
The distance the object moves depends on your Grid options; if you have Snap Objects to Grid selected, a nudge moves your object one grid measurement. If this Snap option is not enabled, your object moves one pixel in the chosen direction.
TIP
You can also nudge any selected object by selecting the object and pressing any arrow key. Using this technique, your object always moves one pixel at a time in the direction you've chosen. (If you have Snap Objects to Grid enabled, pressing the arrow key nudges the object one unit of grid space, instead of one pixel.)
Aligning and Distributing Drawing Objects
In addition to precise positioning of an object on the page, Word offers relative positioning. A drawing object can be aligned relative to another object or to the page itself. This means that multiple objects can be lined up along any of their edges or centers. They can also be centered on the page or aligned along the edge of the page. Furthermore, you can have Word evenly space your objects across (or down) the page. A tremendous amount of power is packed into the Align or Distribute commands, accessed by clicking the Draw button on the Drawing toolbar.
To align or distribute objects, first select the objects you want to align. Next, click Draw, Align or Distribute from the Drawing toolbar. Then, from the Align or Distribute submenu, select one of the following:
Align Left? Aligns selected objects along the left edge of the object farthest to the left.
Align Center? Aligns selected objects along the vertical center of the selected objects.
Align Right? Aligns selected objects along the right edge of the object farthest to the right.
Align Top? Aligns selected objects along the top edge of the highest object.
Align Middle? Aligns selected objects along the horizontal center of the selected objects.
Align Bottom? Aligns selected objects along the bottom edge of the lowest object.
Distribute Horizontally? Distributes selected objects evenly along the same horizontal line, leaving the same amount of space between each one.
Distribute Vertically? Distributes selected objects evenly along the same vertical line, leaving the same amount of space between each one.
Relative to Canvas? Aligns selected objects relative to the Drawing Canvas. When this option is selected, all align or distribute commands use the Drawing Canvas as a super object that controls their positioning. For example, if you check Relative to Canvas and then choose Align Center, your selected object(s) is centered horizontally inside the Drawing Canvas. (This option becomes Relative to Page if you choose not to use the Drawing Canvas.)
When objects are distributed, they are arranged evenly with an equal amount of space between them, either horizontally or vertically.
You may often use the Align and Distribute commands consecutively. First, create your objects, roughing out their placement. Next, choose Align Top to line them up. Finally, select Distribute Horizontally to arrange the objects across the page or Drawing Canvas.


