Inserting a Photo or Another Image You've Created
The simplest way to insert an image in your document is to insert it directly, from a file stored on your hard drive, your network, your intranet, or the Internet. To do so, follow these steps:
Choose Insert, Picture, From File. The Insert Picture dialog box appears, typically displaying the My Pictures folder (see Figure 13.1). This is the folder Word provides as a default for storing all the photos you personally use.
Figure 13.1. From the Insert Picture dialog box, you can browse to any picture.
NOTE
My Pictures is a subfolder within your My Documents folder. By default, each user of your computer has her own My Documents and My Pictures folders, so images stored inside yours won't be displayed by default when others use your PC.
Windows XP also provides a Shared Pictures folder within the Shared Documents folder inside My Documents. If you store images in the Shared Pictures folder, they will be more easily accessible to all users who share your computer.
Browse to and select the image file you want to use. You can browse to any location on your network, as well as Web or FTP sites you've set up as Network Places.
 To learn more about browsing to and setting up Network Places, see "Saving Across a Network," p. 82.
If you want to see a larger preview of your image, choose Preview from the View button in the Insert Picture dialog box. The Preview window at the right side of the screen shows a large preview of the image (see Figure 13.2).
Figure 13.2. When you use Insert Picture to select an image, it's previewed in the Preview window.
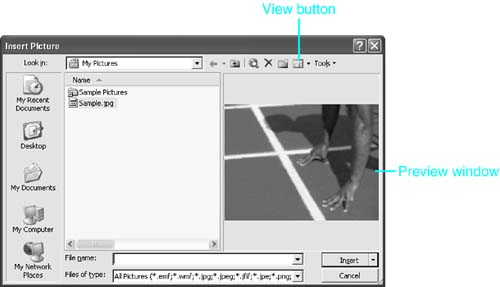
When you're satisfied with the image you've chosen, click Insert.
Linking to a Photo Stored on Your Hard Drive or Network
Inserting images into your documents can significantly increase the document's file size. You can avoid this problem if you insert only a link to the original image instead.
CAUTION
If you plan to distribute a document containing links to images, you need to distribute the images as well, and they must be in the same relative paths as in your document. Otherwise, Word will fail to find them and will display blank spaces in place of your images.
One option is to place all your images in the same folder before you create links to them. Another is simply to forget about linking, and place entire images in your document.
Follow the steps in the preceding procedure, but instead of clicking Insert to insert the image itself, click the down arrow next to the Insert button (see Figure 13.3). Then, choose Link to File.
Figure 13.3. Linking to a file instead of inserting the image itself.
The image still appears in your document, but your document will be smaller because it doesn't contain the actual image. The image is automatically updated whenever you open your Word document or edit the graphic while the Word document is open. However, if the image is moved, renamed or deleted, it will no longer appear.
If Word doesn't recognize the file type you're importing, see "What to Do When Word Doesn't Recognize the File Type You've Tried to Import," in the "Troubleshooting" section of this chapter. |
Inserting an Image as an Editable Object
In some cases, you will want to insert an image that you created in a graphics program. However, you may also want to edit that image after you've inserted it into Word. To insert an image in a form that can easily be edited by the original graphics program, insert it as an object. By doing so, you maintain a connection to the graphics program you used to create the image, and can open the graphics program by double-clicking on the image within Word. Follow these steps:
Choose Insert, Object.
Select the Create from File tab and click Browse.
In the Browse dialog box, browse to and select the image file you want to insert.
TIP
To preview the image, click the down arrow next to the Views button and choose Preview.
Click Insert.
NOTE
Word also gives you the option of displaying an icon in place of the object; the default icon corresponds to the program your computer uses to edit the object.
To display an icon in place of an image, click the Display as Icon check box in the Create from File tab of the Object dialog box. When you do, the Change Icon button appears; you can click this button to select a different icon for your image.
Inserting an Image You Capture with a Scanner or Digital Camera
Word 2003 enables you to insert images directly from a scanner or digital camera, without using an additional application. To do so, Word uses the scanner or digital camera drivers you've already installed. To place a picture from a scanner or digital camera, follow these steps:
Place your insertion point in the document where you want the image to appear.
Make sure that your scanner or digital camera is properly connected. If you're using a scanner, place the printed image on the scanner.
Choose Insert, Picture, From Scanner or Camera. The Insert Picture from Scanner or Camera dialog box appears (see Figure 13.4).
Figure 13.4. The Insert Picture from Scanner or Camera dialog box.
If you have more than one scanner and/or digital camera available, choose the source from the Device drop-down box (if you have only one device, it should be displayed by default).
If you intend to use your scanned image on a Web or intranet site, choose Web Quality. Word scans your image at a lower resolution that is usually sufficient for onscreen display. If you plan to use the image in a printed document, use Print Quality. Word scans the image at higher resolution (better picture quality), creating a significantly larger file.
By default, Microsoft Clip Organizer automatically catalogs imported images alongside the other images it has cataloged. If you don't want it to do this, clear the Add Pictures to Clip Organizer check box.
Click Insert. Word captures the image using its built-in scanner/camera settings and places the image in your document. If Word doesn't scan after you click Insert, your scanner may not support automatic scanning. Click Custom Insert instead, and follow the instructions in the dialog box that appears next.
If Word still can't scan after you click Custom Insert, see "What to Do When Word Doesn't Work with Your Scanner," in the "Troubleshooting" section of this chapter. |
CAUTION
Word works only with scanners and digital cameras that support the industry-standard TWAIN interface. In addition, you must install the device's driver, connect the device, and turn it on before using Word's Insert Picture from Scanner or Camera feature. For driver installation issues you should refer to the manual that should have come with your scanner or digital camera.
TIP
If you plan to edit the document later, using an image editor such as Paint Shop Pro or Adobe Photoshop, choose Print Quality. This gives you a higher quality image to start with, and you can use the image editor to prepare a lower-resolution Web file later, after you've refined the image.


