Customizing Merged Documents with Word Fields
In many mailings, every form letter is alike, except for a personalized name, address, and salutation (Dear Mr. Jones). However, in other mailings you may want to customize your form letters further, varying your message depending on the individual recipient. In still other cases, you may want to skip certain recipients altogether, while still retaining them in your data source. Word provides a set of special fields that can be used to customize your letters in ways like these.
 For more information about Word fields in general, see Chapter 23, "Automating Your Documents with Field Codes," p. 771.
These mail-merge fields provide many ways in which you can customize a merge. To insert any Word field, place the insertion point in the main document where you want the field to appear, click the Insert Word Field button, and choose a Word field.
Table 17.2 lists the Word fields available from the Insert Word Field toolbar button and briefly describes what they do. Many of these fields are discussed in more detail in the following sections.
Field | What It Does |
|---|---|
Ask | Asks the user for input and assigns that input to a bookmark. With the Set and/or { REF } fields, you can use that bookmark throughout your document. |
Fill-in | Asks the user for input at each new mail-merge document and places that input in the document. |
If…Then…Else… | Specifies text to print if a certain condition is met, and different text or an alternative merge field otherwise. |
Merge Record # | Inserts the number of your data record in your main document. |
Merge Sequence # | Inserts the number of data records successfully merged into a main document. (Often used with Merge Record # to include text such as "Letter 12 of 148.") |
Next Record | Tells Word to print the next record without starting a new page. Often used with labels. |
Next Record If | Starts the next record on the same page only if certain conditions are met. This command is a left over from very old versions of Word; using Filter and Sort, as discussed later in this chapter, accomplishes the same task with more flexibility. |
Set Bookmark | Marks text as a bookmark that you can insert repeatedly throughout a document. |
Skip Record If | Skips printing the current record if a specified condition is met. This command is a left over from very old versions of Word; using Filter and Sort, as discussed later in this chapter, accomplishes the same task with more flexibility. |
TIP
These fields can be used in any type of mail-merge main document. Some, such as Ask and Fill-in, are available in any Word document.
You can also use other Word fields to customize your form letters. For example, using { DATE } can enable Word to insert the current date into your letters.
You can also use Word formula fields to perform calculations. For example, perhaps you're sending a letter confirming a customer order. You can use merge fields to place dollar amounts for each item in your letters and use the AutoSum button on the Tables and Borders toolbar to insert a formula field that tallies the value of all those items.
Using the Fill-In Field
Perhaps the most straightforward Word field is Fill-In. When you insert a Fill-In field, Word stops before printing each document and asks the user for input to place in the location specified by the Fill-In field.
To insert a Fill-In field, click on Insert Word Field and choose Fill-in. The Insert Word Field: Fill-In dialog box opens (see Figure 17.25).
Figure 17.25. Use the Insert Word Field: Fill-In dialog box to create the Fill-In field.
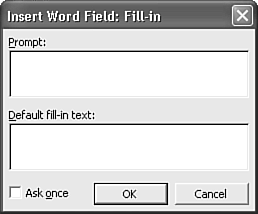
In the Prompt box, insert the question you want to ask whoever is running the mail merge?for example, "How big a discount for this customer?"
If you want the same text in every letter, check the Ask Once check box. Then, after the user inserts the information once, Word repeats that information in all letters that the mail merge generates.
To specify default text that prints unless you choose different text for a specific letter, type the default text in the Default Fill-In Text box.
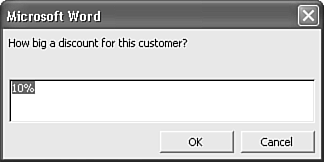
When you (or a colleague) start the merge process, Word displays a Fill-In dialog box that displays the question or information you supplied when you created the Fill-In field and prompts you to type information (see Figure 17.26).
Figure 17.26. A sample Fill-In prompt dialog box.
Using the Ask Field
The Ask field takes this concept of requesting user input one step further. Rather than placing your response directly in text, the Ask field transforms your response into the contents of a bookmark. Wherever you place that bookmark in your text, these contents appear. Therefore, Ask is ideal for inserting the same text repeatedly throughout a letter.
After you click Insert Word Field and choose Ask, type the name of the bookmark you want Word to create (see Figure 17.27). The bookmark's name can be up to 40 characters long but cannot include spaces. In the Prompt text box, type the text you want Word to display when it prompts you for the bookmark. In the Default Bookmark Text box, type the information you want Word to include in the main document when you type nothing in the Ask dialog box that appears when you start the merge process.
Figure 17.27. Inserting an Ask field.
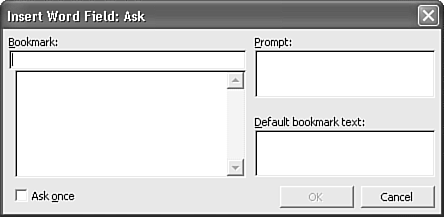
All Ask does is create a bookmark; it doesn't place anything in your letter by itself. You have to place a bookmark field wherever you want the text. You can insert this field manually before you use the Ask field. First, press Ctrl+F9 where you want the bookmark to appear. Field brackets appear. Then type the bookmark name between the field brackets; for example, { offer }.
The Ask field also displays a prompt during the merge so that you can add personal notes to clients or add other information that is not suitable to store in a data source. As with the Fill-In field, the prompt appears each time Word merges a new data-source document record with the main document unless you instruct Word otherwise.
TIP
The information you supply when you include an Ask field can be used in other fields; for example, if you supply a number as the response to an Ask field, you can later use that number as a basis of comparison in an If…Then…Else… field.
Using the If…Then…Else… Field
The If…Then…Else… field uses the following syntax: If such-and-such happens, Then do this; Else do something different. You can use this field (especially in conjunction with other merge fields and Word fields) to customize the text of each letter, based on any attribute of the recipient you choose.
Suppose, for example, that some of your form letters go to recipients in Tampa, whereas others go to recipients in Orlando. If you're asking your recipient to make an appointment, you may need to provide different phone numbers for Tampa and Orlando residents to call. In this case, you could use an If…Then…Else… statement to tell Word which phone number to include if the city is Tampa and which phone number to include if the city is Orlando.
To create an If…Then…Else… field, follow these steps:
Click your insertion point at the place in the document where you want the customized text to appear.
Click Insert Word Field, and choose If…Then…Else…. The Insert Word Field: IF dialog box opens (see Figure 17.28).
Figure 17.28. You can use this dialog box to build an If…Then…Else… field.
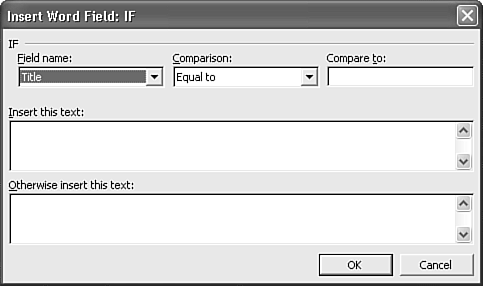
In the Field Name list box, choose the field you want Word to use when making the comparison.
In the Comparison list box, choose the comparison operator; for example, whether you want text inserted only if a value is Greater Than the value found in the field. You can choose from the following comparisons: Equal To, Not Equal To, Less Than, Greater Than, Less Than or Equal, Greater Than or Equal, Is Blank, or Is Not Blank.
Unless you've chosen Is Blank or Is Not Blank, you also need to fill in the Compare To box. Enter the number or text you want Word to search for in the selected field.
In the Insert This Text box, type the text you want Word to insert if the comparison is true.
In the Otherwise Insert This Text box, type the text you want Word to insert if the comparison is false.
TIP
If you edit the field directly (by right-clicking it in the document, choosing Toggle Field Codes, and then entering text and field codes within the field brackets that appear), you can gain even more control of your If…Then…Else… field.
For example, you can insert an { INCLUDETEXT } field as either the Then or the Else value, and the { INCLUDETEXT } field can retrieve a large block of text from the source document you choose. In fact, the source document that { INCLUDETEXT } brings into your merge document can even have its own merge fields, as long as they access the same data source.
This technique makes it convenient to create mail merges that send two entirely different letters to two categories of recipients?for example, those who are on time with their payments and those who are late.
Using the Set Bookmark Field
The Set Bookmark field (which actually inserts a field simply called Set) sets the contents of a bookmark, much as you've already seen Ask do. But there's one big difference: The user isn't prompted for the contents of these bookmarks during the mail merge. Rather, you set the contents of the bookmark ahead of time. You can then include the bookmark in another field, such as an If…Then…Else… field.
To create a { SET } field in your main document, click the Insert Word Field button and choose Set Bookmark. The Insert Word Field: Set dialog box opens (see Figure 17.29).
Figure 17.29. You can define a bookmark in advance using the Insert Word Field: Set dialog box.
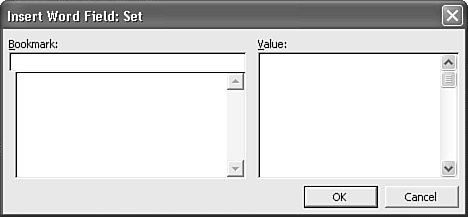
In the Bookmark text box, type the name you want to give to the bookmark. In the Value text box, type the text you want the bookmark to represent. To print the information, you must insert a Ref or Bookmark field in the document or include the bookmark in an Ask or If…Then…Else… field.
Using the Merge Record # and Merge Sequence # Fields
Sometimes, in a direct mail campaign, you want to include a unique serial number on each letter you send; it's a quick way for recipients to identify themselves. Word provides two ways to include such a serial number: the Merge Record # and Merge Sequence # fields. The distinction between these fields is subtle: Both generate a unique number in each merged document; however, the number they generate may be different.
Merge Record # returns a record number based on the number of the first record in your data source that you actually used in your merge. So if you created a merge that ignored the first five records in your data source, your first letter would display the number 6.
Merge Sequence # always inserts the number 1 in the first merged letter (or other document) you create, the number 2 in the second letter, and so forth?incrementing each additional letter by 1.
TIP
You can use { MERGEREC } inside a formula field to generate numbers from any starting point you want. For example, if you want your first letter to be numbered 101 instead of 1, insert the following field:
{ 100 + { MERGEREC } }
Using the Next Record and Next Record If Fields
When you choose Next Record from the Insert Word Field list, you instruct Word to merge the next data record into the current document, rather than starting a new merged document. Word automatically does this when you are setting up a mailing label, an envelope, or a directory, but it's rarely needed in form letters.


