Printing Envelopes in Word
Word automates envelope and label printing?a process that was once tedious and difficult, especially if you were working with large or nonstandard envelopes.
In the simplest example, assume that you've written a standard business letter, in which the recipient's name and address appear at the top, under the date. To print an accompanying envelope, choose Tools, Letters and Mailings, Envelopes and Labels. The Envelopes and Labels dialog box shown in Figure 6.5 appears (make sure that the Envelopes tab is selected).
Figure 6.5. The Envelopes and Labels dialog box, showing the name and address Word has picked up from your letter.
When it opens this dialog box, Word searches your letter for the places where you're most likely to have included an address. If it finds something that looks like an address, it places this information in the Delivery Address box on the Envelopes tab. If Word cannot find an address, it leaves the space blank.
CAUTION
Occasionally, Word may find three other lines that seem to fit the general form of an address but in fact are incorrect. Whether Word's guess is right or wrong, you can edit it in the Delivery Address scroll box.
If you've entered your own name and address in the User Information tab located in Tools, Options, Word also pulls that information into the Return Address scroll box. You can edit your address, if necessary, or if you don't want a return address?perhaps you're using preprinted envelopes that already contain one?click the Omit check box.
TIP
If you don't want Word to find names and addresses for you automatically, you can tell it to flag specific text as the Delivery Address or Return Address text, using two bookmarks designed for this purpose: EnvelopeAddress and EnvelopeReturn.
First, select the text in an open document that you want to use as your outgoing or return address and choose Insert, Bookmark. When the Bookmark dialog box appears, select the Bookmark name box, and type EnvelopeAddress for an outgoing address, or EnvelopeReturn for a return address. (Type these as one word, with no spaces.) Finally, click Add.
 For more information about bookmarks, see Chapter 22, "Using Footnotes, Bookmarks, and Cross-References," p. 743.
If you are using Microsoft Outlook, you can retrieve a delivery or return address from the names stored in its Contact List. In the Envelopes and Labels dialog box, click the Address Book icon (it resembles an open address book) located above the Delivery or Return address forms. The Select Name dialog box appears (see Figure 6.6). Choose a name and click OK. |
Figure 6.6. Choosing a name from your Outlook contacts list, using the Select Name dialog box.
NOTE
For more information on these features, see the Microsoft Knowledge Base articles Q134901, Q141874, and Q167770.
Adding a New Name to Your Envelope and Contacts List
If you're adding a new name that isn't in the contacts list, click Advanced, and click New from the drop-down list. The New Entry dialog box opens; choose New Contact, and click OK.
A new Outlook 2003 Contact item appears; here you can use the different tabs aligned across the top of the box to enter the recipient's address and any other information you have available (see Figure 6.7).
Figure 6.7. Adding a new name to your Outlook contacts list.
Click Save and Close when you're finished; Word returns you to the Envelopes and Labels dialog box and displays the recipient's name and business address in the Delivery Address scroll box. At the same time, the name is added to your Outlook contacts list.
Printing an Envelope?Now or Later
Assuming that you use a standard (#10) business envelope and that your addresses are correct, you can simply print the envelope by clicking the Print button in the Envelopes and Labels dialog box (refer to Figure 6.5). If necessary, Word prompts you to insert an envelope into your printer's manual feed mechanism, showing how the envelope should be inserted.
If you're not ready to print yet, you can tell Word to add the envelope to the beginning of your document as Page 0 in a separate section. Then, when you print the document, Word prompts you to insert the envelope first. To add an envelope at the beginning of your document, click Add to Document in the Envelopes and Labels dialog box. This closes the Envelopes and Labels dialog box and then, as you can see in Figure 6.8, shows how the envelope appears in your document (in Print Layout view).
Figure 6.8. The envelope, appearing as Page 0 in Print Layout view.
If Word prompts you to feed envelopes manually, even though you've placed a stack of envelopes in a printer tray, see "What to Do If Word Incorrectly Prompts You to Feed Envelopes Manually," in "Troubleshooting" at the end of this chapter. |
Adding Graphics to an Envelope
Most business envelope stationery includes some form of logo or graphic accompanying the return address. With Word, you can include a graphic next to the return address, without paying for printed stationery. Follow these steps to add a clip art image to your envelope:
Choose Tools, Letters and Mailings, Envelopes and Labels.
In the Envelopes tab, click Add to Document. This inserts the envelope as a new section at the beginning of your document. (As mentioned earlier, the envelope becomes Page 0, so it doesn't affect the page numbering of your document.)
Click the area of the envelope where you want to place the graphic.
Insert the picture using any of Word's tools for doing so. For example, choose Insert, Picture, From File; then browse to the picture and choose Insert.
For more information about inserting graphics in documents, see Chapter 13, "Getting Images into Your Documents," p. 437.Resize the graphic, if necessary, by dragging one of the square sizing handles surrounding the image.
NOTE
You can also import a graphic from Word's Media Gallery or use a scanned logo. Or you can use Microsoft WordArt to design special type effects. (WordArt and Word's other graphics tools are covered in Chapter 13 and Chapter 14, "Using Word's Quick and Easy Drawing Tools.")
After you create a design for your return address (or for some other purpose), you may want to include it on all your envelopes from now on. To do so, first select all the text and graphics you want to use; these are typically found on page 0 along with the rest of your envelope. Next, choose Insert, AutoText, New. In the Create AutoText dialog box, type EnvelopeExtra1 and click OK.
NOTE
You actually can create two special AutoText entries to use on envelopes: EnvelopeExtra1 and EnvelopeExtra2. If you create these AutoText entries in the Normal template, they will be available to all templates, and, therefore, they will appear on all envelopes. If you want to use them in specialized situations only, create them in a template other than the Normal template. If you later decide you don't want to include these entries on envelopes at all, delete the AutoText entries.
Understanding Envelope Printing Options
You've learned the basics of envelope printing. But that's just the beginning: Word enables you to control all the following elements:
What size of envelopes you use
Whether the envelopes use postal bar codes
How the delivery and return addresses look and where they appear on the envelope
How the envelopes feed into your printer
To work with these settings, click Options in the Envelopes tab of the Envelopes and Labels dialog box. The Envelope Options dialog box appears, as shown in Figure 6.9.
Figure 6.9. The Envelope Options dialog box is your control center for printing envelopes.
Changing Envelope Sizes
By default, Word expects you to use a standard business envelope?normally referred to as a #10 envelope. Word previews how your printed envelope should look in the Preview box of the Envelope Options dialog box (refer to Figure 6.9). If you're using a different kind of envelope, click on the Envelope Size drop-down box to choose one of Word's built-in envelope sizes.
You can also create a custom-size envelope, which you might need if you're designing a special mailing piece?though custom-size envelopes can be expensive.
To create a custom-size envelope, choose Custom Size from the Envelope Size drop-down box. The Envelope Size dialog box appears (see Figure 6.10). Set the sizes you want (in inches) and click OK.
Figure 6.10. Setting a custom envelope size.
Adding Bar Codes to Your Envelopes
By now you've doubtless noticed that much of the mail you receive contains postal bar codes. Two kinds of postal bar codes are generally used:
Delivery Point Barcode (POSTNET). These codes are ZIP codes translated into bar-code language that the U.S. Postal Service computers can read.
Facing Identification Marks (FIMs). These codes flag different kinds of Courtesy Reply Mail. Most of us know this as Business Reply Mail, which uses the FIM-A mark.
Adding bar codes to your mail has two benefits. First, if you're doing mass mailings that qualify, you can get a lower postal rate. Second, bar-coded mail is sometimes delivered more quickly. Fortunately, Word can handle the bar coding for you.
To add a delivery point bar code, check the Delivery Point Bar Code check box. If you're creating Business Reply Mail, check the FIM-A Courtesy Reply Mail check box. (This box is available only if Delivery Point Bar Code is also checked, because you can't have a FIM-A bar code without a POSTNET code.)
CAUTION
Word's bar-code options work only if the Windows locale is set to US. In Windows 2000, this setting appears in the General tab of the Regional Options dialog box, found in the Control Panel. In Windows XP, this setting appears in the Regional Options tab of the Regional and Language Options dialog box, also found in the Control Panel.
Don't use FIM codes if you're also using Internet postage: Internet postage systems print their own FIM codes.
Changing Envelope Formatting
To change the formatting of the addresses on your envelope, click the Options button in the Envelopes and Labels dialog box. The Envelope Options dialog box appears (refer to Figure 6.9). The Envelope Options tab of this dialog box provides near-total control over how your delivery and return addresses look and where they print on the envelope.
To change the appearance of the typeface used in either the delivery address or the return address, click Font in the appropriate section of the Envelope Options dialog box.
If you click the Font button in the Delivery Address section of the Envelope Options dialog box, the Envelope Address dialog box opens (see Figure 6.11). This looks much like the Font dialog box discussed in Chapter 4, "Quick and Effective Formatting Techniques."
Figure 6.11. The Envelope Address dialog box contains most of the character formatting options available in the Font dialog box.
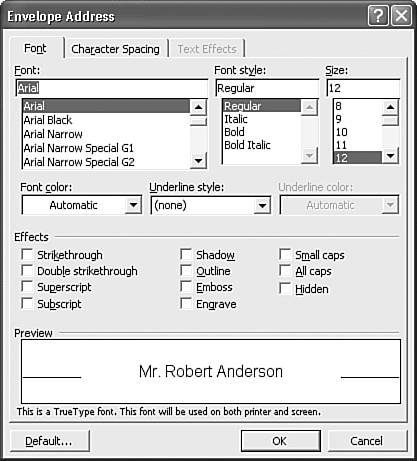
From here, you can choose a font, a font style, a size, and font effects. (Animations aren't available because they don't print.) You can also click the Character Spacing tab to control character spacing and kerning. When you have the envelope address formatting the way you want it, click OK.
For more information on how Word uses templates as the basis for creating both envelopes and other documents, see Chapter 11, "Templates, Wizards, and Add-Ins," p. 355.
Controlling Where Delivery and Return Addresses Are Printed
You can also control how far from the left edge or top of the envelope the delivery and return addresses appear. With the Envelope Options dialog box open (refer to Figure 6.9), change the From Left and From Top settings in either the Delivery Address or the Return Address box, or both.
NOTE
By default, Word's settings make sure that you do not enter addresses beyond the range of your printer, beyond the edges of the envelope you've specified, or beyond the areas acceptable to the U.S. Postal Service. For instance, using Word's default settings, you can't set the delivery address to be less than 1" from the left edge or less than 1 1/2" from the top edge of the envelope.
Controlling How Envelopes Feed into Your Printer
Word allows you to control several aspects of how you feed envelopes to your printer while printing envelopes. To change these settings, display the Envelopes tab of the Envelopes and Labels dialog box, click Options, and choose the Printing Options tab (see Figure 6.12).
Figure 6.12. The Printing Options tab of the Envelope Options dialog box lets you control how your envelopes feed into your printer.

Word sets a default feed method based on information it finds in the printer driver you selected. You should rarely have to change this; if you do, you can click on one of the envelope images shown in the Feed Method area of the dialog box.
Similarly, based on your printer driver, Word specifies whether your envelope should be placed Face Up or Face Down. If necessary, you can change this setting as well.
Depending on the options provided by your printer, you can also control the source where your envelopes will feed from. For example, you can specify whether envelopes will be fed manually, will be placed in the default tray you ordinarily use for regular paper, or will be fed from a different tray.
In general, the default settings in this dialog box will be the appropriate ones. If you make changes, and find that the changes do not work properly (or you simply want to revert to the default settings), click the Reset button. This button is available only if you have made changes to your envelope printing options.


