Using Document Properties to Simplify Document Management
In Chapter 3, "Essential Document Creation and Management Techniques," you learned about Word's powerful capabilities for finding files, which are accessible by choosing Tools, Find from within the Open dialog box. You may recall that one of the ways Word can search for files is by document property. This section takes a closer look at document properties and shows you how to use them to your advantage?whether you're responsible for one desktop or many.
To work with document properties, choose File, Properties. The Properties dialog box opens (see Figure 34.7).
Figure 34.7. You can review a document's properties (and edit many of them) by displaying the Properties dialog box.
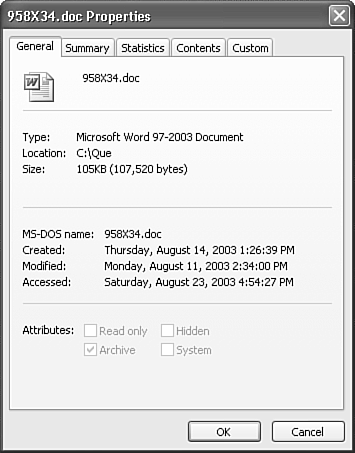
This dialog box contains five tabs:
General? This tab includes information Word automatically stores about every document, including when it was created, how large it is, and where it is stored.
Summary? This tab includes the document's title, comments, author, keywords, and other important document information.
Statistics? This tab includes information Word compiles about the size and contents of a document, as well as how long it has been open and how many times it has been saved.
Contents? This tab includes major parts of a document file.
Custom? Options available on this tab enable you to create your own document properties or choose from 27 optional document properties Word can provide.
General Information Stored in the Properties Dialog Box
Display the General tab of the Properties dialog box when you want to know basic information about your Word document, including its current size and its MS-DOS "short" (8.3) filename, as well as when the file was created, last modified, and last accessed.
Most of the items in the General tab are self-evident, but a few are worth calling to your attention:
Type? Ordinarily, this is a Microsoft Word 97-2003 document.
Location? This displays the complete file path, whether on a local or networked computer.
Size? This is the file's size in bytes, the amount of space it occupies on disk.
MS-DOS Name? This is the old-fashioned 8.3 short filename stored with every file in Windows 98 and Windows NT?the name that stays with your file even if you send it to a Windows 3.x system or an older Macintosh or Linux/Unix system that doesn't support long filenames.
Modified? This tells you when a file was last saved so that you can tell whether specific edits are likely to be reflected.
No general information is stored with a file until you save it for the first time.
Working with Summary Information
Chances are that the Properties tab you'll use most is the Summary tab (see Figure 34.8). Here, you insert editable information about your file?including the categories by which you're most likely to search for it in Word's Tools, Find dialog box, such as Author, Comments, or Keywords.
Figure 34.8. For most people, the Summary tab is the workhorse of the Properties dialog box.
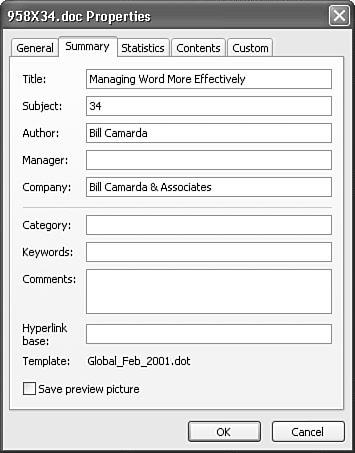
If you've set up Word properly, much of this information can be entered for you automatically. Word enters a title based on the first line of text in your document?commonly a document's title. Word enters the Author based on the name stored in the User Information tab of the Tools, Options dialog box. If you ever run AutoSummarize, Word automatically copies the list of keywords it generates into the Keywords box. Finally, you can include Manager, Company, Category, and other information along with templates so that they are automatically included in every document built with those templates.
One more item on this tab is worth pointing out: Save Preview Picture. If you check this box, Word displays a thumbnail of the first page in the Preview pane of the File, Open dialog box, reflecting formatting. If you do not check the box, you can scroll through the text of the entire document in the Open dialog box's Preview pane.
TIP
If nothing else, you might add your company name to the Summary tab of the Properties dialog box in Normal.dot. This provides an added measure of security by showing who owns the computer on which your documents were created. It's easy to remove this information?but many Word users don't even realize it's there.
NOTE
The name specified in the Author box doesn't change if you forward the file to a colleague for editing on his or her computer. However, the Last Saved By name in the Statistics tab does change when your colleague saves the file.
If you are responsible for the documents created by an entire workgroup or organization, consider requiring (or at least actively encouraging) users to include Summary information along with their document. One way to do this is to have Word display the Summary tab of the Properties dialog box whenever a user saves a file for the first time. To do this, choose Tools, Options and select the Save tab. Check the Prompt for Document Properties check box and click OK.
Some Word users do not want to store this information with their documents, for privacy and security reasons. To remove it, along with other document information that can be traced to a specific user or computer, follow these steps:
Choose Tools, Options, Security; then check the Remove Personal Information from File Properties on Save check box and click OK.

Understanding and Using Document Statistics
The Statistics tab (see Figure 34.9) compiles several useful statistics about your document. You can see when your document was created, modified, and accessed?the same information you already saw in the General tab. Here, however, you can also see when your document was last printed?and who saved it last, even if it was saved by someone other than the author.
Figure 34.9. The Statistics tab gives you a quick look at the most important statistics associated with your document.
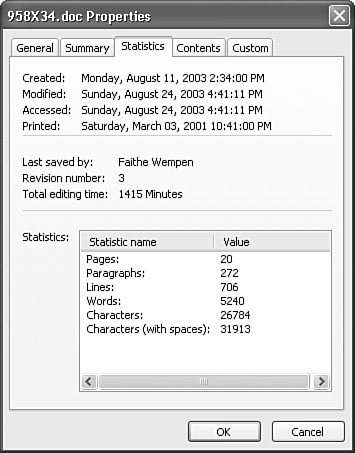
Revision Number tells you how many times you've saved the file. Because you may save a file every few minutes, it's easy to generate hundreds of revisions. If you want a true draft number, consider writing a Visual Basic macro that requests the current draft number and stores it in another Properties box, such as Comments. You can name the macro AutoClose so that it runs whenever you save a file associated with the template where the macro is stored.
The Statistics tab also reports Total Editing Time, which is actually the amount of time the document has been open. Of course, several other documents, or for that matter several different applications, may be open at the same time. Word doesn't care; it assumes that you're editing a document whenever it's open.
Using Contents Information
As you saw earlier, if you check the Save Preview Picture check box in the Summary tab, the next time you look at the Properties dialog box, Word stores its headings in the Contents tab.
NOTE
Unfortunately, several document elements you might reasonably expect to find here are not included. For example, Contents does not report on multiple document versions stored in the same file, macro modules stored with a file, or embedded graphics.
Creating Custom Properties
If the properties you've seen so far aren't enough, Word provides 27 more custom properties you can assign at will?or you can create your own. To work with custom properties, choose File, Properties and display the Custom tab (see Figure 34.10).
Figure 34.10. If you need a property that Word doesn't provide, you can add it in the Custom tab of the Properties dialog box.
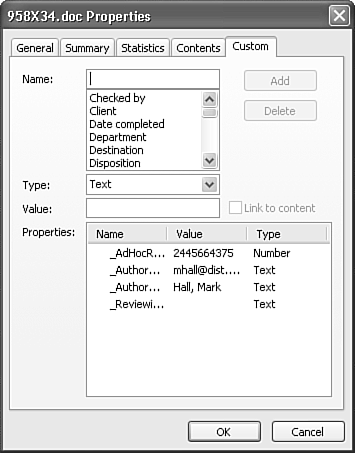
Follow these steps to add a new category:
Choose a name for your custom property in the Name scroll box, or type a name of your own.
In the Type box, specify the kind of information you want your property to contain: text, a date, a number, or a Yes/No choice.
In the Value text box, enter the value with which you want your custom property to start. For example, if you've created a Date Completed property, you might enter the date 2/1/2003. The Value you insert must be in a format compatible with the Type you've just chosen.
When you're finished, click Add. The custom property, its type, and its value now appear in the Properties scroll box.
After the property has been created, you can modify it by selecting it in the Properties scroll box, entering a new Value or Type, and choosing Modify. Or you can delete it by selecting it and choosing Delete.
NOTE
Because custom properties require a Value, you can't create an empty custom property. If you want to include a custom property in your document or template, insert a "dummy" value that users can later replace with a real one.
Creating Custom Properties That Update Themselves
You can create a custom property that knows how to update itself, based on changing information in your document.
Imagine, for example, that every division in your company sends you a monthly executive summary reporting new sales activity. Your reporting template includes a table; that table contains a cell listing the total value of all new customer sales made that month. You might want to search all those documents, quickly identifying the divisions where sales exceeded $10,000,000. However, you have dozens of divisions and you would rather not open each file individually to see the value stored in the table?you only want to know who has exceeded a certain threshold so that you can learn why.
To accomplish this task, you first create a bookmark associated with the text in your document that you want to attach to your property:
In your template, select the formula field that contains the calculation of total profits.
Choose Insert, Bookmark.
Type a bookmark name and click Add.
Next, create a custom property based on that bookmark:
Choose File, Properties.
Choose the Custom tab.
Check the Link to Content check box. (This box is grayed out unless your document contains at least one bookmark.) Notice that the Value box has turned into a drop-down box named Source.
In the Name text box, enter or select a name for your new custom property.
In the Source drop-down box, choose the bookmark to which you want to link your custom property.
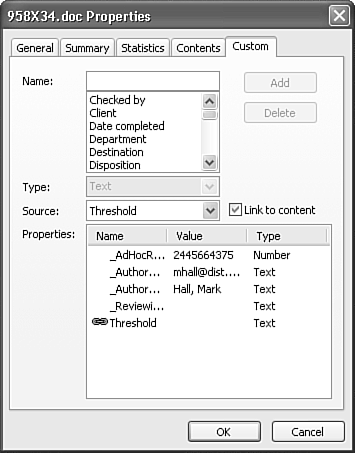
Click Add. The new custom property appears in the Properties list. A Link icon appears next to it, indicating that this custom property is linked to a bookmark (see Figure 34.11).
Figure 34.11. You can create a custom property linked to bookmarked text in your document.
Using Fields to Display Properties in Your Document
Many of the elements stored in the Properties dialog box can be placed in your document automatically, using fields. For example, you might want to create a cover sheet that prints with each of your documents. Table 34.1 lists fields that use information stored in the Properties dialog box. Of course, anytime you update your fields, changes in the corresponding Properties boxes are reflected in them.
Field | What It Displays | Notes |
|---|---|---|
Author | Author data from Summary tab | |
Comments | Comments data from Summary tab | |
CreateDate | File creation date from General tab | |
DocProperty | Information from any property you choose | Can also work with custom properties after you create them. Select the property in Insert, Field, Options. |
EditTime | Editing time from Statistics tab | |
FileName | Filename | \p switch adds full pathname. |
FileSize | File size | \k switch specifies kilobytes. \m switch specifies megabytes. |
Info | Information from any summary | Select the property of your choice in Insert, Field, Options. |
Keywords | Keywords data from Summary tab | |
LastSavedBy | Last saved by data from Statistics tab | |
NumChars | Number of characters in document | |
NumPages | Number of pages in document | |
NumWords | Number of words in document | |
PrintDate | Print date from Statistics tab | |
SaveDate | Last saved date from General tab | |
Template | Template currently attached to document | \p switch adds full pathname of template. |
Title | Title data from Summary tab |


