Organizing Entire Toolbars or Menus
So far, you've learned how to add or remove individual commands on menu bars and toolbars. Now step back a moment and look at the menu bars and toolbars themselves. Are they organized appropriately for easy use? In the following sections, you'll learn how to
Rearrange commands on any toolbar or menu
Copy or move commands from one toolbar or menu to another
Widen or narrow boxes in a toolbar to improve readability
Divide toolbar buttons or menu items logically for easy understanding
Rearranging Commands on Any Toolbar or Menu
You may sometimes want to rearrange the commands on a toolbar or menu?perhaps to place the ones you use most often at the top. As with adding and removing commands, you can do this through the Rearrange Commands dialog box. Follow these steps:
Choose Tools, Customize to open the Customize dialog box (refer to Figure 31.3).
Click Rearrange Commands to display the Rearrange Commands dialog box (refer to Figure 31.4).
Choose the Menu Bar you want to rearrange from the Menu Bar drop-down box. Or, if you want to rearrange a Toolbar, click Toolbar, and choose the toolbar from the Toolbar drop-down box.
In the Controls list, choose the Control you want to move. Then, click Move Up or Move Down repeatedly, until the command appears where you want it to.
TIP
You can also choose any of the other options on the shortcut menu. Many of these are discussed in later sections of this chapter.
When you're finished rearranging your menu bar or toolbar, click Close to return to the Customize dialog box.
When you're finished making all your customizations, click Close to apply them.
Copying or Moving Toolbar Buttons
You may occasionally want to move a toolbar button or menu item from one toolbar or menu bar to another, or copy the command so that it appears on more than one toolbar or menu bar. With the Customize dialog box open, you can do any of the following:
To move a toolbar button, drag it from one toolbar to another.
To copy a toolbar button, press Ctrl while you drag the button from one toolbar to another.
To move a toolbar button within the same toolbar, click and drag it to its new location.
Widening Boxes in a Toolbar
If you add the Font, Font Size, or Style commands (from the Format category), or (Web) Address command (from the Web category) to a toolbar, Word doesn't insert a button; rather, it inserts a drop-down box, just like the Style drop-down box that appears on Word's Formatting toolbar. You might find the box too wide or narrow for your purposes. For example, you might be in the habit of using exceptionally long style names. Or you might want to squeeze a font box onto a toolbar with little extra space for it.
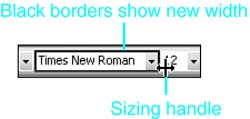
To change the width of a box on a toolbar, make sure that the Customize dialog box is open. Then, place your mouse pointer on the left or right edge of the box so that the mouse icon shows a sizing handle, and then drag it to the width you want (see Figure 31.6).
Figure 31.6. Dragging a font, font size, or style box to the width you want.
Dividing Toolbar Buttons and Menu Items Logically
Perhaps you've noticed that Word's toolbar buttons and menu commands are grouped logically, with a group separator line between each group. (For example, you can find a group separator line between the Spelling and Grammar icon and the Cut icon on the Standard toolbar, and between the Print and Send To commands on the File menu.
You can add a group separator line of your own to make your custom toolbar buttons or menu commands easier to understand and use. To do so, choose Tools, Customize to display the Customize dialog box.
If you are adding a separator line to a toolbar, right-click the button immediately to the right of where you want the separator to appear, and choose Begin a Group from the shortcut menu. If you are adding a separator line to a menu bar, right-click the menu item immediately below where you want the separator to appear, and choose Begin a Group from the shortcut menu.


