What Styles Are and How They Work
In Word, a style is a series of formats that can be applied all at once to one or more paragraphs, or one or more characters. Rather than applying formats one at a time by clicking toolbar buttons or using keyboard shortcuts or dialog boxes, you choose a style and Word automatically applies all the formatting for you. If you want or need to change the appearance of your entire document, all you have to do is change the styles. Styles can be named, making it easy to choose the right formatting for headings and other document elements and keep that formatting consistent.
 For more information about keeping styles consistent using Word's Format Checker and related features, see Chapter 4, "Quick and Effective Formatting Techniques," p. 107.
How Styles and Templates Work Together
Styles are intimately linked to another Word feature, templates. Templates are patterns for your documents, which can include many features, including styles, boilerplate text, manually formatted text, graphics, and custom automation tools such as macros and special toolbars.
When you store your styles in a template, the styles are immediately available whenever you create a document based on that template. By default, your styles are stored in the Normal template?which makes them available to every document you create. As you'll see in Chapter 11, you can use templates to manage, organize, and distribute collections of styles?and this makes it easy to refine and standardize the look of all your documents.
For more information about working with templates, see Chapter 11, "Templates, Wizards, and Add-Ins," p. 355.
Word offers two kinds of styles: paragraph styles and character styles; both can be stored in your templates. Each type of style is covered next.
Understanding Paragraph Styles
Paragraph styles control the formatting of entire paragraphs. Any manual formatting you can add to a font or paragraph can be included in a paragraph style. If you can find it in one of the following dialog boxes, you can add it to a paragraph style by choosing
Format, Font (Font, Character Spacing, and Text Effects tabs)
Format, Paragraph (Indents and Spacing, Line and Page Breaks tabs)
Format, Tabs (tab stops, alignment, and leaders)
Format, Borders and Shading (Borders and Shading tabs, but not Page Borders)
Tools, Language, Set Language (the language in which text should be proofed)
Format, Bullets and Numbering (Bulleted, Numbered, and Outline Numbered tabs)
Understanding Character Styles
Unlike paragraph styles, character styles can be built only from the text formatting options available in the Format, Font dialog box; the Format, Borders and Shading dialog box; and the Tools, Language, Set Language dialog box.
Chances are, you'll use paragraph styles much more often than character styles. Paragraph styles are easier to create, and they can do more. For certain purposes, however, character styles are indispensable.
For example, you might have a short block of text that must always be formatted in a specific way, such as a company name. With character styles, it's easier to make sure that this text is always formatted correctly to begin with and remains formatted correctly as a document evolves.
NOTE
Two additional types of styles are covered elsewhere in this book. Table styles, which streamline the consistent formatting of tables, are covered in Chapter 12, "Structuring and Organizing Information with Tables." List styles, which make it easy to consistently format numbered and bulleted lists, are covered in Chapter 5, "Controlling Page Features."
How Paragraph and Character Styles Interact
Character styles are superimposed on paragraph styles. When character and paragraph styles conflict, the font specified in a character style takes precedence. However, if a character style does not specify a formatting attribute and the paragraph style does, the paragraph style is applied.
For example, imagine you have a paragraph style named Summary that specifies
12-point Times New Roman italic
Now, imagine you superimpose a character style named Smith, which specifies
14-point Impact
You get 14-point Impact just as your character style requests, but you'll also get italic because your character style hasn't expressed a preference and your paragraph style has. On the other hand, if your paragraph and character styles both specify italic, Word assumes that you want to preserve some contrast between the two styles and formats the text as not italic. Therefore, you can't count on a character style being absolute.
As is covered in the next section, manual formatting of text overrides both paragraph and character styles.
How Manual Formatting and Styles Interact
Manual formatting is superimposed on both paragraph and character styles. As in the preceding example, however, Word seeks to maintain contrast. So if you add italic formatting to a paragraph that's styled to use italic, Word displays non-italic text.
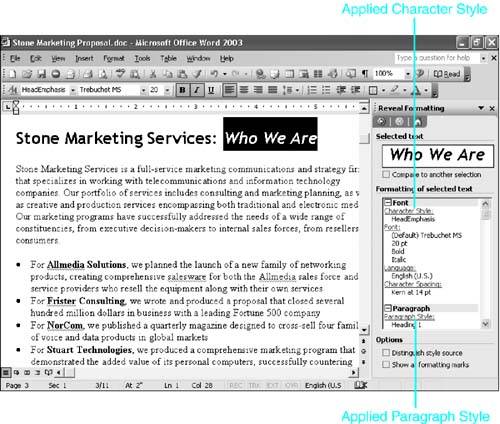
To see which formatting elements in a block of text have been created by styles and which have been created by manual formatting, select the text and choose Format, Reveal Formatting. The Reveal Formatting task pane appears. Character styles, if any, are listed under Font formatting. Paragraph styles are listed under Paragraph formatting (see Figure 10.1).
Figure 10.1. Displaying all the paragraph and font formatting associated with a block of text.
To clear all manual formatting and character styles, leaving only paragraph styles, select text and press Ctrl+spacebar, or display the Styles and Formatting task pane and choose Clear Formatting from the Pick Formatting to Apply scroll box.
Displaying Styles with Your Text
Sometimes you might like to view the styles in your document as you work. For example, you may have a set of corporate styles you need to follow. Or you might have styles that look similar to each other; viewing the style names helps you tell them apart.
You already know that you can view style and formatting information about selected text by displaying the Reveal Formatting task pane (choose Format, Reveal Formatting). However, Word offers a little-known way to display all style names alongside the text that uses them: the Style Area (see Figure 10.2).
Figure 10.2. Word's Style Area, along the left side of this figure, enables you to view your styles and document at the same time.
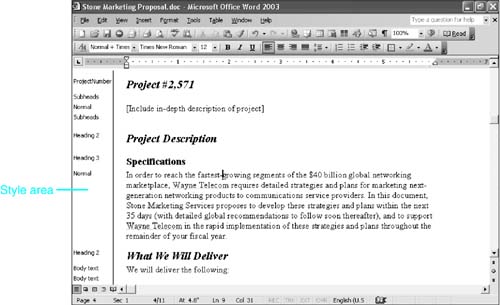
The Style Area works only in Normal and Outline views. To display a Style Area, choose Tools, Options, View. Then specify a Style Area Width greater than 0 inches. (The default setting, 0" , means that Word displays no Style Area. That's why you may never have seen one.)
TIP
Try a measurement of 0.8 inches, sufficient to display most style names without reducing the editing area too much.
After you have a Style Area, you can resize it with the mouse. To do this, place the mouse pointer over the border of the Style Area. When the pointer changes to appear as vertical bars, click and drag the border to the width you want.


