Entering Asian Text with Input Method Editors
Documents prepared in ideographic languages such as Chinese, Korean, and Japanese can be read in Word 2003 if you have appropriate fonts installed, such as the Asian fonts. However, text cannot be entered in these languages using standard methods.
If you need to write extensively in Korean, Japanese, or Chinese, the best solution is to configure Word for these languages using the techniques discussed later in this chapter.
However, many users need to enter text in these languages only occasionally. For them, Microsoft's Language Pack provides Input Method Editors (IMEs)?add-on software that converts keystrokes into ideographic characters.
IMEs typically contain an engine that converts keystrokes into phonetic and ideographic characters, as well as a dictionary of the most widely used ideographic words. As you type characters based on the sounds of the spoken language, the IME attempts to guess which ideographic character or characters you want. The IME also provides tools for manually choosing characters one at a time.
For more information about IMEs, including how to install and use them, see the Microsoft Word Online Help under the topic "Input Method Editors."
Formatting and Proofing Text in Multiple Languages
Just as text in Word can be formatted with fonts and styles, so too can it be formatted with a specific language. Formatting text in a specific language tells Word which of your installed proofing tools to use and also helps Word choose the right formatting for dates, times, and numbering.
There are two ways to format text in a specific language other than English:
You can use the automatic language detection feature to do it for you.
You can do it manually, through the Tools, Language, Set Language dialog box.
Having Word Assign Languages to Text Automatically
Word 2003's automatic language detection feature can identify the language in which you're writing by comparing the words you type against the proofing tools you've installed. If Word determines that you are writing in a different language, it can format the text automatically for that language.
Automatic language detection works one sentence at a time, so it doesn't get tripped up by foreign-language words or phrases you may use in an English-language document, or by Greek characters you might use in a formula. In detecting languages, Word considers only the languages that meet one of the following requirements:
Enabled for editing (see the section "Enabling Languages in Office")
Set as the default for documents created with the template you're using
Associated with the keyboard you are using
Enabling Languages in Office
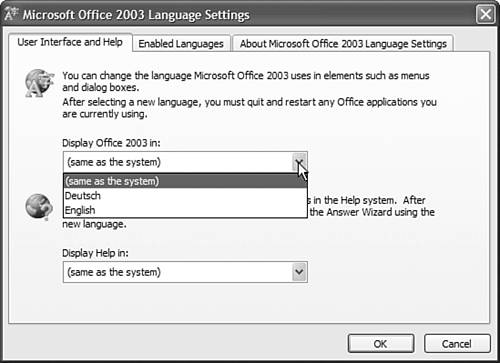
To enable specific languages for use by Word and Office, you use a special utility program called Microsoft Office 2003 Language Settings. To access this utility, choose Start, All Programs, Microsoft Office, Microsoft Office Tools, Microsoft Office 2003 Language Settings. The Microsoft Office 2003 Language Settings dialog box opens, displaying the Enabled Languages tab (see Figure 35.4).
Figure 35.4. The Microsoft Office 2003 Language Settings dialog.

NOTE
In a default installation, the Language Settings tool is not installed, so you may need to wait for it to be installed the first time you access it.
In the Available Languages list, select the languages for which you want to install additional support. Use the Add button to add support for a language, or the Remove button to remove support for an already-enabled language. The languages appear in the Enabled Languages box at the right. When you're finished, click OK. The next time you open Word, the language support is activated, and the language-specific styles and macros are automatically available.
Turning on Automatic Language Detection in Word
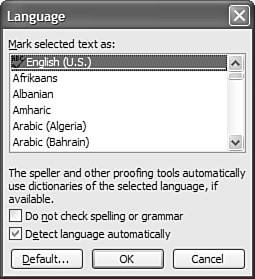
Automatic Language Detection is enabled by default in Word 2003. If you find that the automatic detection is not working, turning on automatic language detection is simple. First, open Word. Choose Tools, Language, Set Language. The Language dialog box opens (see Figure 35.5). Check the Detect Language Automatically check box and click OK.
Figure 35.5. The Language dialog box.

NOTE
If Word is open when you make changes to the language settings, you will need to close and reopen it for the settings to take effect.
Manually Assigning Text to a Language
If you do not want to set up automatic language detection, or if you do not have all the proofing tools you need to use it fully, you can still manually assign a language to your text.
To manually assign text to a language, first select the text. Then choose Tools, Language, Set Language. The Language dialog box opens. In the Mark Selected Text As scroll box, choose the language you want Word to use, and click OK.
NOTE
In the Mark Selected Text As list of languages, the languages you have installed proofing tools for are marked with a check-mark icon and the letters ABC, similar to the spell-check icon on the Standard toolbar.
Specifying "No Proofing" on Selected Text
Occasionally, you may edit in languages for which you do not ever expect to have proofing tools available or accessible. If so, you may want to specify that Word skip proofing all or part of your document to avoid having Word flag most of the words as incorrect. To do so, select the text that you do not want to be proofed. Next, choose Tools, Language, Set Language. The Language dialog box opens. Check the Do Not Check Spelling or Grammar check box and click OK.
CAUTION
If automatic language detection is turned on, Word automatically skips proofing for text blocks it cannot identify as being written in a recognizable language.
Use the Do Not Check Spelling or Grammar setting carefully. If it's used too often, misspelled words and bad grammar can creep into your documents unnoticed; this can present an embarrassing situation.
TIP
Use the Do Not Check Spelling or Grammar option whenever you have long lists of product names, company names, or other text that Word would otherwise flag as potentially incorrect simply because it cannot find those words in its dictionary.
Changing Word's Default Language
Word automatically creates documents using whatever language you set as the default; in the United States, this language is English (US). You can change the default language to any foreign or English variant, and Word adjusts its proofing tools as necessary.
To change the default language for all documents associated with the Normal template, follow these steps:
Choose Tools, Language, Set Language.
In the Language dialog box, choose the language you want to use.
Click Default. A confirmation dialog box appears.
Click Yes to confirm that you want to change the default language.


