Using WordArt
You can often create powerful visual impact using nothing more than text. Word and Office provide a special tool for creating text effects: WordArt.
Using WordArt, you can give your text added dimension, color, and style. Moreover, your WordArt creation is completely customizable after you've created it?you can even change the text you included.
WordArt tends to be most useful when you need to attract attention?for example, in retail advertising or brochures, on report cover pages, or for the banner at the top of a newsletter. WordArt tends to be less useful when you need highly refined imagery for a highly sophisticated and discriminating audience. Use WordArt for no more than a few words at a time so that you can achieve maximum impact without compromising readability.
NOTE
WordArt objects work much like other objects, such as drawing objects. You can resize them by selecting them and dragging their resizing handles; you can also drag them to new locations.
Unfortunately, they also have the drawbacks of other Word objects: They cannot be checked for spelling, nor can their text be located through Find and Replace.
Inserting a WordArt Object
To create a WordArt object, follow these steps:
Choose Insert, Picture, WordArt. The WordArt Gallery appears (see Figure 13.32).
Figure 13.32. The WordArt Gallery offers 30 customizable preset designs.
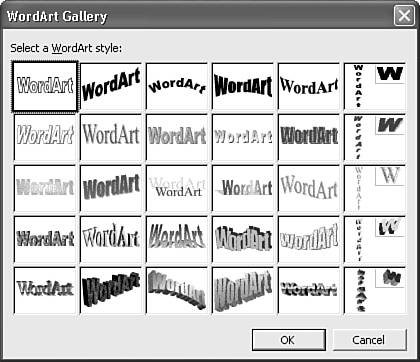
Double-click any of the 30 preset designs, which opens the Edit WordArt Text dialog box.
Type in your text to replace the "Your Text Here" phrase.
Make any font changes you want and click OK. WordArt creates your object with sizing handles around it and opens the WordArt toolbar.
When you're finished, you can click outside the WordArt object to return to the regular document. Later, you can change the text in your WordArt object by double-clicking it to reopen the Edit WordArt Text dialog box.
TIP
If you select a word or phrase prior to starting the WordArt process, your text automatically appears in the Edit WordArt Text dialog box.
Modifying Your WordArt Object
It's easy to modify a WordArt object after you've created it. You can either try different preset effects through the WordArt Gallery or combine a preset with one of 40 shapes. Your new shape can then be stretched, resized, and rotated. Experimentation with the various shapes is the best way to understand what generates the best look for your particular WordArt object. Often, trying to achieve one effect leads you to a completely unexpected, but attractive, result.
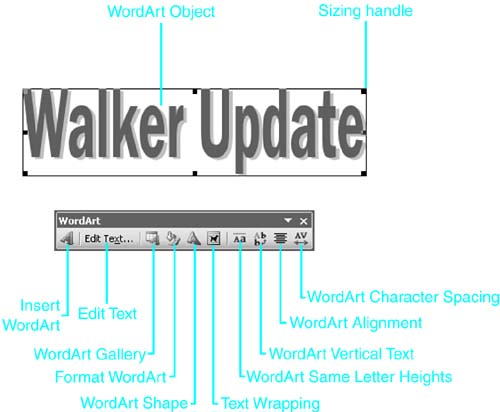
To modify your WordArt object, first select it. This typically displays the WordArt toolbar (see Figure 13.33); if the toolbar doesn't appear, choose View, Toolbars, WordArt.
Figure 13.33. A sample WordArt object and the WordArt toolbar.
Changing WordArt Content and Styling
If you're not satisfied with the content or the appearance of the WordArt image you already have, you can use the WordArt toolbar to change it entirely. Click the Edit Text button to return to the Edit WordArt Text dialog box and change your text, or click the WordArt Gallery button to choose a different prestyled effect.
Adjusting the Shape of a WordArt Object
If you are reasonably satisfied with your WordArt image, you can use the WordArt toolbar to make adjustments to get exactly the effect you're looking for.
For instance, to change the shape into which your WordArt object is warped, select your WordArt object; then click the WordArt Shape button (see Figure 13.34) and select one of the 40 available shapes.
Figure 13.34. Click the WordArt Shape button to choose from 40 shapes for your text.

Using Vertical Text in a WordArt Object
WordArt offers several options for adjusting text. For example, you can stack letters on top of each other by clicking the WordArt Vertical Text button (see Figure 13.35).
Figure 13.35. Stacking the text in a WordArt image.
TIP
You can create columns of text in a WordArt object. When you enter the text for your WordArt object, place a paragraph mark at the end of each word or phrase you want in a separate row. Then, after you display the WordArt object, click the Vertical Text button.
Using WordArt's Same Letter Heights Option
You can also click WordArt's Same Letter Heights button to make your lowercase letters as large as your capital letters.
TIP
The Same Letter Heights tool, like all the WordArt toolbar formatting options, affects the entire WordArt object and can't be selectively applied to one word or a part of a phrase. To achieve that result, you need to create two (or more) WordArt objects, applying the Same Letter Heights formatting to only the object or objects you want. If you then want to group the objects so that you can treat them as a single object, click all the objects by using Select Objects from the Drawing toolbar. Finally, click the Draw button and then the Group button.
Aligning or Stretching Your WordArt Text
You can align or stretch your text using the options that display when you click the WordArt Alignment button (see Figure 13.36). Table 13.1 takes a closer look at the available options.
Figure 13.36. Aligning the text in a WordArt image.
Button | Name | Description |
|---|---|---|
| Left Align | Paragraphs are aligned to the left edge of the bounding box. |
| Center | Paragraphs are centered in the bounding box. |
| Right Align | Paragraphs are aligned to the right edge of the bounding box. |
| Word Justify | Word justifies paragraphs to the edges of the bounding box by stretching the spaces between words. If there is only one word on a line, the letters are spaced out equally. |
| Letter Justify | Word justifies paragraphs to the edges of the bounding box by spacing the letters and the spaces between words equally. Single-word lines are treated the same as with Word Justify. |
| Stretch Justify | Word justifies paragraphs to the edges of the bounding box by stretching the letters and the spaces between words equally. |
Adjusting Letter Spacing in WordArt Text
As with regular Word text, you can tighten or loosen the letter spacing of text in WordArt objects. Normal spacing is 100%; condensed or tighter spacing is less, and expanded or looser spacing is more.
With regular text, letter spacing moves the letters closer together or farther apart. WordArt works differently. Here, letter spacing narrows or widens the characters themselves.
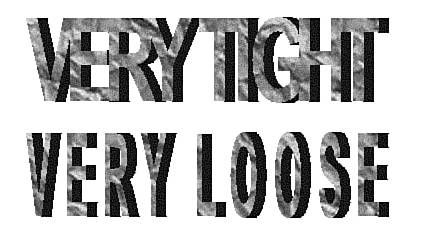
To alter a WordArt object's spacing, click the WordArt Character Spacing button. WordArt provides five preset values (Very Tight, Tight, Normal, Loose, and Very Loose), as well as a Custom box. You can also fit characters such as "A" and "V" more tightly together by enabling the Kern Character Pairs. Figure 13.37 contrasts the two preset extremes, Very Tight and Very Loose.
Figure 13.37. Controlling the letter spacing of text in a WordArt image.
Adjusting a WordArt Object with the Adjustment Handle
By default, WordArt objects are inserted inline. This means they are placed at your insertion point, on a line of text?and they move as your text moves. You can tell that a WordArt object has been inserted inline by the square sizing handles that surround it.
Sometimes you may want more control over the appearance of your WordArt object. For example, you may want to stretch or rotate it. You can't do this with inline WordArt objects, but you can do it with WordArt objects that utilize a different "wrapping style"?for example, objects that will be displayed in a square area that will not move on the page, or objects that will appear behind or in front of text.
To change a WordArt object's wrapping style so that you can stretch or rotate it, follow these steps:
Right-click on the WordArt object to display the shortcut menu.
Choose Format WordArt.
Display the Layout tab, and choose any Wrapping Style except In Line with Text.
Click OK.
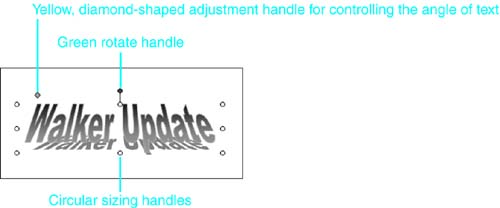
Your WordArt object now has three sets of handles (see Figure 13.38):
Circular sizing handles: Drag one of them outward to enlarge the object, or inward to shrink it.
A green rotate handle: Drag it to rotate the object.
A yellow, diamond-shaped adjustment handle for changing the angle of text: Drag it inward to increase the angle of the text.
Figure 13.38. Additional handles that appear in non-inline WordArt objects.
Depending on the form of the shape, dragging an adjustment handle may have different effects. For example, in a shape with a curved bottom, the adjustment handle alters the degree of the curve. In a shape that fades out at the right, the adjustment handle moves the vanishing point.
Using the Format WordArt Dialog Box
Much like other Word objects, WordArt objects have a Formatting dialog box that brings together many of their formatting options (see Figure 13.39). To view this dialog box, select the object and click Format WordArt on the WordArt toolbar (or right-click on the object and choose Format WordArt from the shortcut menu).
Figure 13.39. Using the Format WordArt dialog box.
Many of the elements in this dialog box, such as Size and Layout, are similar to those you learned about in the discussion of the Format Picture dialog box, earlier in this chapter. Two options are worth pointing out, however:
In the Colors and Lines tab, you can change the fill color, line color, and line weight of your WordArt object.
In the Web tab, Word automatically inserts a copy of the same text that appears in your WordArt object so that viewers can see the text even if they cannot see the formatting.


