Working with Access and Word
Much of an office's day-to-day business involves keeping track of data. Take an overdue invoice notice, for example. Although the letter you send to your debtor is typically a word processing document, the key data incorporated in it may well be stored in a database: the business name and address, invoice numbers, amount due, and so forth. Word's tight integration with Microsoft Access enables you to draw on the same data source to produce any report, mailing, or other document. For example, you may want to
Incorporate specific, filtered elements of a database in a document you're creating, such as a discussion of new customers or sales opportunities
Create a report based entirely (or largely) on Access data but utilize Word's more sophisticated formatting capabilities
Aside from mail merge, there are three ways to retrieve Access data for use in Word:
You can use Word's Database toolbar to specify which Access data you want, and manage the data after you insert it. This technique often makes sense when you're incorporating Access data into a Word document that already exists.
You can use Access's Publish It with Microsoft Word feature to build an RTF (Rich Text Format) file that can be edited and formatted in Word. If you're at least reasonably familiar with Access, this is the fastest way to create a Word document containing large amounts of Access data.
You can use Access's standard data export tools, which enable you to specify the name, placement, and type of file Access creates when it exports data.
The following sections walk you through each of these techniques. But first, the next section provides some background about databases and how Access works with Word.
 For more information on running mail merges, see "An Overview of Word's Mail Merge," p. 584.
Some Important Points About Access Databases
Remember that a database is made up of many records, each of which represents one business, person, or transaction. The records, in turn, are composed of various fields. Each field represents one unique aspect of a record, such as a first name, last name, street address, or ZIP Code. Databases are often represented as tables with each column representing a different field and each row a different record. The first row of the table is reserved for the field names and is called the header row.
In Access, you can enter field names of up to 64 characters with spaces and most special characters. However, if you're planning on using your database in Word, it's best to limit your field names to 20 or fewer characters and avoid spaces and any special characters other than the underscore. Otherwise, when you link your Word document with your Access database while setting up a mail merge, Word automatically truncates the field names to 20 characters and alters any spaces or special characters to the underscore character.
Word inserts your Access data just as it appears in Access. So if your AmountDue field isn't formatted to show dollars and cents in Access, it won't show up that way in Word. The same is true of date fields and text fields.
Integrating Microsoft Access Data into an Existing Word Document
Imagine that you're writing a report to management that describes all the new sales opportunities your division has generated in the past 30 days. You've already written plenty of glowing prose about your sales team's hard work. Now it's time to get down to cases: Which companies represent the largest sales potential? The data is stored in Access. You want to include it in your Word report, in the form of a Word table. In this section, you'll learn how to make that happen.
TIP
If possible, familiarize yourself ahead of time with the specific Access database file you'll be using. For example, you need to know in which database tables the information you're seeking is stored, and which fields exist in those tables.
Follow these steps to import data into Word from Access:
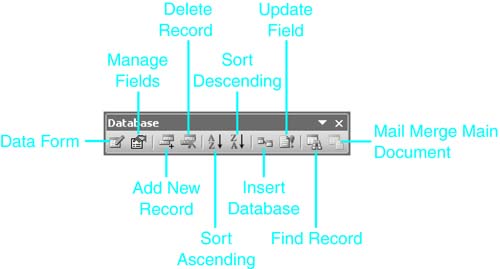
Choose View, Toolbars, Database to display the Database toolbar (see Figure 29.11).
Figure 29.11. The Database toolbar enables you to import and control database data.
Click the Insert Database button. The Database dialog box opens (see Figure 29.12).
Figure 29.12. The first step in integrating Access data into a Word document is to click Get Data and retrieve the data you need.
Click Get Data. The Open Data Source dialog box opens.
TIP
If you want to insert another type of data source, such as an Excel worksheet, choose that option instead.
If your data is actually stored in an SQL Server 2000 database accessed through a Microsoft Access front end, choose Access Projects from the Files of Type drop-down box.
Browse to and select the database you want to use.
Click Open. If your database contains multiple tables, the Select Table dialog box opens (see Figure 29.13).
Figure 29.13. Choosing a database table or preexisting query.
Choose the table that contains the database fields you want to use. If a predefined query exists within Access that generates the data you want, choose that query instead.
Click OK.
You've now connected your Access database to your Word document, but you haven't actually inserted any data yet. At this point, you have a choice:
If you want to insert all the data stored in the database table you selected (or associated with the query you selected)?or specific consecutive numbered records from that table or query?you can click Insert Data in the Database dialog box and work from there. (See "Inserting Data Through the Insert Data Dialog Box," later in this chapter).
If you want to create a more complex query, sort the information placed in your document, or choose which fields to include, click Query Options in the Database dialog box. The Query Options dialog box opens, offering options for specifying which data to include in your Word document. Query Options are covered in the next section.
Creating Query Options
As covered in the previous sections, you manage the process of importing data from Access through the Database dialog box. After you've selected the file that contains your data, you specify which data you want to use by clicking Query Options in the Database dialog box.
Most of Word's database Query Options are covered at length in Chapter 17, in the section "Advanced Filtering and Sorting." Briefly, however,
In the Filter Records tab (see Figure 29.14), you can filter which data appears, based on any field in the database table you've chosen. You can also use comparisons such as "Equal to" and "Is Not Blank" to refine the data further. Finally, you can establish six criteria to widen or narrow the "data net" you're casting.
Figure 29.14. The Filter Records tab of the Query Options dialog box.
In the Sort Records tab (see Figure 29.15), you can choose which field or fields to sort by. You can choose up to three sort fields and specify whether each of them sorts in ascending or descending order.
Figure 29.15. The Sort Records tab enables you to specify a sort order for your data, based on up to three fields.
Finally, in the Select Fields tab? which is not available in mail merge?you can choose which fields from your data source are placed in your document. This tab is shown in Figure 29.16.
Figure 29.16. The Select Fields tab enables you to control which fields of data are placed in your Word document.
By default, every field in the data source is selected. To remove one field, highlight it in the Selected Fields scroll box and click Remove. To remove all fields, click Remove All. You can then add fields back one at a time. In the Fields in Data Source scroll box, highlight the field you want to add. The Remove and Remove All buttons are replaced by Select and Select All buttons. Click Select.
If you don't want a header row containing the field names, clear the Include Field Names check box. When you're finished, click OK.
AutoFormatting Your Data Before You Insert It
In Chapter 12, you learned about Word's tools for AutoFormatting a table after you place it in your document. Because you might want to AutoFormat the information in the database you import, the Database dialog box (refer to Figure 29.12) enables you to choose Table AutoFormat before you place the information in your document.
After you complete the Get Data step and set Query Options (if any), click Table AutoFormat. The Table AutoFormat dialog box appears. Choose the Formats and other settings you want, and click OK to return to the Database dialog box.
Inserting Data Through the Insert Data Dialog Box
Now you're ready to insert the data. In the Database dialog box (refer to Figure 29.12), click Insert Data. The Insert Data dialog box opens (see Figure 29.17). Here, you have one last chance to refine your data. By default, Word searches the entire database for records that fit the query options you've already set. If you prefer to search only a specific range of numbered records, enter the range in the From and To text boxes.
Figure 29.17. In the Insert Data dialog box, you can specify a range of records, or specify that data be inserted as an updateable field.
Finally, if you want the data to be inserted as a { DATABASE } field that can be updated based on the source database file, check the Insert Data as Field check box. When you're finished, click OK. The information appears in your document (see Figure 29.18).
Figure 29.18. Formatted database data inserted in a Word document.
For more information about working with fields, see Chapter 23, "Automating Your Documents with Field Codes," p. 771.
TIP
If you've inserted a { DATABASE } field linked to a database file, you can update the database information at any time by clicking inside the data in your document and either pressing F9 or clicking the Update Field button on the Database toolbar.
Using the Database Toolbar to Modify Data Placed in Your Document
After you've inserted database data in your document, the Database toolbar gives you tools for managing it. The following sections cover each of the tools.
Viewing the Data in a Form
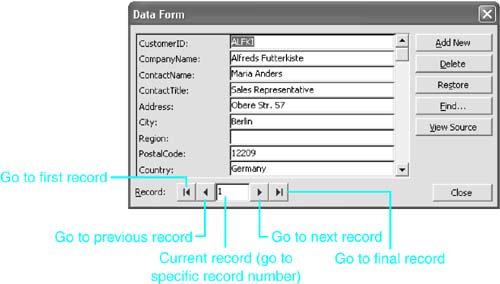
To display the data through a data form, which makes it easier for you to move among records and edit them, click Data Form. Figure 29.19 shows the navigation tools available in a data form.
Figure 29.19. The data form makes it easy to browse and edit the content of records you've inserted.
Managing Fields
To add, rename, or delete fields displayed in the table, click Manage Fields on the Database toolbar. The Manage Fields dialog box opens (see Figure 29.20).
Figure 29.20. In the Manage Fields dialog box, you can add, rename, or remove fields from the database data in your document.
From here, you can
Add a new field by typing a new Field Name and clicking Add.
Remove a field by selecting it in the Field Names in Header Row scroll box and clicking Remove.
Rename a field by selecting it in the Field Names in Header Row scroll box and clicking Rename.
Adding, Deleting, and Sorting Records
To add a blank line where you can enter an additional database record, click Add New Record on the Database toolbar. This adds a new column to the Word table Access has entered in your document.
To remove an existing record, click inside it and click Delete Record.
To sort the records (excluding the header row), click in the column you want to sort by; then click Sort Ascending. To sort in reverse order, click Sort Descending.
Publishing Access Data to Word Via Office Links
Microsoft Access contains a powerful shortcut for exporting data to Word: the Publish It with Microsoft Word feature, one of a family of "Office Links" features. To publish database information using this feature, open the Access database you want to use. You can publish to Word directly from an Access table, query, form, or report.
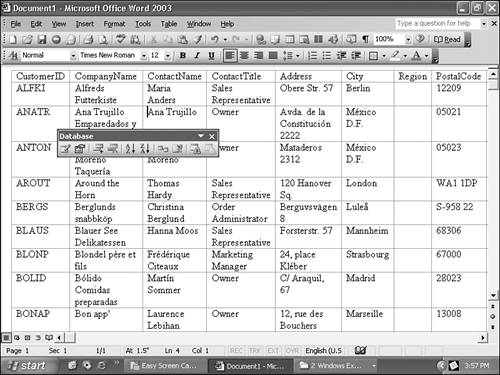
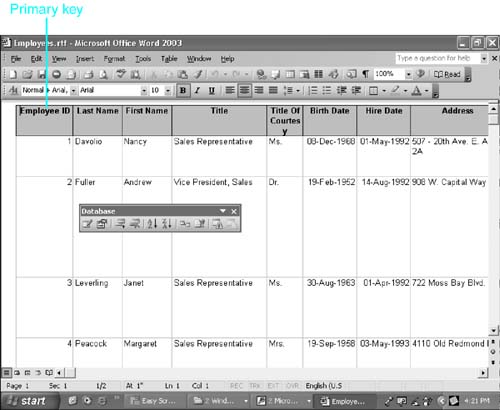
To publish to Word, select or display the item from which you want to publish. Then choose Tools, Office Links, Publish It with Microsoft Word. Access creates an RTF file containing a table of database information and immediately opens the RTF file as a table in a separate Word document window (see Figure 29.21). You can then save the RTF file as a Word document; copy the data into any other Word document; link or embed the Word file; or edit and format your file as needed.
Figure 29.21. An Access table, published to Word.
Keep the following points in mind:
If you publish to Word from a report or form, the appearance of the Word table depends on the formatting you used in the Access report or form. You may find this unsatisfactory. If so, use Table AutoFormat or Word's manual formatting techniques to reformat the data after it appears in Word.
As shown in Figure 29.21, a published Access table may include a column for the primary key, which you may not want. You can, however, manually delete this, by selecting the column and clicking Cut or pressing Ctrl+X.
If you publish from an Access report, the information isn't stored in a Word table at all; rather, Access uses tabs to separate columns. You may want to immediately select the data and choose Table, Convert Text to Table to reformat the information in a Word table, which is almost always easier to manage.
If you publish from a query or a report, you can refine the information you select using Access query and reporting tools, before inserting it in Word. Although there are many ways to build a query in Access 2003, you can often accomplish what you want by following these steps:
Open Access 2003 and open your database.
Choose Insert, Query.
In the New Query dialog box, choose Crosstab Query Wizard, and click OK.
Follow the instructions provided by the wizard.
Regardless of which Access source you use, you may need to adjust column widths and alignments after your data is displayed in Word.
Access automatically names the RTF file after the table, report, form, or query on which it was based, unless it finds an RTF file in the same directory that already uses this name. In that case, you're given a chance to rename the file.
The published data does not retain any link to Access, so it is not automatically updated if the database is updated. Often, the best way to update information you've published to Word is to simply delete it and republish it using Access's Publish It with Microsoft Word feature again.
Getting More Control over Access Data Export
Access's one-click Publish It with Microsoft Word feature is handy, but you may need more control over how you export Access data to Word. If so, open Access and select the form, report, table, or query you want to export. Then, from within Access, choose File, Export. The Export To dialog box, which looks similar to a normal Save As dialog box, appears.
From this dialog box you can
Specify a File Name.
Browse to the folder where you want the file to appear.
Specify a file type (Save as Type); possibilities include Rich Text Format (RTF), Text Files organized for use in a Microsoft Word mail merge, HTML Documents, XML documents, or Active Server Pages designed for Web display using Internet Information Server.
When you're finished, click Save. You now have a file with the name you selected, in the format and location you selected, containing all the information from the table, form, report, or query. You can open or insert this file in Word and edit it there as you want.


